Proxmox и pfsense
Содержание:
- Update Troubleshooting
- Mobile Networking
- Non-pfSense Package Warning
- Highlights
- Throughput
- Пункт 7. Для общего развития
- Planning for the upcoming 2.5.0 release
- Impact of Feature set
- Highlights
- Upgrade Notes
- Upgrade Notes
- Reporting Issues
- Hardware requirements
- Пункт 5. Настраиваем OpenVPN
- OPNsense — Конфигурация VLAN
- OPNsense — Влан Конфигурация
- Учебник — Конфигурация VLAN на коммутаторе Cisco
- Reporting Issues
- Пункт 8. Настройка кассы
Update Troubleshooting
See Upgrade Troubleshooting for the most up-to-date information on working around upgrade issues.
If the update system does not offer an upgrade to 2.4.4-p3 or the upgrade will not proceed, take the following steps:
- Navigate to System > Updates
- Set Branch to Latest stable version
-
Refresh the repository configuration and upgrade script by running the following commands from the console or shell:
In some cases the repository information may need to be rewritten:
- Navigate to System > Updates
- Set the Branch to Latest Development Snapshots
- Wait for the page to refresh
- Set the Branch to Latest stable version
If the update still does not appear, run the commands above from the console or shell.
Mobile Networking

OPNsense supports 3G and 4G (LTE) cellular modems as failsafe or primary WAN
interface. Both USB and (mini)PCIe cards are supported.
Supported Devices
While all devices supported by HardenedBSD will likely function under OPNsense their
configuration depends on a AT command string that can differ from device to device.
To make thing easier some of these strings are part of a easy selectable profile.
Tested devices by the OPNsense team include:
-
Huawei ME909u-521 (device cuaUx.0)
-
Huawei E220 (device cuaUx.0)
-
Sierra Wireless MC7304 (device cuaUx.2)
Note
If you have tested a cellular modem that is not on this list, but does work then
please report it to the project so we can list it and inform others.
3G — 4G Cellular Failover
To setup Cellular Failover, just follow these two how-tos:
Note
Treat the cellular connection the same as a normal WAN connection.
Non-pfSense Package Warning
Third party packages from alternate repositories are causing problems for users with the upgrade process and also with post-upgrade behavior. These packages have never been supported, and had to be manually added by users outside of the GUI.
Due to the major changes required for FreeBSD 11.2 and PHP 7.2, third party packages from alternate repositories cannot be present during the upgrade. There is no way to predict if a third party package supports the new version or will cause the upgrade itself to fail.
The upgrade process will automatically remove packages installed from alternate repositories. After the upgrade completes, the user can reinstall these packages. Packages from alternate repositories will not appear in the Installed Packages list in the GUI, and must be entirely managed in the command line.
This change does not affect packages installed from the official pfSense package repository.
Highlights
The following lists are a brief summary of changes in pfSense 2.4.4. To see a complete list of changes and find more detail, see the Release Notes.
Free pfSense Gold Content
With the release of pfSense 2.4.4, all former pfSense Gold content is now free for all!
- AutoConfigBackup is integrated into pfSense version 2.4.4 and free for all to use. It is no longer an add-on package. It is now located under Services > Auto Config Backup.
- All hangout videos are available free on YouTube, and future hangouts are being broadcast using YouTube Live.
- The pfSense Book is now available free on the Netgate website.
New Features
2.4.4 includes a number of significant new features:
- OS Upgrade: Base Operating System upgraded to FreeBSD 11.2-RELEASE-p3. As a part of moving to FreeBSD 11.2, support is included for C3000-based hardware.
- PHP 7.2: PHP upgraded to version 7.2, which required numerous changes to syntax throughout the source code and packages.
- Routed IPsec (VTI): Routed IPsec is now possible using using FreeBSD Virtual Tunnel Interfaces (VTI).
- IPsec Speed Improvements: The new Asynchronous Cryptography option under the IPsec Advanced Settings tab can dramatically improve IPsec performance on multi-core hardware.
- Default Gateway Group: The default gateway may now be configured using a Gateway Group setup for failover, which replaces Default Gateway Switching.
- Limiter AQM/Queue Schedulers: Limiters now include support for several Active Queue Management (AQM) methods and Queue Scheduler configurations such as FQ_CODEL.
- Certificate Subject Requirements: The Certificate Manager and OpenVPN wizard now only require the Common Name to be set, and all other fields are optional.
- DNS over TLS: The DNS Resolver now includes support for DNS over TLS as both a client and a server, including for domain overrides.
- Captive Portal Authentication: Captive Portal authentication is now integrated with the User Manager system. Captive Portal instances may now use RADIUS, LDAP, or Local Authentication like other integrated services.
- Captive Portal HTML Design and Usability: The default Captive Portal page has been redesigned. Controls have also been added which allow the logo and background images and Terms of Service text to be customized without editing and uploading custom HTML code.
- Integrated Switch Improvements: Netgate devices with integrated switches such as the SG-3100 and XG-7100 can now configure per-port speed and duplex settings, discrete port configuration interfaces can now be tied to switch ports for up/down status, and LAGG support is also now available (Load Balance mode only)
- New Hardware: Support has been added for the new SG-5100.
- … and more!
Security
This release includes several important security patches:
- FreeBSD SA for CVE-2018-6922: Resource exhaustion in TCP reassembly FreeBSD-SA-18:08.tcp
- FreeBSD SA for CVE-2018-3620, CVE-2018-3646: L1 Terminal Fault (L1TF) Kernel Information Disclosure FreeBSD-SA-18:09.l1tf
- FreeBSD SA for CVE-2018-6923: Resource exhaustion in IP fragment reassembly FreeBSD-SA-18:10.ip
- FreeBSD SA for CVE-2018-14526: Unauthenticated EAPOL-Key Decryption Vulnerability FreeBSD-SA-18:11.hostapd
- FreeBSD SA for CVE-2018-6924: Improper ELF header parsing FreeBSD-SA-18:12.elf
- FreeBSD errata notice for LazyFPU remediation causing potential data corruption FreeBSD-EN-18:08.lazyfpu
- Fixed two potential XSS vectors and an authenticated command execution issue.
- Upgraded several binary packages in the base system to address upstream vulnerabilities, including strongSwan CVE-2018-5388, OpenSSH CVE-2018-15473, and cURL CVE 2018-14618
- Updated default cryptographic settings for OpenVPN, IPsec, and Certificates
- Changed the included DH groups to those defined in RFC 7919
- Added stronger IPsec Pre-Shared Key usage warnings, and a button to generate a secure PSK
- Changed from to for monitoring failed logins and locking out offenders, this allows the lockout to work on IPv4 and IPv6 and also terminates states when adding offenders to the block list
-
Disabled OpenVPN compression by default on new instances for security reasons due to VORACLE
Users are strongly urged to disable compression on OpenVPN instances if they pass unencrypted data such as HTTP to arbitrary Internet sites.
Notable Bug Fixes
In addition to security fixes, pfSense software version 2.4.4 also includes important bug fixes.
- Fixed an issue with ARM hardware not completely halting when shut down (SG-3100 and SG-1000)
- Fixed HDMI hotplug issues on Minnowboard Turbot hardware (MBT-2220 and MBT-4220)
- Fixed SG-1000 autonegotiation for 10baseT speed and duplex
- … and many more!
Throughput
The main hardware-factors of the OPNsense setup involved are CPU, RAM,
mass storage (disc), the number and quality of network interfaces.
|
Throughput (Mbps) |
Hardware requirements |
Feature set |
Users / Networks |
|---|---|---|---|
|
1-10 |
Basic spec. |
narrowed |
few (1-10) |
|
11-150 |
Minimum spec. |
reduced |
adjusted (10-30) |
|
151-350 |
Reasonable spec. |
all |
substantial (30-50) |
|
350-750+ |
Recommended spec. |
all |
substantial+ (50-150+) |
|
Mbps (Mbit/s or Mb/s) — Megabit per second — 1,000,000 bits per second |
- Network interface cards
-
As the FreeBSD hardware-lists and -recommendations
say, Intel network interface cards (NIC) for
LAN
connections are reliable, fast and not error-prone. Intel chipset
NICs deliver higher throughput at a reduced CPU
load.
Supported hardware
The HardenedBSD 11.2-RELEASE is the base of OPNsense. All HardenedBSD drivers
are included in the OPNsense kernel, and the hardware compatibility is
the same.
Tip
If you are looking to buy new hardware then take a look at our partner page
as these partners contribute back to OPNsense and sell hardware that is know to work well.
For further help and support, see
List of references
-
Schellevis, Jos; Hardware requirements; OPNsense > Get
started (2015) -
McKusick, Marshall; Neville-Neil, George V; Warson, Robert NM; The
Design and Implementation of the FreeBSD Operating System (2015);
Addison-Wesley, New Jersey; ISBN 978-0321968975
Пункт 7. Для общего развития
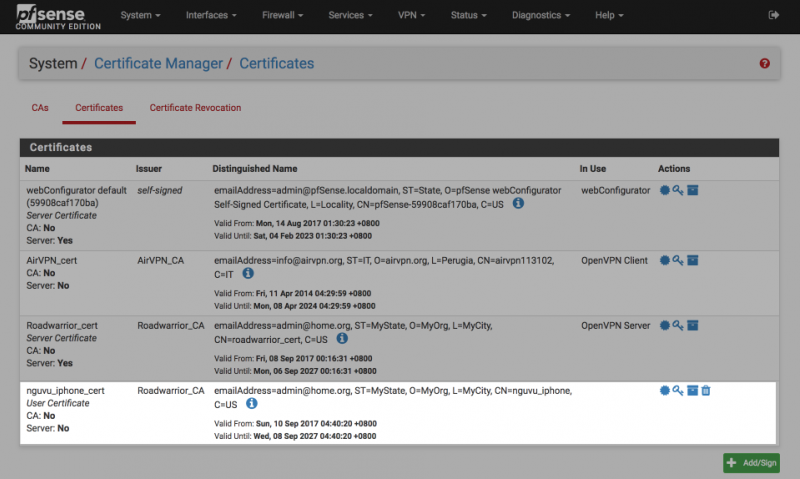
Когда я настраивал TLS/SSL, я слабо представлял, что должно быть написано в конфиге у клиента, у меня были весьма скромные знания по OpenVPN. Я попробовал решение в лоб — настроил на другом pfSense коннект в режиме «клиент», подгрузил сертификаты клиента, проверил как работает. Маршрутизатор настраивается через веб интерфейс, коннект не составил никакой сложности.
Благодаря консоли управления pfsense я знал, что конфиги OpenVPN лежат в папке /var/etc/openvpn. Используя Edit File можно посмотреть, как включение и выключение галочек и параметров в веб интерфейсе прописывается в файл. Заодно можно подглядеть ключи.
Если будете делать так же — не забываем удалить за собой OpenVPN-клиент и сертификаты с тестового сервера.
Planning for the upcoming 2.5.0 release
We are hard at work on the upcoming pfSense 2.5.0 release. Keep an eye on the draft copy of the 2.5.0 Release Notes for information about upcoming changes. 2.5.0 will bring a base OS upgrade to FreeBSD 12 as well as upgrades to OpenSSL 1.1.1, PHP 7.3, and Python 3.6.
The built-in load balancer has been deprecated from pfSense 2.5.0, and all related code has been removed, as it is not compatible with FreeBSD 12. Plan migrations to alternate solutions such as the HAProxy package now.
Please note that pfSense version 2.5.0 WILL NOT require AES-NI. The original plan was to include a RESTCONF API in pfSense version 2.5.0, which for security reasons would have required hardware AES-NI or equivalent support. Plans have since changed, and pfSense 2.5.0 does not contain the planned RESTCONF API, thus the removal of the AES-NI requirement.
Impact of Feature set
While most features do not affect hardware dimensioning, a few features
have massive impact on it. The candidates are:
- Squid
-
a caching web proxy which can be used for web-content control,
respectively. These packages rely strongly on CPU load and
disk-cache writes. - Captive portal
-
settings with hundreds of simultaneously served captive portal users
will require more CPU power in all the hardware specifications
displayed below. - State transition tables
-
it is a known fact, that each state table entry requires about 1 kB
(kilobytes) of RAM. The average state table, filled with 1000
entries will occupy about ~10 MB (megabytes) of
RAM.
OPNsense usage settings with hundred of thousands of connections
will require memory accordingly.
Highlights
Security / Errata
pfSense software release version 2.4.4-p3 addresses several critical security issues:
- A privilege escalation issue where an authenticated user could have used a technique similar to directory traversal to gain access to pages for which they otherwise would not have privileges
- A privilege escalation issue where an authenticated user granted access to the Dashboard or widgets could have gained access to pages for which they otherwise would not have privileges
-
A privilege escalation issue where an authenticated user granted access to edit OpenVPN servers, clients, or client-specific overrides could have executed shell scripts via OpenVPN advanced options to gain higher privileges
A new set of privileges has been created to delegate access to edit the advanced options fields on these pages. Existing users who are not administrators, but only have access to the stated pages, can no longer edit advanced option fields until the new privileges have been granted.
- Potential cross-site scripting (XSS) vectors in 10 GUI pages
-
The daemon which protects the GUI and ssh against brute force attacks was changed to use a single table to block offenders from reaching the GUI and SSH, which corrects previous unexpected inconsistencies in behavior.
-
Several FreeBSD security advisories:
- FreeBSD-SA-19:03.wpa
- FreeBSD-SA-19:04.ntp
- FreeBSD-SA-19:05.pf
- FreeBSD-SA-19:06.pf
- FreeBSD-SA-19:07.mds
- FreeBSD-EN-19:08.tzdata
- DNS over TLS host verification has been added, thanks to support from a recent Unbound version that made it possible on systems without OpenSSL 1.1.x.
For complete details about these issues, see the see the Release Notes.
Upgrade Notes
Due to the significant nature of the changes in this version of pfSense software, warnings and error messages, particularly from PHP and package updates, are likely to occur during the upgrade process. In nearly all cases these errors are a harmless side effect of the changes between FreeBSD 11.1 and 11.2 and between PHP 5.6 and PHP 7.2.
Always take a backup of the firewall configuration prior to any major change to the firewall, such as an upgrade.
Do not upgrade packages before upgrading pfSense! Either remove all packages or leave the packages alone before running the update.
The upgrade will take several minutes to complete. The exact time varies based on download speed, hardware speed, and other factors such installed packages. Be patient during the upgrade and allow the firewall enough time to complete the entire process. After the update packages finish downloading it could take 10-20 minutes or more until the upgrade process ends. The firewall may reboot several times during the upgrade process. Monitor the upgrade from the firewall console for the most accurate view.
Consult the Upgrade Guide for additional information about performing upgrades to pfSense software.
Upgrade Notes
Due to the significant nature of the changes in 2.4.4 and later, warnings and error messages, particularly from PHP and package updates, are likely to occur during the upgrade process. In nearly all cases these errors are a harmless side effect of the changes between FreeBSD 11.1 and 11.2 and between PHP 5.6 and PHP 7.2.
Always take a backup of the firewall configuration prior to any major change to the firewall, such as an upgrade.
Do not update packages before upgrading pfSense! Either remove all packages or do not update packages before running the upgrade.
The upgrade will take several minutes to complete. The exact time varies based on download speed, hardware speed, and other factors such installed packages. Be patient during the upgrade and allow the firewall enough time to complete the entire process. After the update packages finish downloading it could take 10-20 minutes or more until the upgrade process ends. The firewall may reboot several times during the upgrade process. Monitor the upgrade from the firewall console for the most accurate view.
Consult the Upgrade Guide for additional information about performing upgrades to pfSense software.
Reporting Issues
This release is ready for a production use. Should any issues come up with pfSense 2.4.4-RELEASE-p3, please post about them on the the forum or on the /r/pfSense subreddit.
Thanks!
pfSense software is Open Source
For those who wish to review the source code in full detail, the changes are all publicly available in three repositories on GitHub:
- Main repository — the web GUI, back end configuration code, and build tools.
- FreeBSD source — the source code, with patches of the FreeBSD base.
- FreeBSD ports — the FreeBSD ports used.
Download
Using the automatic update process is typically easier than reinstalling to upgrade. See the Upgrade Guide page for details.
Supporting the Project
Our efforts are made possible by the support of our customers and the community. You can support our efforts via one or more of the following.
- Official appliances direct from the source. Our appliances are the fast, easy way to get up and running with a fully-optimized firewall.
- Commercial Support – Purchasing support from us provides you with direct access to Netgate Global Support.
- Professional Services – For more involved and complex projects outside the scope of support, our most senior engineers are available under professional services.
Hardware requirements
For substantially narrowed OPNsense functionality there is the basic
specification. For full functionality there are minimum, reasonable and
recommended specifications.
Minimum
The minimum specification to run all OPNsense standard features that do
not need disk writes, means you can run all standard features, expect
for the ones that require disk writes, e.g. a caching proxy (cache) or intrusion detection
and prevention (alert database).
|
Processor |
500 MHz single core cpu |
|
RAM |
512 MB |
|
Install method |
Serial console or video (vga) |
|
Install target |
SD or CF card with a minimum of 4 GB, use nano images for installation. |
Table: Minimum hardware requirements
Reasonable
The reasonable specification to run all OPNsense standard features,
means every feature is functional, but perhaps not with a lot of users
or high loads.
|
Processor |
1 GHz dual core cpu |
|
RAM |
1 GB |
|
Install method |
Serial console or video (vga) |
|
Install target |
40 GB SSD, a minimum of 1 GB memory is needed for the installer to run. |
Table: Reasonable hardware requirements
Recommended
The recommended specification to run all OPNsense standard features,
means every feature is functional and fits most use cases.
|
Processor |
1.5 GHz multi core cpu |
|
RAM |
4 GB |
|
Install method |
Serial console or video (vga) |
|
Install target |
120 GB SSD |
Table: Recommended hardware requirements
Hardware guide
Пункт 5. Настраиваем OpenVPN
Тут всё просто. Всё в pfSense настраивается мышкой через user-friendly интерфейс. Спасибо разработчикам и всем участникам сообщества.
Идём VPN → OpenVPN → Servers, добавляем сервер.
Сделаю некоторые замечания:
— я работаю с tap туннелем, мне так удобнее, он имитирует L2 уровень. С ним работают всякие мультикасты, бродкасты и т.п.; — протокол UDP быстрее чем TCP, и ширина канала в одинаковых условиях больше. Это древняя проблема OpenVPN; — выбираем в разделе Server mode режим RemoteAccess; — выбираем в разделе Peer Certificate Authority из списка наш сертификат CA; — выбираем в разделе Server certificate наш серверный сертификат; — выбираем в разделе DH Parameter length (bits) нужную длину; — выбираем в разделе Certificate Depth режим One(Client+Server), это схема без удостоверяющих посредников; — в разделе IPv4 Tunnel Network прописываем нашу туннельную сетку, например 192.168.202.0/24; — в разделе IPv4 Local network(s) прописываем ресурсы, роутинг до которых должны получить кассы. У меня это например 192.168.100.2/32, 192.168.1.0/24; — остальное можно не трогать, либо заполнять на своё усмотрение. Не забудьте открыть на фаерволе порт, на который повешается ваш OpenVPN сервер.
ВАЖНО! Кассы будут цепляться на сервер, и получать адреса из диапазона IPv4 Tunnel Network, адреса будут выдаваться в порядке очередности подключения. Но сервер 1С всегда должен знать, что «такая то касса» находится на «таком то адресе»
Поэтому настраиваем дальше.
Идём в VPN → OpenVPN → Client Specific Overrides, кнопка Add. Нужно создать настройки для конкретных клиентов. Привяжем каждому клиенту свой IP адрес
Дальше алгоритм такой:
— выбираем в Server List наш сервер — Common name прописываем имя нашего клиентского сертификата из п.4 — в разделе Advanced прописываем команду присвоения IP адреса
OPNsense — Конфигурация VLAN
Хотите узнать, как настроить функцию OPNsense Vlan? В этом уроке мы покажем вам, как выполнять конфигурацию Vlan на сервере OPNsense.
OPNsense 19.7
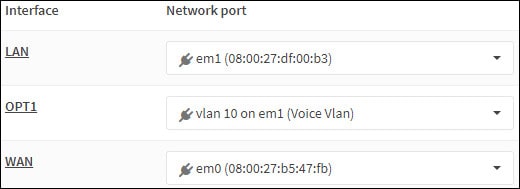
Вот список существующих интерфейсов на нашем сервере OPNsense перед нашей конфигурацией:
WAN — 200.200.200.200
ЛАН — 192.168.1.1.1
В нашем примере мы создадим подинтерфейс VLAN под названием OPT1 на интерфейсе LAN Physical.
Подинтерфейс под названием OPT1 будет вовечастным vLAN 10 и будет использовать IP-адрес 192.168.10.1:
Вот список интерфейсов на нашем сервере OPNsense после нашей конфигурации:
WAN — 200.200.200.200
ЛАН — 192.168.1.1.1
OPT1 — 192.168.10.1
На этой странице мы предлагаем быстрый доступ к списку учебников, связанных с OPNsense.
OPNsense — Влан Конфигурация
Откройте программное обеспечение для браузера, введите IP-адрес брандмауэра Opnsense и получите доступ к веб-интерфейсу.
В нашем примере в браузер был введен следующий URL::
— https://192.168.15.11
Opnsense веб-интерфейс должен быть представлен.
На оперативном экране введите информацию для входа в opNsense Default Password.
Имя пользователя: корень
Пароль: Пароль, установленный во время установки OPNsense
После успешного входа, вы будете отправлены на панель мониторинга OPNSense.

Получите доступ к меню Opnsense Interfaces, получите доступ к подменю «Другие типы» и выберите опцию Vlan.
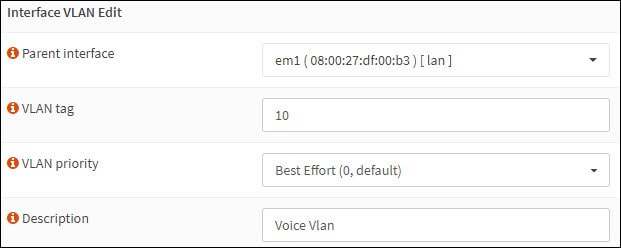
Получите доступ к экрану VLAN, нажмите на кнопку Добавить и выполните следующие конфигурации:
— Родительские интерфейсы — Выберите физический интерфейс
— VLAN Tag — Введите идентификационный номер VLAN
Описание — Дополнительно введите описание
Нажмите на кнопку Сохранить, чтобы создать Opnsense Vlan.
Получите доступ к меню Opnsense Interfaces и выберите опцию Assigments.
На экране интерфейса Назначения выберите новый интерфейс Vlan и нажмите на кнопку Добавить.
Нажмите на кнопку Сохранить.
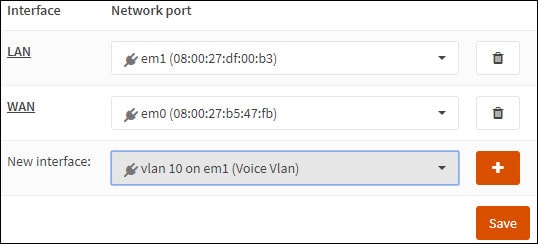
В нашем примере Vlan 10 был назначен нашему брандмауэру OPNsense под названием OPT1.
Получите доступ к меню Opnsense Interfaces и выберите новый интерфейс.
В нашем примере мы выбрали интерфейс OPT1.
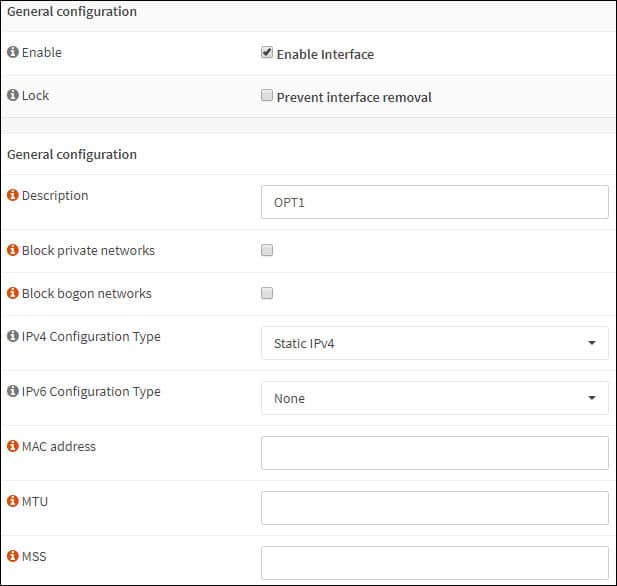
В области общей конфигурации выполните следующую конфигурацию:
Включить — Да
Описание — По желанию, вы можете изменить название интерфейса Vlan
Тип конфигурации IPv4 — Статический IPV4
Тип конфигурации IPv6 — Нет
Скорость и дуплекс — По умолчанию
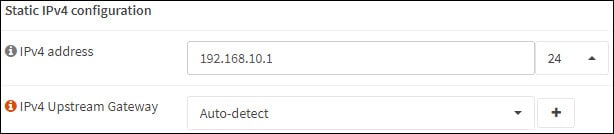
В области конфигурации Static IPv4 выполните следующую конфигурацию:
IPv4 Адрес — Настройка IP-адреса интерфейса Vlan и нетмаска
Нажмите на кнопку Сохранить.
Нажмите на кнопку Изменения применить.
Поздравляю! Вы закончили конфигурацию Opnsense Vlan.
Имейте в виду, что необходимо создать правила брандмауэра, чтобы новый интерфейс VLAN был в общении.
Учебник — Конфигурация VLAN на коммутаторе Cisco
Теперь вам нужно выполнить конфигурацию багажника Vlan на сетевом коммутаторе.
В нашем примере мы покажем, как выполнять конфигурацию Vlan на модели Cisco Catalyst Switch 2960.
На оперативном экране введите административную информацию входа.
Используйте команду терминала настройки для входа в режим конфигурации.
Copy to Clipboard
Switch>
Switch> enable
Switch# configure terminal
Создайте новый vlan, выберите идентификационный номер и добавьте краткое описание.
Copy to Clipboard
Switch(config)# vlan 10
Switch(config-vlan)# name Voice Network
Switch(config-vlan)# exit
Доступ к режиму конфигурации интерфейса и установить порт коммутатора в качестве ствола.
Добавьте список авторизованных Vlans использовать этот багажник.
Copy to Clipboard
Switch(config)# interface gigabitethernet0/40
Switch(config-if)# switchport mode trunk
Switch(config-if)# switchport trunk native vlan 1
Switch(config-if)# switchport trunk allowed vlan add 1,10
Switch(config-if)# exit
Switch(config)# exit
В нашем примере порт коммутатора 40 был настроен как ствол.
Следующим Вланам было разрешено использовать этот порт в качестве ствола: 1 и 10.
Vlan 1 является по умолчанию родной VLAN Cisco коммутаторов.
Не забудьте сохранить конфигурацию багажника Switch
Copy to Clipboard
Switch# copy running-config startup-config
Подключите интерфейс opnsense LAN к порту Cisco Switch номер 40.
Трафик, поступающий из интерфейса Opnsense LAN, не будет иметь тег VLAN и будет членом родного VLAN VLAN VLAN.
Трафик из интерфейса Opnsense OPT1 будет иметь тег VLAN 10 и будет членом Cisco Switch VLAN 10.
2020-02-15T15:18:17-03:00
Reporting Issues
This release is ready for a production use. Should any issues come up with pfSense 2.4.4-RELEASE, please post about them on the the forum or on the /r/pfSense subreddit.
Thanks!
pfSense software is Open Source
For those who wish to review the source code in full detail, the changes are all publicly available in three repositories on GitHub:
- Main repository — the web GUI, back end configuration code, and build tools.
- FreeBSD source — the source code, with patches of the FreeBSD base.
- FreeBSD ports — the FreeBSD ports used.
Download
Using the automatic update process is typically easier than reinstalling to upgrade. See the Upgrade Guide page for details.
Supporting the Project
Our efforts are made possible by the support of our customers and the community. You can support our efforts via one or more of the following.
- Official appliances direct from the source. Our appliances are the fast, easy way to get up and running with a fully-optimized firewall.
- Commercial Support – Purchasing support from us provides you with direct access to Netgate Global Support.
- Professional Services – For more involved and complex projects outside the scope of support, our most senior engineers are available under professional services.
Пункт 8. Настройка кассы
У кассы по умолчанию открыта smb-папка с именем \ipaddressexchange, там есть доступ на запись. Выгружаем в неё все 4 файла из п.6.
Подконнекчиваемся по SSH к кассе, стандартный дефолтный аккаунт root / 324012, переносим наши файлы в /opt/networks. Да, на борту какой то обрезанный линукс.
Чтобы коннектиться к серверу нужен файл client.ovpn, его можно посмотреть в п.7 и отредактировать под свои нужды. Положить туда же — /opt/networks. У меня получилось примерно так:
Файл сохраняем. Всё заработает, когда мы перезагрузим кассу, например через reboot. Не забудьте прописать правила на интерфейсе openVPN в pfSense для наших подсетей!
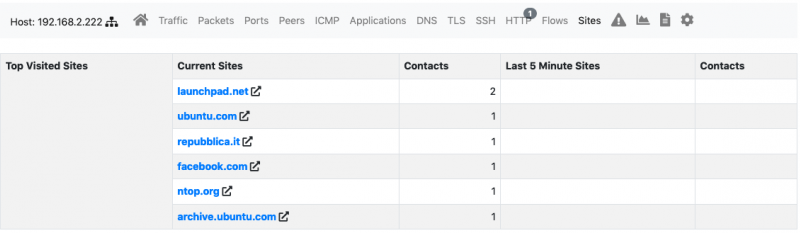
Как визуально видеть, что кассы работают(коннектятся)?
Вариант 1 — вынести виджет OpenVPN на главную страницу pfSense Вариант 2 — через меню Status->OpenVPN Вариант 3 — через кассу. Коннектимся по ssh, а дальше уже стандартный набор — ifconfig, ping etc…