Data science
Содержание:
- Модуль PyYAML
- Parsing CSV Files With the pandas Library#
- Read CSV files with csv.DictReader()
- Example 3 : Skip rows but keep header
- Middleware: Components that Play Both Sides
- Dialects in CSV module
- Reading a CSV file and Skipping Rows
- What Is a CSV File?#
- Understanding Generators#
- pandas read_csv Basics
- Машинное обучение в SciKit-Learn
- Изучение программирования
- Advanced CSV Loading
Модуль PyYAML
Для работы с YAML в Python используется модуль PyYAML. Он не входит в
стандартную библиотеку модулей, поэтому его нужно установить:
pip install pyyaml
Работа с ним аналогична модулям csv и json.
Чтение из YAML
Попробуем преобразовать данные из файла YAML в объекты Python.
Файл info.yaml:
1 2 3 4 5 6 7 8 9 10 11 12 13 14 15 16 17 18 |
- BS 1550 IT 791 id 11 name Liverpool to_id 1 to_name LONDON - BS 1510 IT 793 id 12 name Bristol to_id 1 to_name LONDON - BS 1650 IT 892 id 14 name Coventry to_id 2 to_name Manchester |
Чтение из YAML (файл yaml_read.py):
1 2 3 4 5 6 7 |
import yaml
from pprint import pprint

with open('info.yaml') as f
    templates = yaml.safe_load(f)

pprint(templates)
|
Результат:
$ python yaml_read.py
Формат YAML очень удобен для хранения различных параметров, особенно,
если они заполняются вручную.
Запись в YAML
Запись объектов Python в YAML (файл yaml_write.py):
1 2 3 4 5 6 7 8 9 10 11 12 13 14 15 16 17 18 19 20 |
import yaml

trunk_template =
    'switchport trunk encapsulation dot1q', 'switchport mode trunk',
    'switchport trunk native vlan 999', 'switchport trunk allowed vlan'


access_template =
    'switchport mode access', 'switchport access vlan',
    'switchport nonegotiate', 'spanning-tree portfast',
    'spanning-tree bpduguard enable'


to_yaml = {'trunk' trunk_template, 'access' access_template}

with open('sw_templates.yaml', 'w') as f
    yaml.dump(to_yaml, f, default_flow_style=False)

with open('sw_templates.yaml') as f
    print(f.read())
|
Файл sw_templates.yaml выглядит таким образом:
access
- switchport mode access
- switchport access vlan
- switchport nonegotiate
- spanning-tree portfast
- spanning-tree bpduguard enable
trunk
- switchport trunk encapsulation dot1q
- switchport mode trunk
- switchport trunk native vlan 999
- switchport trunk allowed vlan
Parsing CSV Files With the pandas Library#
Of course, the Python CSV library isn’t the only game in town. Reading CSV files is possible in as well. It is highly recommended if you have a lot of data to analyze.
is an open-source Python library that provides high performance data analysis tools and easy to use data structures. is available for all Python installations, but it is a key part of the Anaconda distribution and works extremely well in Jupyter notebooks to share data, code, analysis results, visualizations, and narrative text.
Installing and its dependencies in is easily done:
As is using / for other Python installations:
We won’t delve into the specifics of how works or how to use it. For an in-depth treatment on using to read and analyze large data sets, check out Shantnu Tiwari’s superb article on working with large Excel files in pandas.
Read CSV files with csv.DictReader()
The objects of a class can be used to read a CSV file as a dictionary.
Example 6: Python csv.DictReader()
Suppose we have a CSV file (people.csv) with the following entries:
| Name | Age | Profession |
|---|---|---|
| Jack | 23 | Doctor |
| Miller | 22 | Engineer |
Let’s see how can be used.
Output
{'Name': 'Jack', ' Age': ' 23', ' Profession': ' Doctor'}
{'Name': 'Miller', ' Age': ' 22', ' Profession': ' Engineer'}
As we can see, the entries of the first row are the dictionary keys. And, the entries in the other rows are the dictionary values.
Here, csv_file is a object. The object can be iterated over using a loop. The returned an type for each row. That’s why we used to convert each row to a dictionary.
Notice that we have explicitly used the dict() method to create dictionaries inside the loop.
Note: Starting from Python 3.8, returns a dictionary for each row, and we do not need to use explicitly.
The full syntax of the class is:
To learn more about it in detail, visit:
Example 3 : Skip rows but keep header
mydata = pd.read_csv("workingfile.csv", skiprows=)
second third
   ID first_name company  salary
0  13      Steve  Google      96
1  14    Stevart     RBS      71
2  15       John       .      78
Instead of you can also write . Both means the same thing but range( ) function is very useful when you want to skip many rows so it saves time of manually defining row position.
Hidden secret of skiprows option
When skiprows = 4, it means skipping four rows from top. skiprows= means skipping rows from second through fifth. It is because when list is specified in skiprows= option, it skips rows at index positions. When a single integer value is specified in the option, it considers skip those rows from top
Middleware: Components that Play Both Sides
Note that a single object may play the role of a server with respect
to some application(s), while also acting as an application with
respect to some server(s). Such «middleware» components can perform
such functions as:
- Routing a request to different application objects based on the
target URL, after rewriting the environ accordingly. - Allowing multiple applications or frameworks to run side-by-side
in the same process - Load balancing and remote processing, by forwarding requests and
responses over a network - Perform content postprocessing, such as applying XSL stylesheets
The presence of middleware in general is transparent to both the
«server/gateway» and the «application/framework» sides of the
interface, and should require no special support. A user who
desires to incorporate middleware into an application simply
provides the middleware component to the server, as if it were
an application, and configures the middleware component to
invoke the application, as if the middleware component were a
server. Of course, the «application» that the middleware wraps
may in fact be another middleware component wrapping another
application, and so on, creating what is referred to as a
«middleware stack».
For the most part, middleware must conform to the restrictions
and requirements of both the server and application sides of
WSGI. In some cases, however, requirements for middleware
are more stringent than for a «pure» server or application,
and these points will be noted in the specification.
Here is a (tongue-in-cheek) example of a middleware component that
converts text/plain responses to pig Latin, using Joe Strout’s
piglatin.py. (Note: a «real» middleware component would
probably use a more robust way of checking the content type, and
should also check for a content encoding. Also, this simple
example ignores the possibility that a word might be split across
a block boundary.)
Dialects in CSV module
Notice in Example 4 that we have passed multiple parameters ( and ) to the function.
This practice is acceptable when dealing with one or two files. But it will make the code more redundant and ugly once we start working with multiple CSV files with similar formats.
As a solution to this, the module offers as an optional parameter.
Dialect helps in grouping together many specific formatting patterns like , , , into a single dialect name.
It can then be passed as a parameter to multiple or instances.
Example 5: Read CSV files using dialect
Suppose we have a CSV file (office.csv) with the following content:
"ID"| "Name"| "Email"
"A878"| "Alfonso K. Hamby"| "alfonsokhamby@rhyta.com"
"F854"| "Susanne Briard"| "susannebriard@armyspy.com"
"E833"| "Katja Mauer"| "kmauer@jadoop.com"
The CSV file has initial spaces, quotes around each entry, and uses a delimiter.
Instead of passing three individual formatting patterns, let’s look at how to use dialects to read this file.
Output
From this example, we can see that the function is used to define a custom dialect. It has the following syntax:
The custom dialect requires a name in the form of a string. Other specifications can be done either by passing a sub-class of class, or by individual formatting patterns as shown in the example.
While creating the reader object, we pass to specify that the reader instance must use that particular dialect.
The advantage of using is that it makes the program more modular. Notice that we can reuse ‘myDialect’ to open other files without having to re-specify the CSV format.
Reading a CSV file and Skipping Rows
What if our data file(s) contain information on the first x rows and we need to skip rows when using Pandas read_csv? For instance, how can we skip the first three rows in a file looking like this:
We will now learn how to use Pandas read_csv and skip x amount of rows. Luckily, it’s very simple we just use the skiprows parameter. In the following example, we are setting skiprows to 3 to skip the first 3 rows.
Pandas read_csv skiprows example:
How do we use Pandas skiprow parameter? Here’s a Pandas read_csv example, where we skip the three first rows:
Note we can obtain the same result as above using the header parameter (i.e., data = pd.read_csv(‘Simdata/skiprow.csv’, header=3)).
What Is a CSV File?#
A CSV file (Comma Separated Values file) is a type of plain text file that uses specific structuring to arrange tabular data. Because it’s a plain text file, it can contain only actual text data—in other words, printable ASCII or Unicode characters.
The structure of a CSV file is given away by its name. Normally, CSV files use a comma to separate each specific data value. Here’s what that structure looks like:
Notice how each piece of data is separated by a comma. Normally, the first line identifies each piece of data—in other words, the name of a data column. Every subsequent line after that is actual data and is limited only by file size constraints.
In general, the separator character is called a delimiter, and the comma is not the only one used. Other popular delimiters include the tab (), colon () and semi-colon () characters. Properly parsing a CSV file requires us to know which delimiter is being used.
Understanding Generators#
So far, you’ve learned about the two primary ways of creating generators: by using generator functions and generator expressions. You might even have an intuitive understanding of how generators work. Let’s take a moment to make that knowledge a little more explicit.
Generator functions look and act just like regular functions, but with one defining characteristic. Generator functions use the Python yield keyword instead of . Recall the generator function you wrote earlier:
This looks like a typical function definition, except for the Python yield statement and the code that follows it. indicates where a value is sent back to the caller, but unlike , you don’t exit the function afterward.
Instead, the state of the function is remembered. That way, when is called on a generator object (either explicitly or implicitly within a loop), the previously yielded variable is incremented, and then yielded again. Since generator functions look like other functions and act very similarly to them, you can assume that generator expressions are very similar to other comprehensions available in Python.
Note: Are you rusty on Python’s list, set, and dictionary comprehensions? You can check out Using List Comprehensions Effectively.
pandas read_csv Basics
There is a long list of for the read_csv function. We’ll only be showing the popular ones in this tutorial.
The most basic syntax of read_csv is below.
With only the file specified, the read_csv assumes:
- the delimiter is commas (,) in the file.We can change it by using the sep parameter if it’s not a comma. For example, df = pd.read_csv(‘test1.csv’, sep= ‘;’)
- the first row of the file is the headers/column names.
- read all the data.
- the quote character is double (“).
- an error will occur if there are bad lines. Bad lines happen when there are too many delimiters in the row.
Most structured datasets that are saved to text-based files can be opened using this method. They often have clear formats and don’t need any further specification of read_csv.
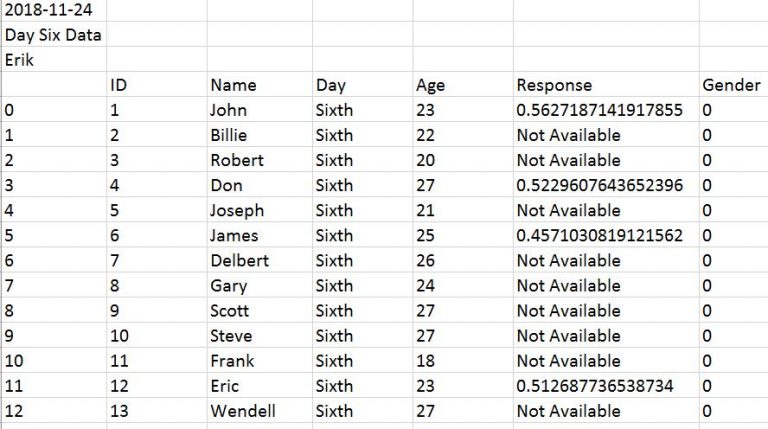
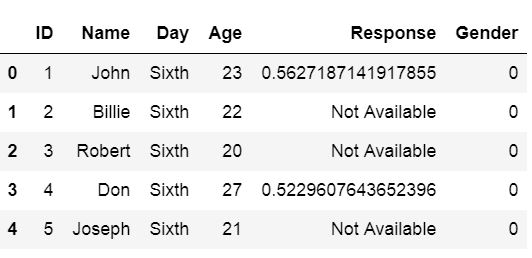
The test1.csv file is nice and clean, so the default setting is appropriate to load the file.
Below you can see the original file (left) and the pandas DataFrame df (right).
Note: you can use the type function to find out that df is a pandas.core.frame.DataFrame.
As you can see, the first row in the csv file was taken as the header, and the first three lines are straightforward.
But how can we have commas (,) and double quotes (“) in the 3rd and 4th row?
Shouldn’t they be special characters?
Take a closer look at the original file of test1.csv, and you will notice the tricks:
- to have the delimiter comma (,) in the data, we need to put quotes around them.
- to have the quote (“) in the data, we need to type two double quotes (“”) to help read_csv understand that we want to read it literally.
Машинное обучение в SciKit-Learn
SciKit-Learn — это свободно распространяемая библиотека для работы с методами машинного обучения на Python. Она содержит реализации методов классификации, регрессии и кластеризации, а также нейронных сетей. SciKit предоставляет широкий набор инструментов для решения проблемы размерности данных, сравнения моделей машинного обучения и их производительности и для извлечения важных признаков.
Рассмотрим реализацию линейной регрессии, например, для проверки гипотезы о том, что вес спортсмена и его возраст взаимосвязаны.
Python
from sklearn.linear_model import LinearRegression
import numpy as np
|
1 |
fromsklearn.linear_model importLinearRegression importnumpy asnp |
После импортирования необходимых библиотек избавимся от отсутствующих значений типа NA самым простым (но не самым лучшим) способом: удалим все строки, в которых в каком-либо столбце присутствуют NA:
Python
data2 = data2.dropna(axis=0)
| 1 | data2=data2.dropna(axis=) |
Зададим переменные для модели, зависимость которых мы собираемся исследовать:
Python
x = np.array(data2.Age.values)
y = np.array(data2.Weight.values)
x = x.reshape((-1, 1))
|
1 |
x=np.array(data2.Age.values) y=np.array(data2.Weight.values) x=x.reshape((-1,1)) |
Построим модель:
Python
model = LinearRegression()
model.fit(x, y)
model = LinearRegression().fit(x, y)
|
1 |
model=LinearRegression() model.fit(x,y) model=LinearRegression().fit(x,y) |
И подсчитаем коэффициент линейной регрессии, чтобы оценить эффективность модели:
Python
r_sq = model.score(x, y)
print(‘coefficient of determination:’, r_sq)
|
1 |
r_sq=model.score(x,y) print(‘coefficient of determination:’,r_sq) |
Результат:
Python
coefficient of determination: 0.024385595989105727
| 1 | coefficient of determination0.024385595989105727 |
Коэффициент детерминации (или R2) очень низкий (для приемлемой модели он должен быть не менее ), а значит, либо предобработка данных не была проведена должным образом (что верно, так как мы не учитывали разброс данных и другие характеристики), либо метод линейной регрессии в этом случае не подходит, и возраст и вес спортсменов никак не связаны (что тоже возможно).
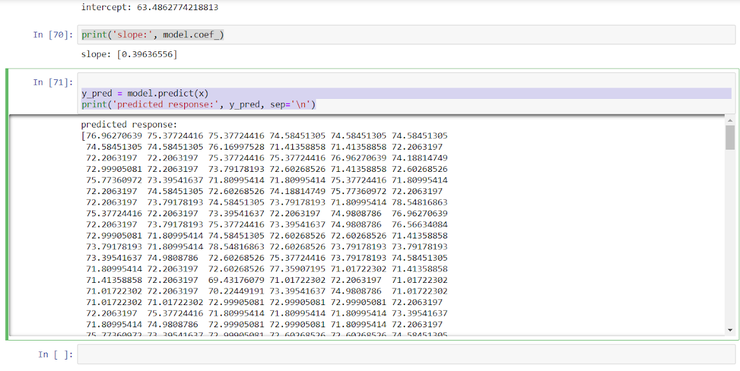
Для наглядности мы можем предсказать значение веса по возрасту, но как мы только что выяснили, доверять этой модели не стоит.
Python
y_pred = model.predict(x)
print(‘predicted response:’, y_pred, sep=’\n’)
|
1 |
y_pred=model.predict(x) print(‘predicted response:’,y_pred,sep=’\n’) |
Изучение программирования
С крепкими знаниями в области информатики и хотя бы базовым пониманием программирования вам нужно набраться опыта в разработке проектов.
Udacity: Software Development Process — отличный курс для тех, кто ещё не принимал участие в крупных проектах. Тут вас ознакомят с подробностями рабочего процесса и работой с инструментарием (например Git), а также расскажут о настройке интегрированной среды разработки.
Изучение языков программирования
Для разработки операционной системы вам понадобится освоить минимум два языка программирования:
- низкоуровневый язык ассемблера;
- высокоуровневый язык программирования.
Первый используется для работы напрямую с процессором. Процессор «понимает» только машинный код, и для каждого типа процессора есть только один соответствующий язык. Одной из самых популярных архитектур процессора является x86. Она была разработана компанией Intel и на текущий момент широко используется многими производителями компьютерного железа, включая AMD. По этой причине в этой статье акцент будет именно на архитектуру x86.
Высокоуровневые языки программирования, в свою очередь, работают сразу на нескольких архитектурах. Самый популярный из таких языков — Cи. Чаще всего именно на нём и пишутся операционные системы. Но это не означает, что этот язык единственный. Для написания ОС можно использовать и более высокоуровневые языки, например C++ или Python.
Язык ассемблера для x86
«x86 Assembly Guide» — неплохо подойдёт для начального изучения ассемблера. Несмотря на то, что эта статья коротка для полного курса, в ней содержится всё необходимое для дальнейшего углубления.
Книга «Programming from the Ground Up» Джонатана Бартлетта является одной из основных по изучению ассемблера. В ней основами языка программирования подкрепляются базисы информатики.
Для изучения ассемблера есть ещё одна показательная книга — «The Art of Assembly Language», написанная Рэнди Гайдом. Изначально книга писалась специально для курсов, которые вёл автор в Калифорнийском университете Cal Poly и UC Riverside. В середине 90-х годов книга была признана определяющей в этой сфере.
Если вдруг вышеописанные материалы вам не подошли, вот ещё пара отличных книг:
- «Assembly Language Step-by-Step: Programming with Linux» Джефа Дантеманна;
- «Modern X86 Assembly Language Programming» Дэниэля Кассварма.
Кроме того, на нашем сайте есть статья о написании простейшего ядра под x86 на C.
Язык Cи
Как уже упоминалось выше, для написания ОС есть несколько высокоуровневых языков программирования. Однако самый популярный из них — Си.
Начать изучать этот язык можно отсюда. Этот ресурс ознакомит вас с базовыми понятиями и подготовит к более сложным задачам.
«Learn C the Hard Way» — название ещё одной книги. Кроме привычной теории в ней собрано много практических решений. Этот учебник расскажет обо всех аспектах языка.
Либо же можете выбрать одну из этих книг:
- «The C Programming Language» Кернигхана и Ритчи;
- «C Programming Absolute Beginner’s Guide» Пэрри и Миллера.
Advanced CSV Loading
There are some additional flexible parameters in the Pandas read_csv() function that are useful to have in your arsenal of data science techniques:
Specifying Data Types
As mentioned before, CSV files do not contain any type information for data. Data types are inferred through examination of the top rows of the file, which can lead to errors. To manually specify the data types for different columns, the dtype parameter can be used with a dictionary of column names and data types to be applied, for example: .
Note that for dates and date times, the format, columns, and other behaviour can be adjusted using parse_dates, date_parser, dayfirst, keep_date parameters.
Skipping and Picking Rows and Columns From File
The nrows parameter specifies how many rows from the top of CSV file to read, which is useful to take a sample of a large file without loading completely. Similarly the skiprows parameter allows you to specify rows to leave out, either at the start of the file (provide an int), or throughout the file (provide a list of row indices). Similarly, the usecols parameter can be used to specify which columns in the data to load.
Custom Missing Value Symbols
When data is exported to CSV from different systems, missing values can be specified with different tokens. The na_values parameter allows you to customise the characters that are recognised as missing values. The default values interpreted as NA/NaN are: ‘’, ‘#N/A’, ‘#N/A N/A’, ‘#NA’, ‘-1.#IND’, ‘-1.#QNAN’, ‘-NaN’, ‘-nan’, ‘1.#IND’, ‘1.#QNAN’, ‘N/A’, ‘NA’, ‘NULL’, ‘NaN’, ‘n/a’, ‘nan’, ‘null’.
# Advanced CSV loading example

data = pd.read_csv(
    "data/files/complex_data_example.tsv",      # relative python path to subdirectory
    sep='\t' 					# Tab-separated value file.
    quotechar="'",				# single quote allowed as quote character
    dtype={"salary": int}, 		        # Parse the salary column as an integer
    usecols=.   # Only load the three columns specified.
    parse_dates=, 		# Intepret the birth_date column as a date
    skiprows=10, 				# Skip the first 10 rows of the file
    na_values= 			# Take any '.' or '??' values as NA
)