Оптимизация и автоматизация тестирования веб-приложений
Содержание:
- Getting started
- Content-Security-Policy
- Классификация недостатков CWE
- HUNT Suite for Burp Suite Pro/Free
- Expect-CT
- Примеры запуска sshprank
- Description
- ZAP Root CA certificate
- Goals
- Feature-Policy
- Configuration example
- Справка по ARTLAS
- Historic:
- Install ZAP Root CA certificate
- Usage Instructions:
- X-Frame-Options
- WebWolf the small helper
- Starting OWASP ZAP
- Решение проблем
- Why do we need spidering?
- How to pentest a SPA (Single Page Application) Website?
Getting started
1. Standalone
Download the latest WebGoat release from https://github.com/WebGoat/WebGoat/releases
The latest version of WebGoat needs Java 11. By default WebGoat starts on port 8080 with you can specify a different port. With you
can bind it to a different address (default localhost)
3. Using docker-compose
The easiest way to start WebGoat as a Docker container is to use the file
from our Github repository. This will start both containers and it also takes care of setting up the
connection between WebGoat and WebWolf.
Important: the current directory on your host will be mapped into the container for keeping state.
Content-Security-Policy
A Content Security Policy (CSP) requires careful tuning and precise definition of the policy. If enabled, CSP has significant impact on the way browsers render pages (e.g., inline JavaScript is disabled by default and must be explicitly allowed in the policy). CSP prevents a wide range of attacks, including cross-site scripting and other cross-site injections.
Values
| Directive | Description |
|---|---|
| Define the base URI for relative URIs. | |
| Define loading policy for all resources type in case a resource type’s dedicated directive is not defined (fallback). | |
| Define which scripts the protected resource can execute. | |
| Define from where the protected resource can load plugins. | |
| Define which styles (CSS) can be applied to the protected resource. | |
| Define from where the protected resource can load images. | |
| Define from where the protected resource can load video and audio. | |
| (Deprecated and replaced by ) Define from where the protected resource can embed frames. | |
| Define from where the protected resource can embed frames. | |
| Define from where the protected resource can be embedded in frames. | |
| Define from where the protected resource can load fonts. | |
| Define which URIs the protected resource can load using script interfaces. | |
| Define from where the protected resource can load manifests. | |
| Define which URIs can be used as the action of HTML form elements. | |
| Specifies an HTML sandbox policy that the user agent applies to the protected resource. | |
| Define script execution by requiring the presence of the specified nonce on script elements. | |
| Define the set of plugins that can be invoked by the protected resource by limiting the types of resources that can be embedded. | |
| Instruct the user agent to activate or deactivate any heuristics used to filter or block reflected cross-site scripting attacks, equivalent to the effects of the non-standard header. | |
| Prevent the user agent from loading mixed content. | |
| Instruct the user agent to download insecure HTTP resources using HTTPS. | |
| (Deprecated) Define information the user agent can send in the header. | |
| (Deprecated and replaced by ) Specifies a URI to which the user agent sends reports about policy violation. | |
| Specifies a group (defined in the header) to which the user agent sends reports about policy violation. |
References
- https://www.w3.org/TR/CSP/
- https://developer.mozilla.org/en-US/docs/Web/Security/CSP
- https://owasp.org/www-community/attacks/Content_Security_Policy
- https://scotthelme.co.uk/content-security-policy-an-introduction/
- https://report-uri.io
- https://content-security-policy.com
Классификация недостатков CWE
Концепции разработки – в этом представлении CWE недостатки безопасности классифицируются с использованием принципов и понятий, которые часто встречаются при разработке ПО; представление предназначено в первую очередь для разработчиков и специалистов по оценке качества ПО.
Концепции архитектуры – для анализа качества архитектурных решений на этапе проектирования.
Концепции исследований – представление, предназначенное для упрощения академических исследований. Отличается от первых двух высоким уровнем абстракций
Основное внимание в этом представлении уделено формальным понятиям поведения программного обеспечения, конкретные же примеры по возможности опускаются.
 Рисунок 2. Граф связей недостатка CWE-611.
- Название.
- Описание.
- Другие названия.
- Описание поведения.
- Описание и вероятность возможной эксплуатации.
- Описание возможных последствий эксплуатации.
- Способы предотвращения.
- Информация о связях с другими элементами CWE.
- Источники.
- Примеры кода для языков/архитектур.
- Ссылки на актуальные CVE.
Таблица 1. Пример описания недостатка безопасности.
| CWE 445 | Double free (повторное освобождение памяти) |
| Описание | ПО вызывает free() дважды на одном адресе памяти, что потенциально может привести к непредсказуемому изменению структур, управляющих памятью. |
| Вероятность эксплуатации | От низкой до средней. |
| Общие последствия | Контроль доступа: двойное освобождение памяти может привести к условию write-what-where, позволяя злоумышленнику выполнить произвольный код. |
| Способы предотвращения | Архитектура и дизайн: рекомендуется выбрать язык, обеспечивающий автоматическое управление памятью. |
| Способы предотвращения |
Архитектура и дизайн: рекомендуется выбрать язык, обеспечивающий автоматическое управление памятью.
Реализация: рекомендуется убедиться, что каждое выделение памяти освобождается только один раз. После освобождения блока рекомендуется присвоить указателю значение NULL, чтобы обеспечить невозможность повторного освобождения указателя. Если язык является объектно-ориентированным, рекомендуется убедиться, что деструкторы объектов удаляют каждый фрагмент памяти только один раз. Реализация: рекомендуется использовать инструмент статического анализа для поиска двойных освобождений памяти. |
| Примеры |
Пример кода на языке С++:
char* ptr = (char*)malloc (SIZE); |
| Ссылки на актуальные CVE |
CVE-2002-0059 CVE-2003-0545 CVE-2003-1048 CVE-2004-0642 CVE-2004-0772 CVE-2005-1689 |
| Информация о связях с другими элементами CWE |
Предшествующие:
CWE-666, СWE-675 в представлении CWE-1000 Связанные: CWE-364, CWE- 416, CWE-123 |
| Подверженные платформы | C/C++ |
| Источники |
PLOVER — DFREE — Double-Free Vulnerability7 Pernicious Kingdoms — Double Free CLASP — Doubly freeing memory CERT C Secure Coding — MEM00-C — Allocate and free memory in the same module, at the same level of abstraction CERT C Secure Coding — MEM01-C — Store a new value in pointers immediately after free() CERT C Secure Coding — MEM31-C — Free dynamically allocated memory exactly once CERT C Secure Coding — MEM00-C — Allocate and free memory in the same module, at the same level of abstraction CERT C Secure Coding — MEM01-C — Store a new value in pointers immediately after free() CERT C Secure Coding — MEM31-C — Free dynamically allocated memory exactly once |
- Возможность поиска и группировки срабатываний средства по идентификаторам CWE.
- Срабатывания средства включают или позволяют получить соответствующие им элементы CWE.
- Срабатывания средства однозначно отображаются на элементы CWE.
- В документации средства и в описании срабатываний используются описания из CWE.
- В документации средства и в описании срабатываний явным образом перечислены идентификаторы из CWE.
- Результаты тестирования размещены на сайте CWE.
HUNT Suite for Burp Suite Pro/Free
HUNT Parameter Scanner (hunt_scanner.py)
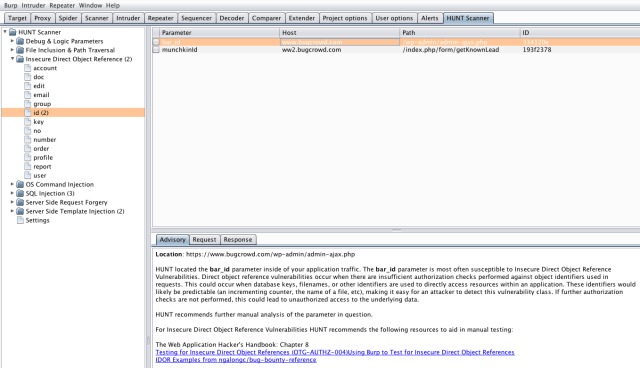
This extension does not test these parameters, but rather alerts on them so that a bug hunter can test them manually. For each class of vulnerability, Bugcrowd has identified common parameters or functions associated with that vulnerability class. We also provide curated resources in the issue description to do thorough manual testing of these vulnerability classes.
Also Readhtrace.sh – Simple Shell Script To Debugging Http/Https Traffic Tracing
HUNT Testing Methodology (hunt_methodology.py)
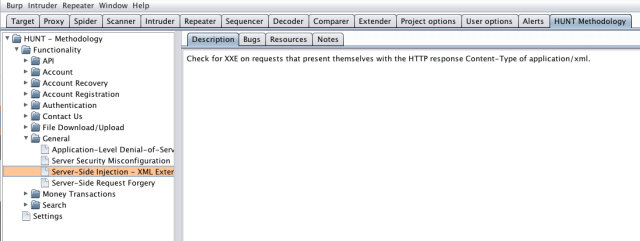
This extension allows testers to send requests and responses to a Burp Suite tab called “HUNT Methodology”. This tab contains a tree on the left side that is a visual representation of your testing methodology. By sending request/responses here testers can organize or attest to having done manual testing in that section of the application or having completed a certain methodology step.
Expect-CT
The header is used by a server to indicate that browsers should evaluate connections to the host for Certificate Transparency compliance.
In Chrome 61 (Aug 2017) Chrome enabled its enforcement via SCT by default (source). You can still use this header to specify an .
This header comes from the (now expired) internet draft Expect-CT Extension for HTTP.
Values
| Value | Description |
|---|---|
| (Optional) Indicates the URL to which the browser should report Expect-CT failures. | |
| (Optional) A valueless directive that, if present, signals to the browser that compliance to the CT Policy should be enforced (rather than report-only) and that the browser should refuse future connections that violate its CT Policy. When both the and directives are present, the configuration is referred to as an “enforce-and-report” configuration, signalling to the browser both that compliance to the CT Policy should be enforced and that violations should be reported. | |
| Specifies the number of seconds after the response is received the browser should remember and enforce certificate transparency compliance. |
References
- https://tools.ietf.org/html/draft-ietf-httpbis-expect-ct-02
- https://httpwg.org/http-extensions/expect-ct.html
- https://scotthelme.co.uk/a-new-security-header-expect-ct/
Примеры запуска sshprank
Взламывать цели из данного списка (-l sshds.txt) с именем пользователя admin (-u admin), списком паролей в файле (-P /tmp/passlist.txt) в 20 потоков работы с хостами:
./sshprank -l sshds.txt -u admin -P /tmp/passlist.txt -x 20
Быстрое сканирование, затем взлом найденных служб ssh. Данные для сканирования передаются в masscan (-m ‘-p22,2022 —rate=5000 —source-ip 192.168.13.37 —range 192.168.13.1/24’):
sudo ./sshprank -m '-p22,2022 --rate=5000 --source-ip 192.168.13.37 --range 192.168.13.1/24'
Сгенерировать тысячу случайных IPv4 адресов, затем просканировать порты со скоростью 1k p/s и найденные sshd сервера попытаться взломать учётными данными ‘root:root’:
sudo ./sshprank -m '-p22 --rate=1000' -r 1000 -v
Собрать баннеры (-b hosts.txt) и вывести их в файл в формате, поддерживаемым опцией ‘-l’:
./sshprank -b hosts.txt > sshds2.txt
Description
At its heart, OWASP WTE is a collection of easy to use application security tools and documentation. WTE has a variety of ways to distribute them:
- Virtual Machines for VMware, VirtualBox and Parallels
- Invidividual Debian packages (.deb) which attempt to be Linux disto agnostic.
- A bootable ISO image
- Hosted on various Cloud providers
- Ala Carte mix-and-match installations for special purposes
The project is focused at providing a ready environment for testers, developers or trainers to learn, enhance, demonstrate or use their application security skills. It’s been an active OWASP project since 2008 and has had over 300,000 downloads.
Beyond the collection of tools from OWASP and other security projects, OWASP WTE has begun producing and including its own security tools, especially where there were no existing tools which fit a particular need.
ZAP Root CA certificate
Imagine you’re visiting multiple SSL protected sites. Every time your
browser connects such a site, a new SSL certificate is created.
But, these certificates are not trusted by anyone (because self created by ZAP).
In other words, your browser will not accept such certificates in the first place.
You may familiar with such situations, when your browser complains certificate
error but you manually can create an exception rule for that server.
Every certificate created by ZAP is in the direct chain of trust
from the “ZAP Root CA” certificate.
(For more details about chain of trust, use your favorite search engine 😉 )
This means, you (your browser) only have to trust the ZAP Root CA once,
and any further certificates are automatically trusted. In other words,
once you’ve added the ZAP Root CA certificate to your list of trusted
Root CAs, your browser doesn’t recognize the man in the middle.
Note:
Generate
If you’re running ZAP the first time, you should generate a Root CA certificate first.
Once you’ve generated one, you have to install it within your browser
or HTTP client application. See section
for more details.
Every generated Root CA certificate is valid for one year. After that period you have
to create a new one.
Every generated Root CA certificate is 2048 bit strong (RSA with SHA1).
Every generated Root CA certificate starts with serial number “1”.
Every generated Root CA certificate consists of the following identifiers:
As you can see, there’s a Location identifier (L) which is only a hexadecimal number.
This number is constructed out of two 32bit hash codes: user’s name and user’s home directory.
This way you can identify your own certificate when using multiple installations.
But there’s no way, that anyone can figure out your name from this hash code.
Import
When you’re using multiple ZAP installation and you want to use the same
Root CA certificate, so you can import it. Simply use one installation of OWASP ZAP
to generate one Root CA certificate.
Copy the file ‘OWASP ZAP/config.xml’ from your users home directory to
the PC, where you want to use the same certificate and press ‘import’ to import it.
You can also import certificates stored in pem files as long as they include both
the certificate and the unencrypted private key in the following format:
And yes, that example will work — its the Superfish certificate!
View
In the options dialog of ZAP you’re seeing the raw bytes (hexa-decimal encoded)
of the certificate. The option “view” tries to use your system’s default
viewing tool for “.CER” files. On Windows, this is typically the same,
when exporting the certificate and double clicking on it.
Save/Export
In the options dialog of ZAP you’re seeing the raw bytes (hexa-decimal encoded)
of the certificate. Many programs are using this simple format for import/export
functions. When clicking ‘export’, these bytes are saved to disk.
This is equal to selecting all and doing CTRL+C (copy to clipboard) and
save it into a new .CER file (which is simple text as you see in the dialog).
Goals
Web application security is difficult to learn and practice. Not many people have full blown web applications like
online book stores or online banks that can be used to scan for vulnerabilities. In addition, security professionals
frequently need to test tools against a platform known to be vulnerable to ensure that they perform as advertised.
All of this needs to happen in a safe and legal environment.
Even if your intentions are good, we believe you should never attempt to find vulnerabilities without permission.
The primary goal of the WebGoat project is simple: create a de-facto interactive teaching environment for web
application security. In the future, the project team hopes to extend WebGoat into becoming a security benchmarking
platform and a Java-based Web site Honeypot.
Feature-Policy
The Feature-Policy header is an experimental feature that allows developers to selectively enable and disable use of various browser features and APIs.
The two most well supported values are and . For all the other ones, please consult page.
Values
| Value | Description |
|---|---|
| Controls access to accelerometer sensors on the device. | |
| Controls access to ambient light sensors on the device. | |
| Controls access to autoplay through and the attribute. | |
| Controls access to the BatteryManager API. | |
| Controls access to video input devices. | |
| Controls access to capturing the display output. | |
| Controls access to setting . | |
| Controls whether is allowed. | |
| Controls whether is allowed. | |
| Controls access to the interface. | |
| Controls access to gyroscope sensors on the device. | |
| Controls access to magnetometer sensors on the device. | |
| Controls access to audio input devices. | |
| Controls access to method. | |
| Controls access to override of the spatial navigation API. | |
| Controls access to the interface. | |
| Controls access to picture-in-picture. | |
| Controls access to audio output devices. | |
| Controls access to USB devices. | |
| (deprecated) Controls access to the method. | |
| (deprecated) Controls access to VR displays. |
Some experimental features are not present in this list, please check the references below for a complete list.
References
- https://w3c.github.io/webappsec-feature-policy/
- https://scotthelme.co.uk/a-new-security-header-feature-policy/
- https://github.com/w3c/webappsec-feature-policy/blob/master/features.md
Configuration example
A configuration example showing how to fully configure a webapp that uses form-based authentication and
cookie-based session management is
seen below:
- set up a context for the web application
- set up the session management method to Cookie-based Session Management
- make sure your browser proxies everything through ZAP and log into your application using the browser
- go to ZAP and identify the request that was done for the login (most usually it’s a HTTP POST request containing the username and the password and possibly other elements)
- If there is an anti-CSRF token in the login request, add the token name in Options Anti CSRF screen, if not present.
- right click on the request and Flag as Context… Form-based Auth Login Request
- a window will be opened already containing the request URL and the parameters (if any). Use the dropdown options to select which of the parameters correspond to the username and to the password
- then you need to tell ZAP how to identify whether an authentication succeeded or not. You can do this by setting logged in or logged out indicators. These are regex patterns which, if found in a response, tell ZAP whether it’s authenticated or not (e.g. presence of a http://example.com/logout link or the presence of a ‘Welcome, User X’). Only one of them is necessary. To set one of them, either type the regex directly in the Session Properties -> Authentication -> Logged In Indicator, either find an authenticated message in the Sites Tree, select it, open the Response View and select the text you wish to define as the indicator using the mouse and select the Flag as Context… Logged in indicator right-click menu option.
- define as many users as you need in the Session Properties -> Users section.
- after this step, various actions are available in ZAP. For example, you can now select the user in Spider dialogue. Or, using the Forced User Mode, you can force all the interactions that go through ZAP for a given Context to be from the perspective of a User. The User Forced Mode is enabled via the previous-to-last button in the toolbar (the one with the user and the lock) and is configured via Session Properties -> Forced User Mode.
Most of the steps above apply as well for other authentication methods. The only things that change when trying to configure authentication using a different method are steps 3, 4, 5 and 6. Instead of these, select the authentication method required from the drop-down list and configure it as needed. More details about configuring each type of authentication can be above and here.
Справка по ARTLAS
У программы нет опций, вся настройка происходит в конфигурационном файле etc/artlas.conf.
ИНТЕГРАЦИЯ С TELEGRAM
api = Маркер вашего API
group_id = Идентификатор Группы/Пользователя которые будут получать уведомления
enable = True для отправки уведомлений или False чтобы не отправлять.
КОНФИГУРАЦИЯ ZABBIX
server_name = имя хоста или сервера в zabbix
agentd_config = конфигурационный файл агента Zabbix
enable_advantage_keys = True или False для использования продвинутых триггеров
notifications = true чтобы включить или false чтобы отключить триггеры уведомлений
enable = true чтобы включить или false чтобы отключить
КОНФИГУРАЦИЯ SYSLOG/SIEM
server_name = IP или имя хоста сервера SySlog/SIEM
enable = True чтобы включить или False чтобы отключить
GENERAL CONFIGURATION
apache_log = Полный путь до журнала доступа Apache access.log
apache_mask = Маска для идентификации полей в журнале доступа apache. Данные обозначения соответствуют формату журнала доступа Apache. Подробности о значении каждого символа в «».
vhost_enable = True чтобы включить или False чтобы отключить поддержку виртуальных хостов
rules = etc/default_filter.json Это файл, который содержит фильтры OWASP
Historic:
2017 Release Candidate Translation Teams:
- Azerbaijanian: Rashad Aliyev ()
- Chinese RC2:Rip、包悦忠、李旭勤、王颉、王厚奎、吴楠、徐瑞祝、夏天泽、张家银、张剑钟、赵学文(排名不分先后,按姓氏拼音排列) OWASP Top10 2017 RC2 — Chinese PDF
- French: Ludovic Petit: , Sébastien Gioria:
- Others to be listed.
2013 Completed Translations:
- Arabic: OWASP Top 10 2013 — Arabic PDFTranslated by: Mohannad Shahat: , Fahad: @SecurityArk, Abdulellah Alsaheel: , Khalifa Alshamsi: and Sabri(KING SABRI): , Mohammed Aldossary:
- Chinese 2013:中文版2013 OWASP Top 10 2013 — Chinese (PDF).项目组长: Rip、王颉, 参与人员: 陈亮、 顾庆林、 胡晓斌、 李建蒙、 王文君、 杨天识、 张在峰
- Czech 2013: OWASP Top 10 2013 — Czech (PDF) OWASP Top 10 2013 — Czech (PPTX)CSIRT.CZ — CZ.NIC, z.s.p.o. (.cz domain registry): Petr Zavodsky: , Vaclav Klimes, Zuzana Duracinska, Michal Prokop, Edvard Rejthar, Pavel Basta
- French 2013: OWASP Top 10 2013 — French PDFLudovic Petit: , Sébastien Gioria: , Erwan Abgrall: , Benjamin Avet: , Jocelyn Aubert: , Damien Azambour: , Aline Barthelemy: , Moulay Abdsamad Belghiti: , Gregory Blanc: , Clément Capel: , Etienne Capgras: , Julien Cayssol: , Antonio Fontes: , Ely de Travieso: , Nicolas Grégoire: , Valérie Lasserre: , Antoine Laureau: , Guillaume Lopes: , Gilles Morain: , Christophe Pekar: , Olivier Perret: , Michel Prunet: , Olivier Revollat: , Aymeric Tabourin:
- German 2013: OWASP Top 10 2013 — German PDF which is Frank Dölitzscher, Torsten Gigler, Tobias Glemser, Dr. Ingo Hanke, Thomas Herzog, Kai Jendrian, Ralf Reinhardt, Michael Schäfer
- Hebrew 2013: OWASP Top 10 2013 — Hebrew PDFTranslated by: Or Katz, Eyal Estrin, Oran Yitzhak, Dan Peled, Shay Sivan.
- Italian 2013: OWASP Top 10 2013 — Italian PDFTranslated by: Michele Saporito: , Paolo Perego: , Matteo Meucci: , Sara Gallo: , Alessandro Guido: , Mirko Guido Spezie: , Giuseppe Di Cesare: , Paco Schiaffella: , Gianluca Grasso: , Alessio D’Ospina: , Loredana Mancini: , Alessio Petracca: , Giuseppe Trotta: , Simone Onofri: , Francesco Cossu: , Marco Lancini: , Stefano Zanero: , Giovanni Schmid: , Igor Falcomata’:
- Japanese 2013: OWASP Top 10 2013 — Japanese PDFTranslated by: Chia-Lung Hsieh: ryusuke.tw(at)gmail.com, Reviewed by: Hiroshi Tokumaru, Takanori Nakanowatari
- Korean 2013: OWASP Top 10 2013 — Korean PDF (이름가나다순)김병효:, 김지원:, 김효근:, 박정훈:, 성영모:, 성윤기:, 송보영:, 송창기:, 유정호:, 장상민:, 전영재:, 정가람:, 정홍순:, 조민재:,허성무:
- Brazilian Portuguese 2013: OWASP Top 10 2013 — Brazilian Portuguese PDFTranslated by: Carlos Serrão, Marcio Machry, Ícaro Evangelista de Torres, Carlo Marcelo Revoredo da Silva, Luiz Vieira, Suely Ramalho de Mello, Jorge Olímpia, Daniel Quintão, Mauro Risonho de Paula Assumpção, Marcelo Lopes, Caio Dias, Rodrigo Gularte
- Spanish 2013: OWASP Top 10 2013 — Spanish PDFGerardo Canedo: , Jorge Correa: , Fabien Spychiger: , Alberto Hill: , Johnatan Stanley: , Maximiliano Alonzo: , Mateo Martinez: , David Montero: , Rodrigo Martinez: , Guillermo Skrilec: , Felipe Zipitria: , Fabien Spychiger: , Rafael Gil: , Christian Lopez: , jonathan fernandez , Paola Rodriguez: , Hector Aguirre: , Roger Carhuatocto: , Juan Carlos Calderon: , Marc Rivero López: , Carlos Allendes: , : , Manuel Ramírez: , Marco Miranda: , Mauricio D. Papaleo Mayada: , Felipe Sanchez: , Juan Manuel Bahamonde: , Adrià Massanet: , Jorge Correa: , Ramiro Pulgar: , German Alonso Suárez Guerrero: , Jose A. Guasch: , Edgar Salazar:
- Ukrainian 2013: OWASP Top 10 2013 — Ukrainian PDFKateryna Ovechenko, Yuriy Fedko, Gleb Paharenko, Yevgeniya Maskayeva, Sergiy Shabashkevich, Bohdan Serednytsky
Install ZAP Root CA certificate
Any HTTPS client you want to use, has to know the OWASP Root CA certificate
as ‘trusted root certificate’. Typically you have to install manually the
ZAP certificate into your browser’s list of trusted root certificates.
Windows / Internet Explorer
The easiest way is to click on and choose
‘Install certificate’. Alternatively, you can save/export your generated
certificate (copy it to you target computer) and double click the .CER file.
When doing so, the regular Windows wizard for certificate installation
assistance is poping up.
In this wizard manually choose the certificate store. Do NOT let
Windows choose automatically the certificate store.
Choose ‘trusted root certificates’ as store and finalize the wizard.
After successfully installation, you can check the certificate.
- Go to Internet options
- Tab Content
- Click certificates
- Click tab trusted root certificates
- The OWASP ZAP Root CA should be there
Mozilla Firefox
Firefox is using it’s own certificate store. Thats why you have to
import it twice, when you’re using both browser on windows.
Installation and late on validation is done in the same preferences dialog:
- Go to Preferences
- Tab Advanced
- Tab Cryptography/Certificates
- Click View Certificates
- Click Authorities tab
- Click Import and choose the saved owasp_zap_root_ca.cer file
- In the wizard choose to trust this certificate to identify web sites (check on the boxes)
- Finalize the wizard
Usage Instructions:
ZAP GUI in a Browser:
Yes, you can run the ZAP Desktop GUI in a browser. You can use it in just the same way as the Swing UI and can even proxy via it.
See the Webswing page for details.
ZAP Headless:
You can also start the ZAP in headless mode with following command:
Note: opens the API up for connections from any other host, it is prudent to configure this more specifically for your network/setup.
ZAP Headless with xvfb:
You can start the ZAP in headless mode with xvfb following command:
Note: opens the API up for connections from any other host, it is prudent to configure this more specifically for your network/setup.
This first starts xvfb (X virtual frame buffer) which allows add-ons that use Selenium (like the Ajax Spider and DOM XSS scanner) to run in a headless environment. Firefox is also installed so can be used with these add-ons.
ZAP Baseline Scan:
The ZAP Baseline Scan runs the ZAP spider against the specified target for (by default) 1 minute and then waits for the passive scanning to complete before reporting the results.
To run it with no ‘file’ params use:
If you use ‘file’ params then you need to mount the directory those file are in or will be generated in, eg
Note that is only supported on Linux and MacOS — on Windows you will need to replace this with the full current working directory.
For more details see the ZAP Baseline Scan page.
Accessing the API from outside of the Docker container:
Docker appears to assign ‘random’ IP addresses, so an approach that appears to work is:
Run ZAP as a daemon listening on “0.0.0.0”:
Find out the container id:
Find out which address has been assigned to it:
You should be then able to point your browser at the specified host/port and access the ZAP API, eg http://172.17.0.8:8090/
Note that on Macs the IP will be the IP of the Docker VM host. This is accessible with:
Scanning an app running on the host OS
IP addresses like localhost and 127.0.0.1 cannot be used to access an app running on the host OS from within a docker container.
To get around this you can use the following code to get an IP address that will work:
For example:
X-Frame-Options
The response header improves the protection of web applications against clickjacking. It instructs the browser whether the content can be displayed within frames.
The CSP frame-ancestors directive obsoletes the X-Frame-Options header. If a resource has both policies, the CSP frame-ancestors policy will be enforced and the X-Frame-Options policy will be ignored.
Values
| Value | Description |
|---|---|
| No rendering within a frame. | |
| No rendering if origin mismatch. | |
| Allows rendering if framed by frame loaded from DOMAIN. |
References
- https://tools.ietf.org/html/rfc7034
- https://tools.ietf.org/html/draft-ietf-websec-x-frame-options-01
- https://tools.ietf.org/html/draft-ietf-websec-frame-options-00
- https://developer.mozilla.org/en-US/docs/Web/HTTP/X-Frame-Options
- https://owasp.org/www-community/attacks/Clickjacking
- https://blogs.msdn.microsoft.com/ieinternals/2010/03/30/combating-clickjacking-with-x-frame-options/
WebWolf the small helper
WebWolf is a separate web application which simulates an attackers machine. It makes it possible for us to
make a clear distinction between what takes place on the attacked website and the actions you need to do as
an “attacker”. WebWolf was introduced after a couple of workshops where we received feedback that there
was no clear distinction between what was part of the “attackers” role and what was part of the “users” role on the
website. The following items are supported in WebWolf:
Upload a file needed to be downloaded during an assignment

Landing page for incoming requests
WebWolf can serve as a landing page to which you can make a call from inside an assignment, giving you as the attacker
information about the complete request. Think of it as a very simple form of .

Starting OWASP ZAP
After you install the application to the default directory, you can start clicking the OWASP ZAP icon on your Windows desktop. The default install directory;
C:\Program Files\OWASP\Zed Attack Proxy\ZAP.exe
As it is a Java application, alternatively you can run the following command to start it. What it gives you extra configuration like scheduling your penetration test or starting with a particular URL. This is how you do it;
java -Xmx512m -jar zap-2.7.0.jar
When you run the app, it asks you whether you want to save the session or not. If you want to reach your website configuration or test results later, you should save the session for later. For now let’s keep it default “No,I do not want to persist the session”
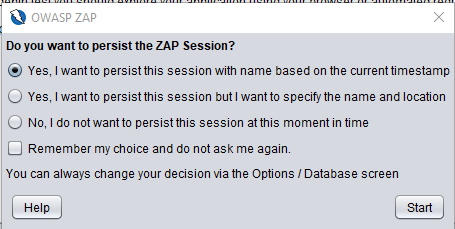
Image 2: Default Startup Dialog of Owasp Zap
Решение проблем
Ошибка ValueError: No JSON object could be decoded
Для работы ARTLAS использует файл default_filter.json с регулярными выражениями из проекта PHP-IDS. В коде программы прописана ссылка на этот файл и она его скачивает при первом запуске. К сожалению, ссылка в настоящее время неправильна (сайт сменился) и программа вместо правильно файла скачивает другую страницу.
Поэтому при запуске показывается следующая ошибка:
Traceback (most recent call last):
  File "artlas.py", line 186, in <module>
    artlas = ARTLAS('/usr/share/artlas/etc/artlas.conf')
  File "artlas.py", line 43, in __init__
    self.rules = json.loads(open(self.conf).read())
  File "/usr/lib/python2.7/json/__init__.py", line 339, in loads
    return _default_decoder.decode(s)
  File "/usr/lib/python2.7/json/decoder.py", line 364, in decode
    obj, end = self.raw_decode(s, idx=_w(s, 0).end())
  File "/usr/lib/python2.7/json/decoder.py", line 382, in raw_decode
    raise ValueError("No JSON object could be decoded")
ValueError: No JSON object could be decoded
Необходимо отредактировать файл artlas.py. Для этого откройте его:
gedit artlas.py
Найдите там строку
http://dev.itratos.de/projects/php-ids/repository/raw/trunk/lib/IDS/default_filter.json
и замените её на:
https://raw.githubusercontent.com/PHPIDS/PHPIDS/master/lib/IDS/default_filter.json
сохраните и закройте файл.
Поскольку неверный файл уже скачался, то его нужно удалить. Он находится в папке программы по пути etc/default_filter.json.
Для удаления этого файла в Arch Linux/BlackArch выполните:
sudo rm /usr/share/artlas/etc/default_filter.json
Ошибка IOError: Permission denied: ‘etc/default_filter.json’
При запуске вы можете столкнуться с ошибкой:
 Getting rules...
Traceback (most recent call last):
  File "artlas.py", line 186, in <module>
    artlas = ARTLAS('/usr/share/artlas/etc/artlas.conf')
  File "artlas.py", line 40, in __init__
    self.get_file_rules()
  File "artlas.py", line 82, in get_file_rules
    with open('etc/default_filter.json','w') as file_rules:
IOError:  Permission denied: 'etc/default_filter.json'
Она означает, что при у программы недостаточно прав для сохранения файла default_filter.json. Запустите её с sudo:
sudo artlas
Why do we need spidering?
If you access all aspects of the site while navigating your website then strictly seeking you don’t need to use the spider — that’s there to pick on things you missed or when proxying isn’t an option.
This is done by right clicking of the site and selecting Attack from the menu, then clicking Spider. Be sure, recurse option is checked! Press the Start Scan button. It will take some time according to the link counts of your website.
How to pentest a SPA (Single Page Application) Website?
If it’s a SPA website, then you need to tell ZAP more information, in particular that one, parameters represents application structure rather than application data. To do this:
- Double click your Context (in our test it’s a modern AspNet Zero SPA)
- Select the ‘Structure’ tab
- Add the ‘structural’ parameter(s)