Java development kit
Содержание:
Platform Prerequisites
Windows
You need to have the following tools installed:
- Cygwin. Some packages to make sure are installed are:
- openssh
- bison
- flex
- g++
- gperf
- make
- makedepend
- mercurial
- perl
- zip
- unzip
- Microsoft Visual Studio 10 SP1 (express edition works). The compiler and other tools are expected to reside in the location defined by the variable VS100COMNTOOLS which is set by the Microsoft Visual Studio installer.
Linux
Setting up a Linux build configuration is fairly straightforward. These build instructions were used for the «official» build platform of Ubuntu 10.04, but also on the latest Ubuntu 12.10. First, run the following command to install all the required development packages:
Ubuntu 14.04, 15.10, 16
sudo apt-get update
sudo apt-get install ksh bison flex gperf libasound2-dev libgl1-mesa-dev \
    libgstreamer0.10-dev libgstreamer-plugins-base0.10-dev libjpeg-dev \
    libpng-dev libx11-dev libxml2-dev libxslt1-dev libxt-dev \
    libxxf86vm-dev pkg-config x11proto-core-dev \
    x11proto-xf86vidmode-dev libavcodec-dev mercurial \    libgtk2.0-dev libgtk-3-dev \
    libxtst-dev libudev-dev libavformat-dev
You will also need to install cmake 3.8 (or higher) in order to build WebKit (because WebKit uses CMake). With Ubuntu 16, this will satisfy the requirements:
sudo apt-get install cmake ruby
Ubuntu 14.10
currently not recommended for building ARM because of packaging conflicts with libgl1-mesa-dev and the compatibility libraries needed for ARM.
Oracle Enterprise Linux 7 and Fedora 21
yum install mercurial bison flex gperf ksh pkgconfig \ libpng12-devel libjpeg-devel libxml2-devel \ libxslt-devel systemd-devel glib2-devel gtk2-devel \ libXtst-devel pango-devel freetype-devel
Building OpenJFX for Linux ARM has only been tested on as a cross build from Linux and MacOSX. The process is only regularly used on Linux. Follow the steps for a Linux build setup first, and then refer to the steps for Cross Building for ARM Hard Float.
Related
-
Tutorial
TLS или протокол безопасности транспортного уровня и предшествующий ему протокол SSL используются для заключения обычного трафика в защищенную оболочку с шифрованием. Используя эту технологию, серверы могут безопасно отправлять информацию клиентам без перехвата сообщений и…
-
Tutorial
WordPress — это одна из самых популярных на сегодня систем с открытым исходным кодом для создания веб-сайтов и блогов в сети Интернет. Ее используют 63% веб-сайтов, которые пользуются системой управления контентом (CMS). На сайты, работающие на WordPress, приходится 36% всех…
-
Tutorial
Автор выбрал фонд Free and Open Source Fund для получения пожертвования в рамках программы Write for DOnations. Несмотря на рост популярности облачных сервисов, необходимость использования…
-
Tutorial
Установка и использование Docker Compose в Ubuntu 20.04
Docker упрощает управление процессами приложений в контейнерах. Хотя контейнеры в некоторых отношениях аналогичны виртуальным машинам, они более компактные и более эффективно используют ресурсы. Это позволяет разработчикам разбить среду приложения на несколько изолированных…
Примечания
- Schwartz, Jonathan . Sun Microsystems (May 23, 2006). Дата обращения 9 мая 2007.
-
(OGG Theora). Sun Microsystems.
- . Sun Microsystems (November 13, 2006). Дата обращения 9 мая 2007.
- Stallman, Richard . Дата обращения 4 декабря 2007.
- . BBC News (November 13, 2006). Дата обращения 9 мая 2007.
- . Sun Microsystems (May 8, 2007). Дата обращения 9 мая 2007.
- Some [прояснить] remains in the JDK; Sun stated that it will continue to use such code in commercial releases until fully functional free and open source alternatives replace it.
-
James Gosling (October 2006), . Интервью c Robert Eckstein
- O’Hair, Kelly (December 12, 2007).
- .
- . Дата обращения 26 августа 2008.
- Tripp, Andy (July 16, 2007). Дата обращения 20 апреля 2008.
- Kennke, Roman (недоступная ссылка) (September 29, 2008). Дата обращения 19 октября 2008.
- Darcy, Joe (June 10, 2010).
- (October 11, 2010).
Returning Unused Memory to the Operating System
By default, ZGC uncommits unused memory, returning it to the operating system. This is useful for applications and environments where memory footprint is a concern. This feature can be disabled using . Furthermore, memory will not be uncommitted so that the heap size shrinks below the minimum heap size (). This means this feature will be implicitly disabled if the minimum heap size () is configured to be equal to the maximum heap size ().
An uncommit delay can be configured using (default is 300 seconds). This delay specifies for how long memory should have been unused before it’s eligible for uncommit.
NOTE! On Linux, uncommitting unused memory requires with support, which first appeared in kernel version 3.5 (for tmpfs) and 4.3 (for hugetlbfs).
Установка Oracle JDK
Если вам нужно установить Oracle JDK, официальную версию от Oracle, сначала установите инсталлятор из стороннего репозитория.
Давайте загрузим Java из репозитория Oracle.
Загрузка пакета Java SE от Oracle
Из-за недавних изменений в том, как Oracle обрабатывает лицензирование Java, вам сначала нужно создать учетную запись Oracle и загрузить программное обеспечение непосредственно с этого веб-сайта. Только после этого вы сможете продолжить установку.
Если у вас еще нет учетной записи Oracle, создайте ее на этой странице.
После этого перейдите на страницу загрузки Oracle Java SE.
Теперь нужно убедиться, что мы загружаем правильную версию Java – ее номер должен соответствовать тому, что ожидает получить инсталлятор. Чтобы проверить, какая версия нужна инсталлятору, откройте список пакетов в его репозитории.
Мы загрузим пакет из этого репозитория на следующем этапе, а пока нужно найти файлы oracle-java11-installer-local…
В этом случае инсталлятор ожидает версию 11.0.4. Все числа, которые идут после дефиса в номере версии пакета, можно смело игнорировать.
Теперь, когда мы знаем правильный номер версии, найдите необходимую версию на , странице загрузки Java.
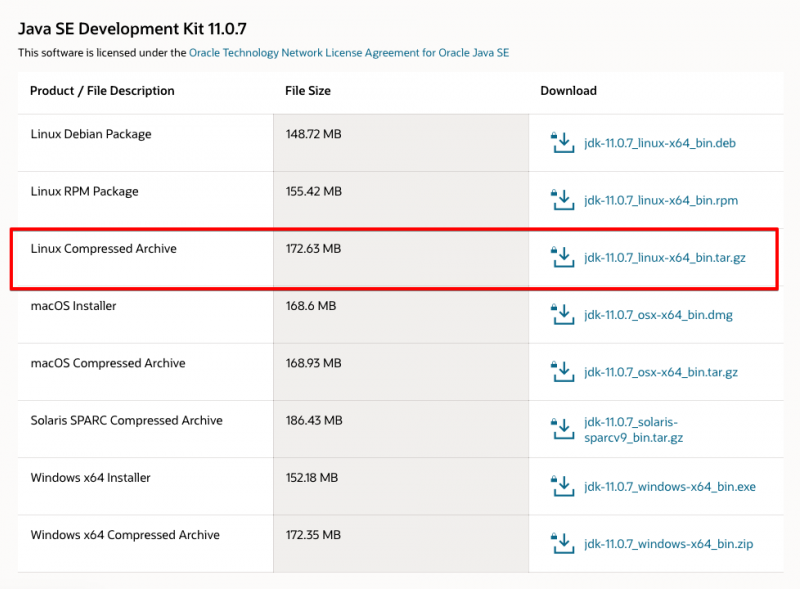
Нажмите кнопку загрузки. После этого нужно принять лицензионное соглашение, для этого кликните Accept License Agreement. Затем выберите пакет .tar.gz для Linux, и загрузка начнется. Возможно, вам придется войти в свою учетную запись Oracle еще раз.
После окончания загрузки нужно загрузить выбранный файл на сервер. Для этого мы будем использовать команду scp, но вы можете использовать любое удобное программное обеспечение для передачи файлов.
На локальном компьютере используйте инструмент scp для загрузки файла на ваш сервер. Согласно следующей команде, ваш файл находится в каталог Downloads в домашней папке пользователя и будет загружен в домашний каталог пользователя 8host на сервере. Если в вашей ситуации пути отличаются, укажите свои пути:
Теперь у вас на сервере есть правильный пакет программного обеспечения Java. Можно добавить репозиторий, в котором находится нужный нам инсталлятор.
Добавление apt-репозитория инсталлятора
Сначала установите пакет software-properties-common, который добавляет команду apt-get-repository – она нужна для добавления в систему дополнительных репозиториев.
После этого нужно импортировать ключ подписи, чтобы проверить программу, которую мы собираемся установить:
С помощью команды add-apt-repository добавьте нужный репозиторий в список источников:
После этого вы увидите сообщение:
Нажмите ENTER, чтобы продолжить установку. Затем система попробует импортировать ключи GPG, но не сможет найти валидные.
Это предупреждение можно проигнорировать.
Чтобы обновить список исходников и сделать новое ПО доступным для установки, введите:
Установка загруженной версии Java
Сначала нужно создать отдельный каталог, который инсталлятор использует для поиска пакета Java, а затем нужно скопировать туда файл .tar.gz.
Когда процесс завершится, установите Java 11 от Oracle, это пакет oracle-java11-installer-local:
Сначала инсталлятор предложит вам принять лицензию. После этого он извлечет и установит Java.
Bug Ids
For OpenJDK 6, you can use the Oracle-internal bug id (if you
have one) or a bug id from the OpenJDK 6 bug tracker
to push a changeset. If you are using the bug id from the OpenJDK 6
bug tracker, please use the complete «issue id» that the OpenJDK 6
tracker creates: For example, instead of
just .
For OpenJDK 6, both of these are lines are acceptable as valid
bug id lines:
1234567: NPE thrown on FileInputStream("")
OPENJDK6-1234: NPE thrown on FileInputStream("")
If you are backporting a changeset from jdk7, jdk7u or jdk8,
using the original Oracle bug id is preferred, since it makes
tracking changes easier.
Contributing
The suggested process is as follows:
- Check the bug database for which JDK versions already have the patch applied.
- When actively starting working on the bug, add the label ‘jdk8u-<username>’ to the bug, where <username> is your OpenJDK username. This makes others aware that someone is already actively backporting this bug.
- Take a copy of the patch from the repository of the JDK version closest to 8u to minimise changes.
- If the patch was developed after the switch to a single repository (during the OpenJDK 10 lifecycle), shuffle the paths using <source jdk>/bin/unshuffle_patch.sh -to9 <original.patch> <9.patch> to get a version that works with the forest of repositories. In some cases, this may mean multiple patches for different repositories.
- If the patch was developed after the switch to the modular system (during the OpenJDK 9 lifecycle) and is not a HotSpot fix, shuffle the paths using <jdk9>/common/bin/unshuffle_patch.sh <repo> <9.patch> <8.patch>
- Try to apply the patch by using hg import <patch>. If it applies, go to #8. Otherwise, #7.
- Fix the patch so it applies. This may require identifying other patches which need to backported first, in which case you start this process again with that fix.
- Build the resulting JDK and/or run any new or modified tests, altering if necessary. Again, this may end up needing dependent backports to fix issues that arise.
- You now should have a working patch. If no changes were necessary other than path shuffling, proceed to step #13. Otherwise, step #10.
- Update the bug with a link to the RFR on the mailing list and add the label ‘jdk8u-needs-review’.
- Go to the bug in JIRA and replace the ‘jdk8u-needs-review’ label with the ‘jdk8u-fix-request’ label. Write a comment preceded with «Fix Request «. Explain the motivation for the fix, and either explain that it applies cleanly to 8u with patch shuffling, or link to the successful review thread on the mailing list. If you don’t have bug database access, someone will need to do this on your behalf.
- Wait for an 8u maintainer to add jdk8u-fix-yes to the bug.
- Once the patch is pushed to the repositories, remove your ‘jdk8u-<username>’ label from the bug.
- Pat yourself on the back, having successfully got a patch into OpenJDK 8u.
Enabling GC Logging
GC logging is enabled using the following command-line option:
-Xlog:<tag set>,:<log file>
For general information/help on this option:
-Xlog:help
To enable basic logging (one line of output per GC):
-Xlog:gc:gc.log
To enable GC logging that is useful for tuning/performance analysis:
-Xlog:gc*:gc.log
Where means log all tag combinations that contain the tag, and means write the log to a file named .
Change Log
JDK 15 (under development)
- Improved NUMA awareness
- Improved allocation concurrency
- Support for Class Data Sharing (CDS)
- Support for placing the heap on NVRAM
- Support for compressed class pointers
- Support for incremental uncommit
- Fixed support for transparent huge pages
- Additional JFR events
JDK 14
- Support for tiny/small heaps (down to 8M)
- Support for JFR leak profiler
- Support for limited and discontiguous address space
- Parallel pre-touch (when using -XX:+AlwaysPreTouch)
- Performance improvements (clone intrinsic, etc)
- Stability improvements
JDK 13
- Increased max heap size from 4TB to 16TB
- Support for -XX:SoftMaxHeapSIze
- Support for the Linux/AArch64 platform
- Reduced Time-To-Safepoint
- Initial version of ZGC
- Does not support class unloading (using -XX:+ClassUnloading has no effect)