Роутер mikrotik routerboard hex rb750gr3 5 x rj45
Содержание:
- Описание
- Overview
- Installation
- Настройка роутера MikroTik hEX S (RB760iGS)
- MicroSD cards
- Характеристики
- Specific configuration
- Hardware
- Preparation, Setup, First Use
- Эксклюзивный обзор Mikrotik hEX-S от ЗАО «Вива-Телеком»
- Обзоры других сетевых маршрутизаторов Mikrotik от ЗАО «Вива-Телеком»
- Programming the W25Q128FV flash chip
- Обзоры других сетевых маршрутизаторов Mikrotik от ЗАО «Вива-Телеком»
Описание
MikroTik hEX S (модель RB760iGS) — это роутер без Wi-Fi на 5 гигабитных ethernet портов, 1 SFP порт для подключения оптики и 1 USB порт для подключения 3G/4G модемов или внешних накопителей. Также устройство оснащено слотом microSD для установки карт памяти.
Внутри маршрутизатора установлен двухъядерный процессор с частотой 880 МГц, работающий в 4 потока. Объем оперативной памяти составляет 256 MБ.
MikroTik hEX S поддерживает аппаратное шифрование IPsec со скоростью около 470 Мбит/с.
Роутер позволяет установить пакет The Dude Server, который предназначен для мониторинга в сети различных устройств, серверов, сервисов, установки связей между ними и оповещении при сбоях.
В комплект поставки входит блок питания 24В 1.2А. Также питание можно подать на роутер по сетевому кабелю по технологии Passive POE или 802.3af/at с напряжением 12-57 В. Пятый ethernet порт выдает питание по стандарту Passive PoE с напряжением до 57 В. Напряжение на выходе 5-го порта будет таким же, как напряжение, подаваемое на вход маршрутизатора. Если подключаемое устройство не поддерживает Passive PoE, то напряжение не подается на 5-й порт.
MikroTik RB760iGS управляется операционной системой RouterOS Level4 с огромным функционалом. С ее помощью вы сможете ограничить скорость пользователям, запретить доступ к социальным сетям или торрентам, сделать в кафе или гостинице HotSpot с перенаправлением на рекламную страничку, организовать защищенное подключение к офису удаленных сотрудников или филиалов по VPN и многое другое.
Если вам нужен недорогой роутер без Wi-Fi с возможностью подключения оптики, то MikroTik hEX S будет отличным выбором. Он обладает хорошей производительностью, поддерживает аппаратное шифрование IPsec, и позволяет мониторить состояние сети с помощью The Dude Server.
Overview
New hEX (RB750Gr3) unit is ideal for small to medium size The Dude server installations. For server database storage on this device you have two options: MicroSD cards or USB flashes.
Note that preferably you should use industrial grade mircoSD cards and USB flashes as they have longer life cycle under applications that can write data to flash more frequently as The Dude server database in this case. Note that you still use standard usb flashes and microSD card they just won’t last as long as Industrial grade counterpart would in long term use.
Note: hEX RB750Gr3 does support mircoSD card standard SDXC UHS-I/Class 10 which means that you can use very large capacity memory cards in the device. The standard supports up to 128GB microSD cards.
Installation
| Model | Current Release | Firmware OpenWrt Install | Firmware OpenWrt Upgrade | Firmware OEM Stock |
|---|---|---|---|---|
| RB750Gr3 | 19.07.3 |
Follow MikroTik Common Procedures to install the OpenWrt firmware.
Depending on the chosen version (snapshot/old stable release/stable release) the firmware might contain LuCI. It’s recommended to install the “Current Release” in the table above.
Flashing OpenWrt using LuCI: Read the section (“After successfully using a web browser to connect to the OpenWrt LuCI…”).
Flashing OpenWrt using SSH (Linux) or PuTTy (Windows): Use UCI to flash OpenWrt with command. Read the full manual.
NOTE that before 19.07.0 release the router was non-natively supported in 18.06.1 release. Upgrade from 18.06.1 to 19.07.0 is not supported. See the former wiki page for details.
Настройка роутера MikroTik hEX S (RB760iGS)
Для настройки роутера MikroTik hEX S (RB760iGS) воспользуйтесь инструкциями:
-
→
- →
- →
- →
- →
- →
- →
- →
- →
- →
- →
- →
- →
- →
- →
- →
- →
- →
- →
- →
Характеристики
| Система | |
|---|---|
| Процессор: | MT7621A 880 МГц, 2 ядра и 4 потока |
| RAM: | 256 MB |
| Flash: | 16 MB |
| Разъемы: | 5 × 10/100/1000 Mbit/s Ethernet RJ45 1 × SFP cage Gigabit Ethernet (Mini-GBIC; SFP модуль не поставляется) 1 × USB 2.0 1 × microSD slot |
| ОС: | MikroTik RouterOS Level4 |
| Другое | |
| Электропитание: | PoE: 12..57 V DC on Ethernet port1jack:12..57 V DC |
| Потребление: | до 11 Вт |
| Размеры: | 113 × 89 × 28 мм |
| Вес: | 129 г |
| Рабочая температура: | от -40°C до +70°С |
Результаты теста производительности
| RB760iGS | MT7621A (880Mhz) 1G all port test | ||||||
|---|---|---|---|---|---|---|---|
| Mode | Configuration | 1518 byte | 512 byte | 64 byte | |||
| kpps | Mbps | kpps | Mbps | kpps | Mbps | ||
| Bridging | none (fast path) | 162.4 | 1,972.2 | 443.7 | 1,817.4 | 1039.1 | 532.0 |
| Bridging | 25 bridge filter rules | 162.4 | 1,972.2 | 168.1 | 688.5 | 174.3 | 89.2 |
| Routing | none (fast path) | 162.4 | 1,972.2 | 444.4 | 1,820.3 | 1035.0 | 529.9 |
| Routing | 25 simple queues | 162.4 | 1,972.2 | 179.6 | 735.6 | 171.4 | 87.8 |
| Routing | 25 ip filter rules | 92.9 | 1,128.2 | 94.1 | 385.4 | 93.8 | 48.0 |
Результаты теста IPsec
| RB760iGS | MT7621A IPsec throughput | ||||||
|---|---|---|---|---|---|---|---|
| Mode | Configuration | 1400 byte | 512 byte | 64 byte | |||
| kpps | Mbps | kpps | Mbps | kpps | Mbps | ||
| Single tunnel | AES-128-CBC + SHA1 | 41.9 | 469.3 | 42.3 | 173.3 | 41.5 | 21.2 |
| 256 tunnels | AES-128-CBC + SHA1 | 41.9 | 469.3 | 43.7 | 179 | 42.7 | 21.9 |
| 256 tunnels | AES-128-CBC + SHA256 | 42.2 | 472.6 | 44.4 | 181.9 | 42.7 | 21.9 |
| 256 tunnels | AES-256-CBC + SHA1 | 32 | 358.4 | 40 | 163.8 | 40.5 | 20.7 |
| 256 tunnels | AES-256-CBC + SHA256 | 32.1 | 359.5 | 39.7 | 162.6 | 40.5 | 20.7 |
MicroSD cards
MicroSD slot on RB750Gr3 should be able to work with any microSD card up SDXC 128GB size standard. Max supported read/write speed is UHS-1/CLASS10. Table contains list of tested microSD cards.
| Brand | Description | Model |
|---|---|---|
| Kingston | 128GB SDXC UHS-I | SDC10G2/128GB |
| Kingston | 64GB SDXC UHS-I | SDCAC/64GB |
| Kingston | 32GB SDHC CLASS10 | SDC10G2/32GBSP |
| Kingston | 8GB SDHC CLASS10 | SDC10G2/8GB |
| Kingston | 8GB SDHC CLASS10 | SDC10/8GB |
| Transcent | Premium 400x microSDXC UHS-I | TS64GUSDU1 |
| Toshiba | Exercia microSDXC UHS-I | M301-EA |
| Silicon Power | Elite microSDXC UHS-I | SP064GBSTXBU1V20SP |
| Sandisk | Ultra microSDXC UHS-I | SDSQUNB-064G-GN3MN |
| Samsung | EVO UHS-I | MB-MP32D |
Note: UHS-3 speed class cards will also work, but wont reach the advertised read/writes speeds as microSD slot on device is only UHS-I speed class.
Характеристики
| Основные характеристики | |
| Производитель | MikroTik |
| Серия | RouterBOARD hEX S |
| Модель | RB760iGS |
| Тип оборудования | Маршрутизатор (роутер)найти похожее (сети) |
| Корпус | Пластик |
| Цвета, использованные в оформлении | Черный |
| Кнопки | Mode, Reset |
| Описание | Универсальная сетевая платформа, позволяющая широкую настройку благодаря RouterOS |
| Количество портов RJ45 (LAN) | 5 x RJ45 |
| Операционная система | RouterOS, уровень лицензии 4 |
| Комплект поставки и опции | |
| Комплект поставки | Блок питания, Руководство пользователякомплект №1 |
| Особенности корпуса | |
| Индикаторы | Link/ACT, Power, SFP |
| Варианты крепления | Крепление к стене |
| Процессор | |
| Процессор | MT7621A 880 МГц (2 ядра) |
| Конфигурация | |
| Память | 256 Мб RAM, 16 Мб flash |
| Эксплуатационные параметры | |
| Рабочая температура | -40 ~ 70 °C |
| Интерфейс, разъемы и выходы | |
| Разъемы | Слот для карт microSD |
| USB порты | 1 x USB |
| Гигабитные порты | 5 портов 10/100/1000 Мбит/сек, 1 из них PoE PSE, 1 PoE PD |
| Порты SFP | 1 x SFPвсе модули SFP |
| Порты WAN | 1 порт RJ-45 1 Гбит/сек, 1 порт SFP |
| Сетевые характеристики | |
| Соответствие стандартам | 802.3at (PoE Plus) |
| Питание | |
| Питание | От электросети, PoE (Power over Ethernet) |
| PoE | Поддерживается в соответствии с IEEE 802.3at (PoE+), IEEE 802.3af (PoE), Passive PoE. На выходе только Passive PoE (12~57 В) |
| Количество портов PoE/PoE+ PSE | 1 порт Passive PoE |
| Максимальная мощность на 1 порт PoE | 30 Вт |
| Блок питания | Внешний, в комплектеблок питания |
| Потребление энергии | 11 Вт |
| Логистика | |
| Размеры (ширина x высота x глубина) | 137 x 89 x 28 мм |
| Вес | 0.34 кг |
| Размеры упаковки (измерено в НИКСе) | 17.4 x 12 x 4.8 см |
| Вес брутто (измерено в НИКСе) | 0.345 кг |
Specific configuration
Network interfaces
The default OpenWRT configuration
Numbers of ports: in UCI (the command and config file ), in LuCI, labels on case:
| Port number in UCI | Port name in LuCI | Label on case | PVID (untagged VLAN) | tagged VLANs |
|---|---|---|---|---|
| WAN | WAN | 2 | ||
| 1 | LAN1 | 2 | 1 | |
| 2 | LAN2 | 3 | 1 | |
| 3 | LAN3 | 4 | 1 | |
| 4 | LAN4 | 5 | 1 | |
| 5 | n/c | —- | ||
| 6 | CPU | —- | 1, 2 | |
| 7 | n/c | —- |
The default network configuration is:
| Interface Name | Description | Default configuration |
|---|---|---|
| br-lan | LAN | 192.168.1.1/24 |
| vlan1 (eth0.1) | LAN ports (Ether2 to Ether5) | br-lan |
| vlan2 (eth0.2) | WAN port (Ether1) | Dual-stack DHCP Client |
Because RB750Gr don’t have wifi, you may change configuration to more simple and save the CPU resources: turn off bridge for LAN interface in the LuCI. After “Save & Apply” the network configuration will:
| Interface Name | Description | Default configuration |
|---|---|---|
| vlan1 (eth0.1) | LAN ports (Ether2 to Ether5) | 192.168.1.1/24 |
| vlan2 (eth0.2) | WAN port (Ether1) | Dual-stack DHCP Client |
Buttons
→ hardware.button on howto use and configure the hardware button(s).
Here, we merely name the buttons, so we can use them in the above Howto.
The MikroTik RB750Gr3 has the following buttons:
| BUTTON | Event |
|---|---|
| Reset | reset |
| Mode | wps |
Hardware
Info
| Architecture | MIPS |
|---|---|
| Vendor | MediaTek |
| Bootloader | Factory RouterBOOT |
| System-On-Chip | MediaTek MT7621AT (MIPS 1004Kc) |
| CPU/Speed | 880MHz |
| Flash-Chip | Winbond 25Q128FVSG |
| Flash size | 16 MiB |
| RAM | 256 MiB DDR3 |
| Ethernet | 10/100/1000 Mbit/s w/ vlan support |
| USB | 1x 2.0 |
| Serial | Yes |
| JTAG | SPI header only |
Flash Layout
| Layer0 | m25p80 spi0.0: w25q128jv (16384 Kbytes) | ||||||
|---|---|---|---|---|---|---|---|
| Layer1 | mtd0 0x000000000000-0x000000040000 256 KiB |
mtd6 0x000000040000-0x000001000000 16128 KiB |
|||||
| Layer2 | mtd1 0x000000000000- 0x00000000f000 3,75 KiB |
mtd2 0x00000000f000- 0x000000010000 4 KiB |
mtd3 0x000000010000- 0x00000001f000 3,75 KiB |
mtd4 0x000000020000- 0x000000021000 4 KiB |
mtd5 0x000000030000- 0x000000031000 4KiB |
mtd7 (minor-fw) 0x000000000000-0x0000001e0000 1920 KiB |
mtd8 (minor-fw) 0x0000001e0000-0x000000fc0000 14208 KiB |
| Layer3 | … 2752 KiB |
mtd9 (squashfs-split) 0x000000490000-0x000000fc0000 11456 KiB |
Opening the case
Case is held together by plastic clips on the bottom of case. To open, using screwdriver push clips in slots outwards, this will release bottom panel.
Serial
→ port.serial general information about the serial port, serial port cable, etc.

| Serial connection parameters for MikroTik RB750Gr3 | 115200, 8N1 |
|---|
Use this line for connecting via screen (assuming a typical USB UART dongle):
screen /dev/ttyUSB0 115200,cs8,parenb,-cstopb
JTAG
→ port.jtag general information about the JTAG port, JTAG cable, etc.
How to connect to the JTAG Port of this specific device:Insert photo of PCB with markings for JTAG port
MMC/SDCARD
To get support for the SD card slot install:
opkg install kmod-sdhci-mt7620
To extend the internal 16M memory look at extroot_configuration.
Preparation, Setup, First Use
1. Storage preparation.
Insert microSD card (device should be powered off when inserting microSD card) or USB flash into device.
Note: As microSD slot is located on the bottom side of device the card needs to be upside down when attempting to insert it as illustrated in icon on the front of the device.
- Power devices back on.
- Check if RouterOS sees the attached storage medium:
"/disk print"
If printout returns something similar to this, then system sees the disk.
 > disk pr
# NAME            LABEL           TYPE    DISK                 FREE       SIZE
0 disk1                           fat32    SD                 116.0GiB     117.0GiB
If added disk by default is formatted with fat32 file-system then we recommend to re-format it to ext3 file-system.
First you will need to eject it:
"disk eject-drive (disk_number)"
After that you can proceed with re-formatting it:
"/disk format-drive 0 file-system=ext3"
Note that the bigger attached disk is the longer it will take to format it. After process is finished reboot the device to re-mount the disk.
 > disk format-drive 0 file-system=ext3
 formatted: 100%
2. Server package installation.
Now that disk is prepared for use you need to install The Dude server package on this system.
Server packages for all systems that support The Dude server can be found in main download page: http://www.mikrotik.com/download
You need to download Server and Client for version that you are using on device. Or update device to latest (Current) version and use Client/Server from this version.
When you have the server package just upload .npk file to device via any of available file transfer methods in RouterOS: Winbox(drag’n’drop), Webfig, FTP or SFPT.
After files are on device just run: «/system reboot» (y/n to confirm the action) and package will install it self during this reboot cycle.
3. First use.
Change server data-path to usb flash or mircoSD card:
"/dude set data-directory=disk1/dude-data"
Enable server:
"/dude set enabled=yes"
Check if server is running:
"/dude print"
 > dude print
         enabled: yes
  data-directory: disk1/dude-data
          status: running
4. Connect to server.
Now server is up and running and you can connect to it with The Dude client and start adding devices to monitor.
- For logging into server from client you need to use the same Admin account that you use on server host device.
- Now proceed with your network auto-discovery or cancel this process and add devices manually.
Note: First time auto-discovery is set to scan network to 2 recursive hops. In case if you do not want this scan to go out of range which you have entered in «Scan Networks» field then change «Recursive Hops» to 0 value.
Эксклюзивный обзор Mikrotik hEX-S от ЗАО «Вива-Телеком»
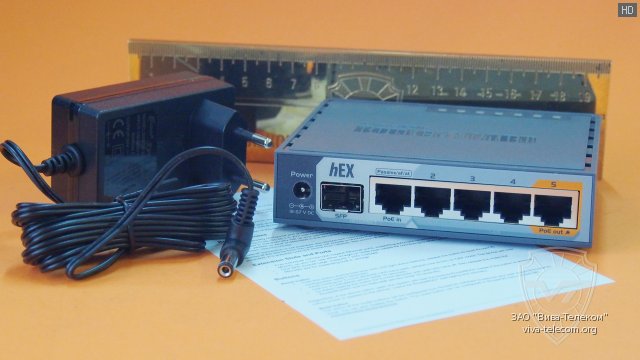
«Комплект поставки маршрутизатора MikroTik hEX S (RB760iGS).Поставляется в картонной коробке, маршрутизатор, блок питания и краткое руководство пользователя.»
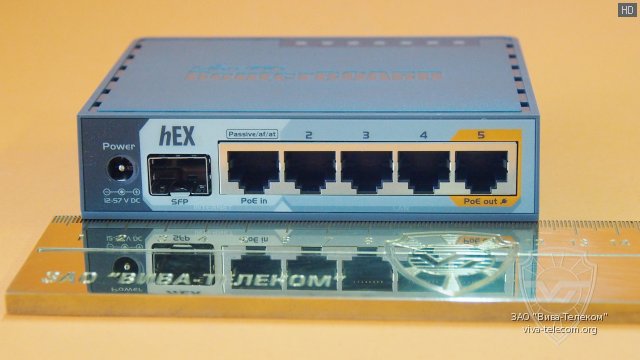
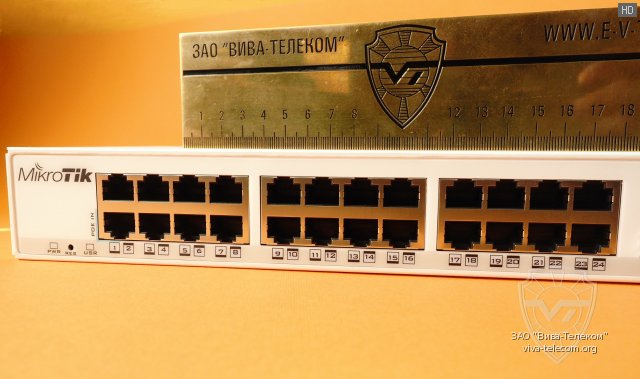
«Все сетевые интерфейсы роутера MikroTik hEX S (RB760iGS) расположены на передней панели.Рассмотрим по порядку слева направо:- первым видим разъем подключения электропитания- вторым идет 1х SFP порт со скоростью передачи данных до 1.25 ГБит/с (SFP модуль в комплекте поставки не поставляется)- и далее порты ETH1-ETH5.ETH1 порт с возможностью питания устройства посредством технологии PoE.ETH5 порт может уже сам запитать стороннее устройство по PoE, надо только знать что более 500 мА порт не выдаст.»
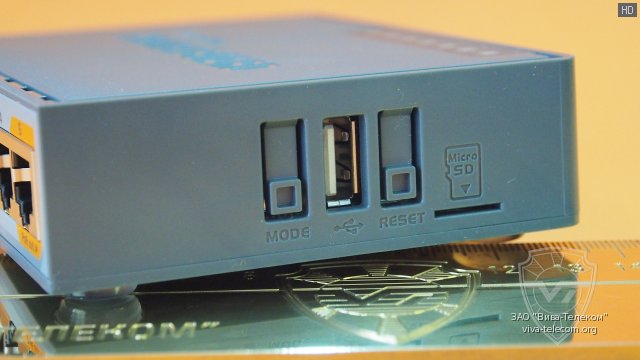
«Кнопки Mode, Reset, порт USB и слот для карты памяти MicroSD в маршрутизаторе MikroTik hEX S, расположены на боковой стороне корпуса.»
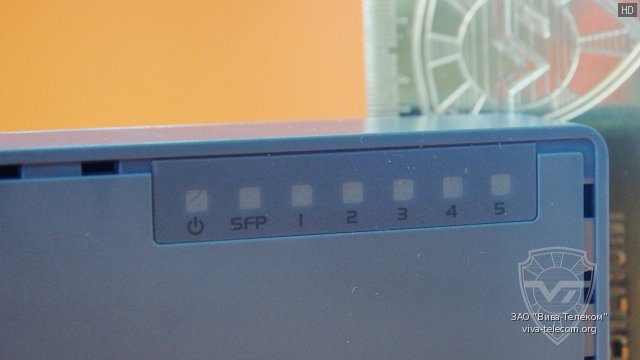
«На верхней крышке корпуса, производителем предусмотрены светодиодные индикаторы активности устройства и сетевых портов.»
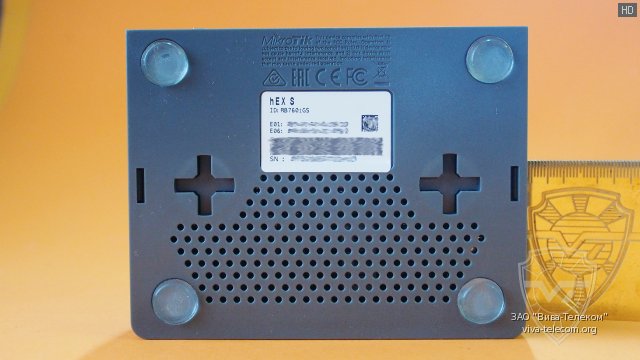
«На нижней крышке корпуса MikroTik hEX S по углам присутствуют противоскользящие ножки, устройство будет устойчиво и не поцарапает ваш стол.Четырехсторонние пазы для закрепления корпуса на стене (потолке) и другой поверхности.А множественная перфорация необходима для лучшего отвода тепла от платы.»
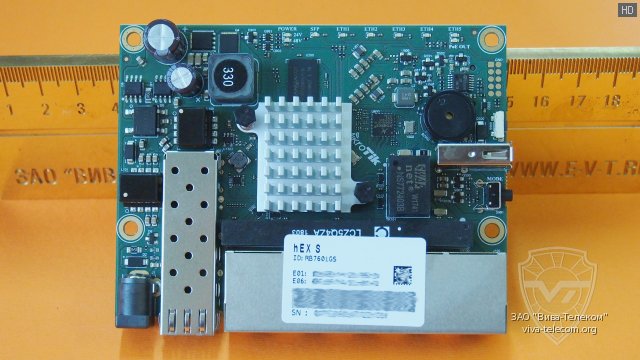
«Внешний вид платы маршрутизатора, видны все навесные элементы MikroTik hEX S (RB760iGS).»
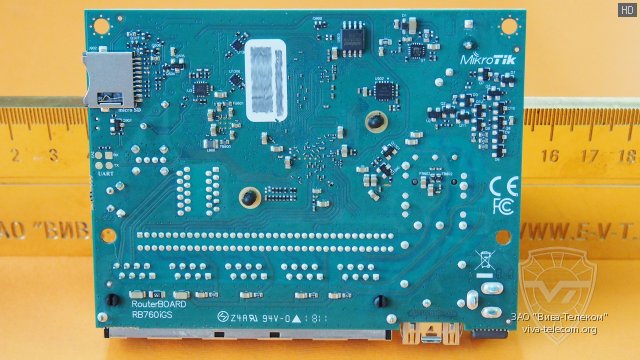
«Печатная плата RB760iGS, вид сзади.»
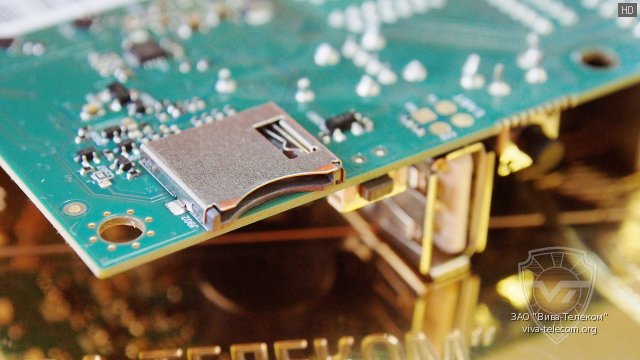
«Слот MicroSD на плате роутера MikroTik hEX S (RB760iGS).»
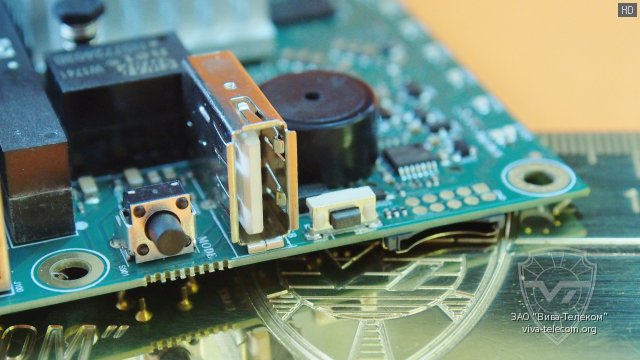
«Порт USB, кнопки RESET и MODE.Кнопки подписаны, так что если случится невозможное, у вас получилось расколоть корпус и потерять его, вы не перепутаете кнопки.»
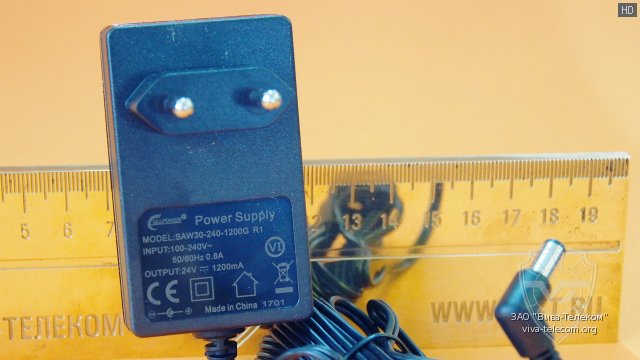
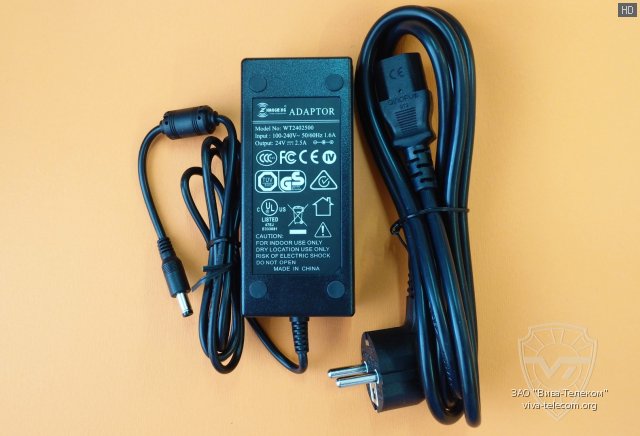
«Блок питания для маршрутизатора MikroTik hEX S (RB760iGS).Выходные параметры адаптера: 24 В, 1,2 А.»
Обзоры других сетевых маршрутизаторов Mikrotik от ЗАО «Вива-Телеком»
| Обзор Mikrotik RouterBOARD-RB3011UiAS-RM11 фото в обзоре | Обзор Mikrotik RB4011iGS+5HacQ2HnD-IN10 фото в обзоре | Обзор Mikrotik RouterBOARD-2011iL-RM9 фото в обзоре |
| Обзор Mikrotik RouterBOARD-RB2011UiAS-2HnD-IN8 фото в обзоре | Обзор Mikrotik RB4011iGS-plus-RM10 фото в обзоре | Обзор Mikrotik hEX PoE lite9 фото в обзоре |
|
Контакты полностью | Краснодар(861) 945-35-55krasnodar@viva-telecom.orgМосква(499) 392-10-00msk@viva-telecom.org Омск(3812) 50-60-00omsk@viva-telecom.orgСтатус счета |
Контакты и поддержкаНовости от 12.08.2020Наши преимуществаО компанииОплатаДоставка
КраснодарСолнечная, д. 4Б, офис 200+7 (861) 945-35-55krasnodar@viva-telecom.orgМоскваМО, Подольск, Рощинская, 22А, офис 302+7 (499) 392-10-00msk@viva-telecom.orgОмск7-я Северная, д. 186+7 (3812) 50-60-00omsk@viva-telecom.org
| Перейти в корзину |
| Перейти в закладки |
| Оборудование и решения профессионалов. 11 лет успешной работыФлагманский сайт и онлайн-магазин компании Вива-Телеком |
Programming the W25Q128FV flash chip
Pin Header Pinout
| Header Pin | Purpose |
|---|---|
| 1 | CLK |
| 2,10 | GND |
| 3 | DO |
| 4 | VCC |
| 5 | CS |
| 6,7 | Not Connected |
| 8 | Program |
| 9 | DI |
Note that in case you want to program the flash chip pin 8 should be tied to GND. This freezes operation of the SoC so that it doesn’t interfere with the programming process. You should also NOT connect VCC to the programmer, instead power the 750gr3 using its normal power supply. This removes the possibility of overloading the USB/Programmer supply.
Although the original author of this section used a Bus Pirate, you can obtain CH341A type USB EEPROM programmer for very little money. There are several advantages to this, one of which being that the programmer has a 16 pin EEPROM socket on board, so you can simply wire the header of the 750gr3 to a DIL socket and plug it in. If you do this, you should wire the pins as follows:
| 750Gr3 Header Pin | DIL pin |
|---|---|
| 1 | 10 |
| 2 | 1 |
| 3 | 6 |
| 5 | 5 |
| 8 | 8 |
| 9 | 9 |
All other pins should remain disconnected. To be safe, you should first plug the DIL into the programmer — this connects pin 8 of the header to GND and prevents the 750 booting up. Then, power on the 750. Then plug the programmer into the USB. It probably doesn’t matter, but this order prevents any signals being applied to the flash chip before the chip itself is powered.
The exact procedure for flashing the image to the W25Q128FV flash chip depends on your flasher. In this example, I used a bus pirate with flashrom. The connections and commands follow this guide: https://www.flashrom.org/Bus_Pirate. Using the bus pirate, reading and writing to the chip can take a very long time!
To make a backup using flashrom and the bus pirate, run the following command multiple times, making sure that each time you get the same image (to be sure you can trust the flasher and chip).
flashrom -p buspirate_spi:dev=/dev/ttyUSB0 -r stock_rb750gr3.bin
Finally, to write your constructed image:
flashrom -p buspirate_spi:dev=/dev/ttyUSB0 -w final.bin
NOTE If flashrom is taking a long time and you want to make sure it’s still working, use the -VVV argument to enable verbose output.
You should now be able to boot the device and connect to it via SSH like normal after installing OpenWrt/LEDE.
Troubleshooting Make sure the chip is recognized/probed correctly by flashrom. Check all the connections, use a SOIC8 test clamp to connect to the chip (you can find one on ebay or amazon).
Обзоры других сетевых маршрутизаторов Mikrotik от ЗАО «Вива-Телеком»
| Обзор Mikrotik RouterBOARD-RB3011UiAS-RM11 фото в обзоре | Обзор Mikrotik RB4011iGS+5HacQ2HnD-IN10 фото в обзоре | Обзор Mikrotik RouterBOARD-2011iL-RM9 фото в обзоре |
| Обзор Mikrotik RouterBOARD-RB2011UiAS-2HnD-IN8 фото в обзоре | Обзор Mikrotik RB4011iGS-plus-RM10 фото в обзоре | Обзор Mikrotik hEX PoE lite9 фото в обзоре |
|
Контакты полностью | Краснодар(861) 945-35-55krasnodar@viva-telecom.orgМосква(499) 392-10-00msk@viva-telecom.org Омск(3812) 50-60-00omsk@viva-telecom.orgСтатус счета |
Контакты и поддержкаНовости от 12.08.2020Наши преимуществаО компанииОплатаДоставка
КраснодарСолнечная, д. 4Б, офис 200+7 (861) 945-35-55krasnodar@viva-telecom.orgМоскваМО, Подольск, Рощинская, 22А, офис 302+7 (499) 392-10-00msk@viva-telecom.orgОмск7-я Северная, д. 186+7 (3812) 50-60-00omsk@viva-telecom.org
| Перейти в корзину |
| Перейти в закладки |
| Оборудование и решения профессионалов. 11 лет успешной работыФлагманский сайт и онлайн-магазин компании Вива-Телеком |
Обзор и фотографии Mikrotik hEX-S