Переход с устаревшей команды iwconfig (wireless_tools) на iw
Содержание:
Настройка хостинга
На предыдущем шаге представлена ссылка на статью, по которой мы сконфигурировали полноценный веб-сервер. Но для хостинга необходимо внести некоторые дополнительные настройки.
Общий пользователь
Так как к одним и тем же каталогам необходимы права доступа для nginx и apache, создаем общую группу и добавим в нее учетные записи, от которых работают данные веб-сервисы.
Добавим группу virtwww:
groupadd virtwww
Задаем созданную группу как дополнительную для apache и nginx:
usermod apache -G virtwww
usermod nginx -G virtwww
Запуск виртуальных доменов от определенного пользователя
Чтобы каждый виртуальный домен apache мог работать от отдельного пользователя, устанавливаем модуль httpd-itk:
yum install httpd-itk
После открываем следующий файл:
vi /etc/httpd/conf.modules.d/00-mpm-itk.conf
и снимаем комментарий для LoadModule — получится:
LoadModule mpm_itk_module modules/mod_mpm_itk.so
Настройка Apache
Добавим разрешения на каталоги, в которых будут храниться файлы сайтов:
vi /etc/httpd/conf/httpd.conf
<Directory /var/www/*/*/www>
AllowOverride All
Options Indexes ExecCGI FollowSymLinks
Require all granted
</Directory>
<Directory /var/www/*/*/cgi>
AllowOverride All
Options Indexes ExecCGI FollowSymLinks
Require all granted
</Directory>
* по предложенной статье права были выданы на каталоги /var/www/*/www, для хостинга мы будем использовать немного другую вложенность.
Способ 2. VlanXX
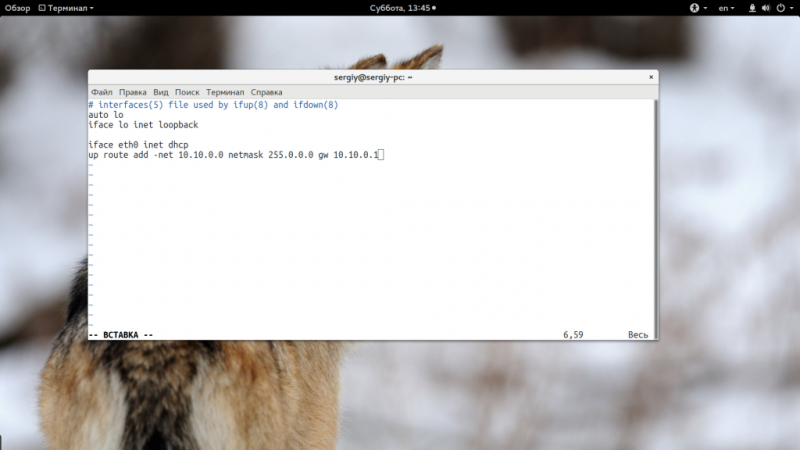
Создаем файл со следующим содержимым:
vi /etc/sysconfig/network-scripts/ifcfg-vlan5
ONBOOT=yes
TYPE=Ethernet
VLAN=yes
VLAN_NAME_TYPE=VLAN_PLUS_VID_NO_PAD
DEVICE=vlan5
PHYSDEV=ens32
VLAN_ID=5
BOOTPROTO=static
IPADDR=192.168.0.15
NETMASK=255.255.255.0
GATEWAY=192.168.0.1
DNS1=192.168.0.2
DNS2=192.168.0.3
* обратите внимание, что в данном варианте мы явно указываем, с каким физическим адаптером (ens32) будет связан виртуальный (vlan5). Также перезапускаем сетевую службу:
Также перезапускаем сетевую службу:
systemctl restart network
vlan_name_type
Параметр vlan_name_type, который мы прописали в данном способе задает тип именования VLAN-интерфейса. Он может принимать следующие значения:
- VLAN_PLUS_VID — vlan00005
- VLAN_PLUS_VID_NO_PAD — vlan5
- DEV_PLUS_VID — ens32.00005
- DEV_PLUS_VID_NO_PAD — ens32.5
Объединение сетевых интерфейсов
Чтобы настройки были постоянными (объединение сети также работало после перезагрузки компьютера), мы настроим сеть через ifcfg-файлы.
Создаем конфигурационный файл для team:
vi /etc/sysconfig/network-scripts/ifcfg-team0
ONBOOT=yes
DEVICE=team0
BOOTPROTO=static
DEVICETYPE=Team
NM_CONTROLLED=no
IPADDR=192.168.1.15
NETMASK=255.255.255.0
GATEWAY=192.168.1.1
DNS1=77.88.8.8
DNS2=8.8.4.4
DOMAIN=dmosk.local
TEAM_CONFIG='{«runner»: {«name»: «loadbalance»}, «link_watch»: {«name»: «ethtool»}}’
* где TEAM_CONFIG — настройка объединения для интерфейса в формате json; подробнее, о настройке сети в CentOS читайте в статье Настройка сети в CentOS.
В примере выше мы используем runner loadbalance — балансировку трафика. Вот возможные варианты и их описание:
| Runner | Описание |
|---|---|
| lacp | Объединение сетевых интерфейсов с помощью протокола LACP (802.3ad). |
| broadcast | Весь трафик идет через все порты. |
| roundrobin | Трафик идет через все интерфейсы поочередно в случайном порядке. |
| loadbalance | Равномерное распределение трафика между всеми интерфейсами. |
| activebackup | Используется только один интерфейс. Остальные подключаются, при недоступности основного в соответствии с выставленными приоритетами. |
Также настроим физические интерфейсы (в данном примере ens32 и ens34):
vi /etc/sysconfig/network-scripts/ifcfg-ens32
ONBOOT=yes
DEVICE=ens32
DEVICETYPE=TeamPort
NM_CONTROLLED=no
TEAM_MASTER=team0
… и ens34:
vi /etc/sysconfig/network-scripts/ifcfg-ens34
ONBOOT=yes
DEVICE=ens34
DEVICETYPE=TeamPort
NM_CONTROLLED=no
TEAM_MASTER=team0
Перезапускаем сетевую службу:
Если один из сетевых адаптеров уже используется, то перезапуск сети может привести к потере удаленного доступа. В таком случае, необходимо перезапустить компьютер командойshutdown -r now.
systemctl restart network
Проверяем состояние team:
teamdctl team0 state
… в моем случае это было:
setup:
runner: loadbalance
ports:
ens32
link watches:
link summary: up
instance:
name: ethtool
link: up
down count: 0
ens34
link watches:
link summary: up
instance:
name: ethtool
link: up
down count: 0
* как видим, используется runner loadbalance; объединены интерфейсы ens32 и ens34, которые находятся в состоянии up.
Командой:
ip a
… мы можем посмотреть состояние интерфейсов и назначенные IP-адреса.
Configure Network Bridge using NMTUI (NetworkManager)
The text user interface tool can be used to configure network bridge in a terminal window. Issue the following command to start the tool:
# nmtui
The text user interface appears. Any invalid command prints a usage message.
NOTE:
After executing nmtui, to navigate, use the arrow keys or press to step forwards and press to step back through the options. Press to select an option. The bar toggles the status of a check box.
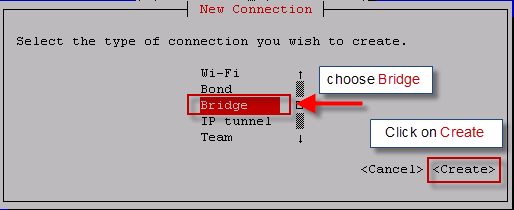
From the starting menu, select Edit a connection. Select Add, the New Connection screen opens.
Select Bridge using which you wish to configure network bridge, the Edit connection screen opens.
Give a Profile name and Device name to the bridge.
To add slave interfaces to the bridge select Add, the New Connection screen opens.
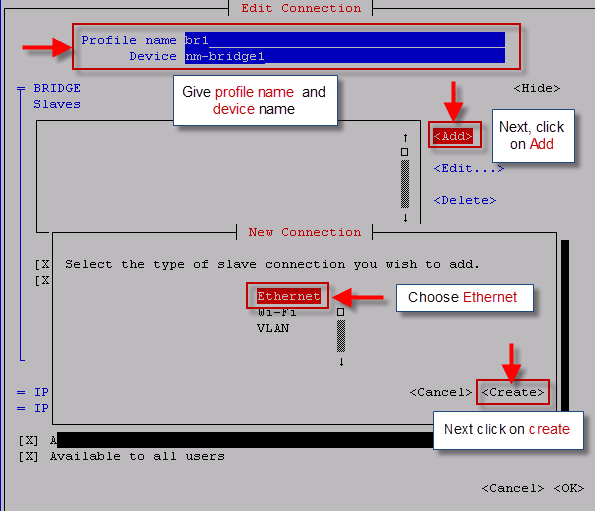
Enter the required slave’s device name or MAC address in the Device section and select the OK button.
NOTE:
If you do not specify a MAC address, the Device section automatically populates once the Edit Connection window reloads, but only if it successfully finds the device.
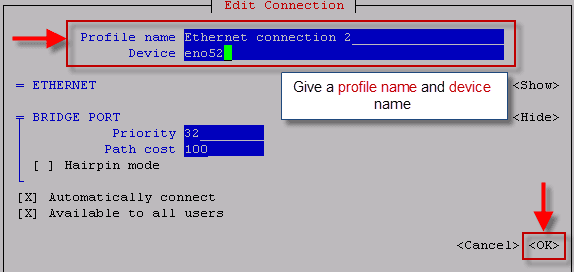
The name of the bridge slave appears in the Slaves section.
If you have a DHCP server then you can leave the IPv4 and IPv6 Address set to «Automatic». If you wish to assign static IP then manually fill in the network details as shown below. Since we are not using IPv6 so I have set IPv6 Configuration as Ignore.
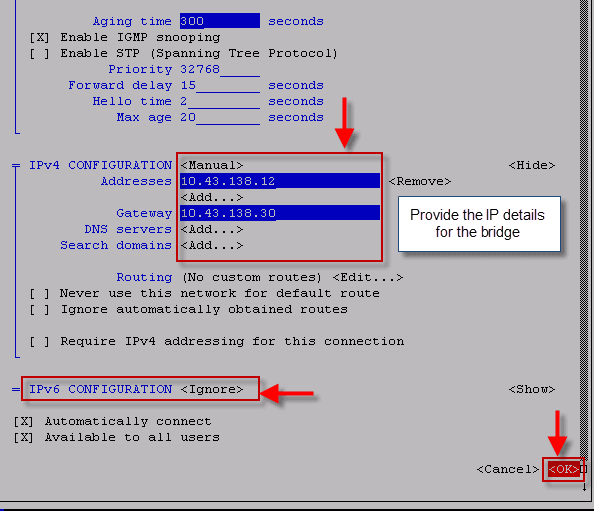
Review and confirm the settings before selecting the button which will exit the nmtui (NetworkManager) utility..
Next restart your network services for the changes to take affect.
# systemctl restart network
Now check your network configuration
# ifconfig
eno51: flags=4163<UP,BROADCAST,RUNNING,MULTICAST> mtu 1500
ether 9c:dc:71:77:ef:51 txqueuelen 1000 (Ethernet)
RX packets 9856 bytes 554308 (541.3 KiB)
RX errors 0 dropped 0 overruns 0 frame 0
TX packets 0 bytes 0 (0.0 B)
TX errors 0 dropped 0 overruns 0 carrier 0 collisions 0

eno52: flags=4163<UP,BROADCAST,RUNNING,MULTICAST> mtu 1500
ether 9c:dc:71:77:ef:59 txqueuelen 1000 (Ethernet)
RX packets 9895 bytes 557714 (544.6 KiB)
RX errors 0 dropped 0 overruns 0 frame 0
TX packets 73 bytes 10718 (10.4 KiB)
TX errors 0 dropped 0 overruns 0 carrier 0 collisions 0

lo: flags=73<UP,LOOPBACK,RUNNING> mtu 65536
inet 127.0.0.1 netmask 255.0.0.0
inet6 ::1 prefixlen 128 scopeid 0x10<host>
loop txqueuelen 1 (Local Loopback)
RX packets 15454 bytes 1232040 (1.1 MiB)
RX errors 0 dropped 0 overruns 0 frame 0
TX packets 15454 bytes 1232040 (1.1 MiB)
TX errors 0 dropped 0 overruns 0 carrier 0 collisions 0

nm-bridge1: flags=4163<UP,BROADCAST,RUNNING,MULTICAST> mtu 1500
inet 10.43.138.12 netmask 255.255.255.255 broadcast 10.43.138.12
inet6 fe80::9edc:71ff:fe77:ef59 prefixlen 64 scopeid 0x20<link>
ether 9c:dc:71:77:ef:59 txqueuelen 1000 (Ethernet)
RX packets 46 bytes 2324 (2.2 KiB)
RX errors 0 dropped 0 overruns 0 frame 0
TX packets 37 bytes 5336 (5.2 KiB)
TX errors 0 dropped 0 overruns 0 carrier 0 collisions 0

virbr0: flags=4163<UP,BROADCAST,RUNNING,MULTICAST> mtu 1500
inet 192.168.122.1 netmask 255.255.255.0 broadcast 192.168.122.255
ether 52:54:00:2c:4b:76 txqueuelen 1000 (Ethernet)
RX packets 2892 bytes 617616 (603.1 KiB)
RX errors 0 dropped 0 overruns 0 frame 0
TX packets 4322 bytes 372843 (364.1 KiB)
TX errors 0 dropped 0 overruns 0 carrier 0 collisions 0

vnet1: flags=4163<UP,BROADCAST,RUNNING,MULTICAST> mtu 1500
inet6 fe80::fc54:ff:fe1c:8df6 prefixlen 64 scopeid 0x20<link>
ether fe:54:00:1c:8d:f6 txqueuelen 1000 (Ethernet)
RX packets 162 bytes 46797 (45.7 KiB)
RX errors 0 dropped 0 overruns 0 frame 0
TX packets 1487 bytes 85335 (83.3 KiB)
TX errors 0 dropped 0 overruns 0 carrier 0 collisions 0
Finally now we will validate our bridge connectivity
# ping 10.43.138.30
PING 10.43.138.30 (10.43.138.30) 56(84) bytes of data.
64 bytes from 10.43.138.30: icmp_seq=1 ttl=64 time=39.4 ms
64 bytes from 10.43.138.30: icmp_seq=2 ttl=64 time=10.8 ms
^C
--- 10.43.138.30 ping statistics ---
2 packets transmitted, 2 received, 0% packet loss, time 1001ms
rtt min/avg/max/mdev = 10.826/25.147/39.469/14.322 ms
So we can connect to our gateway which means our bridge is working as expected.
Configure network bridge via CLI
To configure network bridge, create a file in the directory called , replacing with the number for the interface, such as 0. For our case we will create
The contents of the bridge interface file and ethernet interface file is almost. The differences in this example are as follows:
- The directive is given an interface name as its argument in the format , where is replaced with the number of the interface.
- The directive is given an argument Bridge. This directive determines the device type and the argument is case sensitive.
- The bridge interface configuration file now has the IP address and the physical interface has only a MAC address.
- An extra directive, , is added to prevent the bridge from waiting while it monitors traffic, learns where hosts are located, and builds a table of MAC addresses on which to base its filtering decisions.
- Add to the Ethernet interface to prevent NetworkManager from altering the file.
The following is a sample bridge interface configuration file using a static IP address:
# cat ifcfg-br1
DEVICE=nm-bridge1
STP=no
TYPE=Bridge
BOOTPROTO=none
IPADDR=10.43.138.12
PREFIX=32
GATEWAY=10.43.138.30
IPV6INIT=no
NAME=br1
ONBOOT=yes
DELAY=0
To complete network bridge we must create another interface, or you can use an existing interface, and point it to the bridge interface. The following is a sample Ethernet interface configuration file pointing to a bridge interface. Configure your physical interface in , where is a unique number corresponding to a specific interface, as follows:
# cat ifcfg-Ethernet_connection_2
TYPE=Ethernet
NAME="Ethernet connection 2"
DEVICE=eno52
ONBOOT=yes
BRIDGE=nm-bridge1
NOTE:
Due to consistent network device naming the interface name can be or or will depend upon the network card type.
Finally restart your network service for the changes to take affect
# systemctl restart network
I hope the article to configure network bridge using NetworkManager nmtui on RHEL/CentOS 7/8 Linux was useful. Please let me know your feedback and views using the comment box below.