Документация по mysqldump
Содержание:
Создание простого резервной копии базы данных
# mysqldump -u username -p DB_name > your_file.sql
Это создает файл, содержащий все операторы MySQL для создания таблиц и восстановление данных в существующую базу данных. Если целевая база данных содержит таблицы с одинаковыми именами, они будут перезаписаны. Если вы хотите существующие таблицы, которые будут отброшены и заново использованы, то используйте опцию » add-drop-table»:
# mysqldump --add-drop-table -u username -p DB_name > your_file.sql
Кроме того, вы можете выбрать это в качестве альтернативы:
# mysqldump --add-drop-databases -u username -p DB_name > your_file.sql
Debug options
The following options print debugging information, encode debugging information in the dump file, or let the dump operation proceed regardless of potential problems.
--allow-keywords |
Permit creation of column names that are keywords. This works by prefixing each column name with the table name. |
--comments-i |
Write additional information in the dump file such as program version, server version, and host. This option is enabled by default. To suppress this additional information, use —skip-comments. |
--debug[=debug_options]-# [debug_options] |
Write a debugging log. A typical debug_options string is d:t:o,file_name. The default value is d:t:o,/tmp/mysqldump.trace. |
--debug-check |
Print some debugging information when the program exits. |
--debug-info |
Print debugging information and memory and CPU usage statistics when the program exits. |
--dump-date |
If the —comments option is given, mysqldump produces a comment at the end of the dump of the following form:
-- Dump completed on DATE However, the date causes dump files taken at different times to appear to be different, even if the data are otherwise identical. —dump-date and —skip-dump-date control whether the date is added to the comment. The default is —dump-date (include the date in the comment). —skip-dump-date suppresses date printing. |
--force-f |
Continue even if an SQL error occurs during a table dump. One use for this option is to cause mysqldump to continue executing even when it encounters a view that has become invalid because the definition refers to a table that was dropped. Without —force, mysqldump exits with an error message. With —force, mysqldump prints the error message, but it also writes an SQL comment containing the view definition to the dump output and continues executing. |
--log-error=file_name |
Log warnings and errors by appending them to the named file. The default is to do no logging. |
--skip-comments |
See the description for the —comments option. |
--verbose-v |
Verbose mode. Print more information about what the program does. |
Transactional options
The following options trade off the performance of the dump operation, against the reliability and consistency of the exported data.
--add-locks |
Surround each table dump with LOCK TABLES and UNLOCK TABLES statements. This results in faster inserts when the dump file is reloaded. |
--flush-logs-F |
Flush the MySQL server log files before starting the dump. This option requires the RELOAD privilege. If you use this option in combination with the —all-databases option, the logs are flushed for each database dumped. The exception is when using —lock-all-tables, —master-data, or —single-transaction: In this case, the logs are flushed only once, corresponding to the moment that all tables are locked. If you want your dump and the log flush to happen at the same moment, you should use —flush-logs together with —lock-all-tables, —master-data, or —single-transaction. |
--flush-privileges |
Add a FLUSH PRIVILEGES statement to the dump output after dumping the mysql database. This option should be used any time the dump contains the mysql database and any other database that depends on the data in the mysql database for proper restoration. |
--lock-all-tables-x |
Lock all tables across all databases. This is achieved by acquiring a global read lock for the duration of the whole dump. This option automatically turns off —single-transaction and —lock-tables. |
--lock-tables-l |
For each dumped database, lock all tables to be dumped before dumping them. The tables are locked with READ LOCAL to permit concurrent inserts in the case of MyISAM tables. For transactional tables such as InnoDB, —single-transaction is a much better option than —lock-tables because it does not need to lock the tables at all. Because —lock-tables locks tables for each database separately, this option does not guarantee that the tables in the dump file are logically consistent between databases. Tables in different databases may be dumped in completely different states. Some options, such as —opt, automatically enable —lock-tables. If you want to override this, use —skip-lock-tables at the end of the option list. |
--no-autocommit |
Enclose the INSERT statements for each dumped table within SET autocommit = 0 and COMMIT statements. |
--order-by-primary |
Dump each table’s rows sorted by its primary key, or by its first unique index, if such an index exists. This is useful when dumping a MyISAM table to be loaded into an InnoDB table, but makes the dump operation take considerably longer. |
--single-transaction |
This option sets the transaction isolation mode to REPEATABLE READ and sends a START TRANSACTION SQL statement to the server before dumping data. It is useful only with transactional tables such as InnoDB, because then it dumps the consistent state of the database at the time when START TRANSACTION was issued without blocking any applications. When using this option, you should keep in mind that only InnoDB tables are dumped in a consistent state. For example, any MyISAM or MEMORY tables dumped while using this option may still change state. While a —single-transaction dump is in process, to ensure a valid dump file (correct table contents and binary log coordinates), no other connection should use the following statements: ALTER TABLE, CREATE TABLE, DROP TABLE, RENAME TABLE, TRUNCATE TABLE. A consistent read is not isolated from those statements, so use of them on a table to be dumped can cause the SELECT that is performed by mysqldump to retrieve the table contents to obtain incorrect contents or fail. The —single-transaction option and the —lock-tables option are mutually exclusive because LOCK TABLES causes any pending transactions to be committed implicitly. To dump large tables, combine the —single-transaction option with the —quick option. |
Copyright
Copyright 1997, 2012, Oracle and/or its affiliates. All rights reserved.
This documentation is free software; you can redistribute it and/or modify it only under the terms of the GNU General Public License as published by the
Free Software Foundation; version 2 of the License.
This documentation is distributed in the hope that it will be useful, but WITHOUT ANY WARRANTY; without even the implied warranty of MERCHANTABILITY or
FITNESS FOR A PARTICULAR PURPOSE. See the GNU General Public License for more details.
You should have received a copy of the GNU General Public License along with the program; if not, write to the Free Software Foundation, Inc., 51 Franklin
Street, Fifth Floor, Boston, MA 02110-1301 USA or see http://www.gnu.org/licenses/.
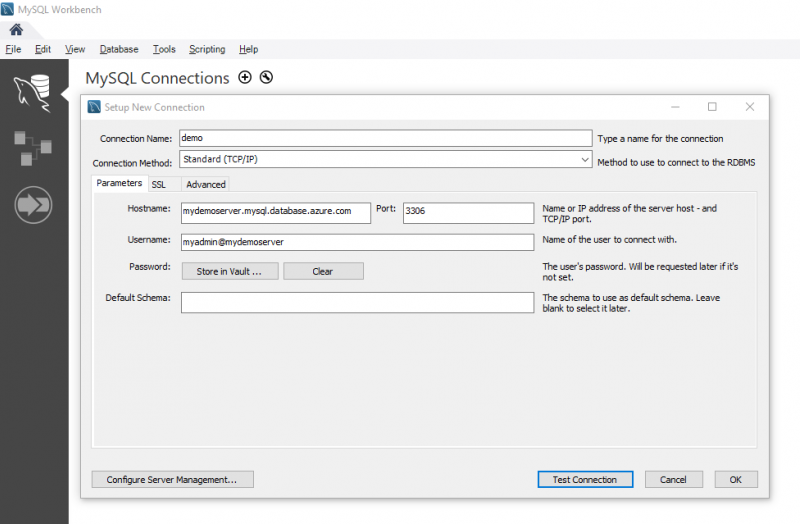
Перед началомBefore you begin
Прежде чем приступить к выполнению этого руководства, необходимо выполнить следующее:To step through this how-to guide, you need to have:
- создать сервер базы данных Azure для MySQL с помощью портала Azure;Create Azure Database for MySQL server — Azure portal
- установить на компьютере служебную программу командной строки mysqldump;mysqldump command-line utility installed on a machine.
- установить MySQL Workbench ссылка на скачивание MySQL Workbench или любой сторонний инструмент MySQL для выполнения команд дампа и восстановления.MySQL Workbench MySQL Workbench Download or another third-party MySQL tool to do dump and restore commands.
Если вы хотите перенести большие базы данных размером более 1 ТБ, попробуйте использовать такие средства сообщества, как mydumper/myloader, которые поддерживают параллельный экспорт и импорт.If you are looking to migrate large databases with database sizes more than 1 TBs, you may want to consider using community tools like mydumper/myloader which supports parallel export and import. Параллельный дамп и восстановление позволяют значительно сократить время миграции для больших баз данных.Parallel dump and restore can help significantly reduce migration time for large databases. Рекомендации по переносу больших баз данных в службу базы данных Azure для MySQL с помощью средств mydumper/myloader можно найти в блоге технического сообщества.You can refer to our techcommunity blog for best practices for migrating large databases to Azure Database for MySQL service using mydumper/myloader tools.
Восстановление
Может понадобиться создать базу данных. Это можно сделать SQL-запросом:
=# CREATE DATABASE users WITH ENCODING=’UTF-8′;
* где users — имя базы; UTF-8 — используемая кодировка.
Синтаксис:
psql <имя базы> < <файл с дампом>
Пример:
psql users < /tmp/users.dump
С авторизацией
При необходимости авторизоваться при подключении к базе вводим:
psql -U dmosk -W users < /tmp/users.dump
* где dmosk — имя учетной записи; опция W потребует ввода пароля.
Из файла gz
Сначала распаковываем файл, затем запускаем восстановление:
gunzip users.dump.gz
psql users < users.dump
Или одной командой:
zcat users.dump.gz | psql users
Определенную базу
Если резервная копия делалась для определенной базы, запускаем восстановление:
psql users < /tmp/database.dump
Если делался полный дамп (всех баз), восстановить определенную можно при помощи утилиты pg_restore с параметром -d:
pg_restore -d users cluster.bak
Определенную таблицу
Если резервная копия делалась для определенной таблицы, можно просто запустить восстановление:
psql users < /tmp/students.dump
Если делался полный дамп, восстановить определенную таблицу можно при помощи утилиты pg_restore с параметром -t:
pg_restore -a -t students users.dump
С помощью pgAdmin
Запускаем pgAdmin — подключаемся к серверу — кликаем правой кнопкой мыши по базе, для которой хотим восстановить данные — выбираем Восстановить:
Выбираем наш файл с дампом:
И кликаем по Восстановить:
Использование pg_restore
Данная утилита предназначена для восстановления данных не текстового формата (в одном из примеров создания копий мы тоже делали резервную копию не текстового формата).
Из бинарника:
pg_restore -Fc users.bak
Из тарбола:
pg_restore -Ft users.tar
С создание новой базы:
pg_restore -Ft -C users.tar
Description
The mysqldump client is a utility that performs logical backups, producing a set of SQL statements that can be run to reproduce the original schema objects, table data, or both. It dumps one or more MySQL database for backup or transfer to another SQL server. The mysqldump command can also generate output in CSV, other delimited text, or XML format.
mysqldump requires at least the SELECT privilege for dumped tables, SHOW VIEW for dumped views, TRIGGER for dumped triggers, and LOCK TABLES if the —single-transaction option is not used. Certain options might require other privileges as noted in the option descriptions.
To reload a dump file, you must have the same privileges needed to create each of the dumped objects by issuing CREATE statements manually.
mysqldump output can include ALTER DATABASE statements that change the database collation. These may be used when dumping stored programs to preserve their character encodings. To reload a dump file containing such statements, the ALTER privilege for the affected database is required.
Создание резервных копий
Синтаксис:
pg_dump <параметры> <имя базы> > <файл, куда сохранить дамп>
Пример:
pg_dump users > /tmp/users.dump
Пользователь и пароль
Если резервная копия выполняется не от учетной записи postgres, необходимо добавить опцию -U с указанием пользователя:
pg_dump -U dmosk -W users > /tmp/users.dump
* где dmosk — имя учетной записи; опция W потребует ввода пароля.
Сжатие данных
Для экономии дискового пространства или более быстрой передачи по сети можно сжать наш архив:
pg_dump users | gzip > users.dump.gz
Скрипт для автоматического резервного копирования
#!/bin/sh
PATH=/etc:/bin:/sbin:/usr/bin:/usr/sbin:/usr/local/bin:/usr/local/sbin
PGPASSWORD=password
export PGPASSWORD
pathB=/backup
dbUser=dbuser
database=db
find $pathB \( -name «*-1.*» -o -name «*-?.*» \) -ctime +61 -delete
pg_dump -U $dbUser $database | gzip > $pathB/pgsql_$(date «+%Y-%m-%d»).sql.gz
unset PGPASSWORD
* где password — пароль для подключения к postgresql; /backup — каталог, в котором будут храниться резервные копии; dbuser — имя учетной записи для подключения к БУБД.
* данный скрипт сначала удалит все резервные копии, старше 61 дня, но оставит от 15-о числа как длительный архив. После при помощи утилиты pg_dump будет выполнено подключение и резервирование базы db. Пароль экспортируется в системную переменную на момент выполнения задачи.
Для запуска резервного копирования по расписанию, сохраняем скрипт в файл, например, /scripts/postgresql_dump.sh и создаем задание в планировщике:
crontab -e
3 0 * * * /scripts/postgresql_dump.sh
* наш скрипт будет запускаться каждый день в 03:00.
На удаленном сервере
Если сервер баз данных находится на другом сервере, просто добавляем опцию -h:
pg_dump -h 192.168.0.15 users > /tmp/users.dump
* необходимо убедиться, что сама СУБД разрешает удаленное подключение. Подробнее читайте инструкцию Как настроить удаленное подключение к PostgreSQL.
Дамп определенной таблицы
Запускается с опцией -t <table> или —table=<table>:
pg_dump -t students users > /tmp/students.dump
* где students — таблица; users — база данных.
Размещение каждой таблицы в отдельный файл
Также называется резервированием в каталог. Данный способ удобен при больших размерах базы или необходимости восстанавливать отдельные таблицы. Выполняется с ипользованием ключа -d:
pg_dump -d customers > /tmp/folder
* где /tmp/folder — путь до каталога, в котором разместяться файлы дампа для каждой таблицы.
Только схемы
Для резервного копирования без данных (только таблицы и их структуры):
pg_dump —schema-only users > /tmp/users.schema.dump
Использование pgAdmin
Данный метод хорошо подойдет для компьютеров с Windows и для быстрого создания резервных копий из графического интерфейса.
Запускаем pgAdmin — подключаемся к серверу — кликаем правой кнопкой мыши по базе, для которой хотим сделать дамп — выбираем Резервная копия:
В открывшемся окне выбираем путь для сохранения данных и настраиваемый формат:
При желании, можно изучить дополнительные параметры для резервного копирования:
После нажимаем Резервная копия — ждем окончания процесса и кликаем по Завершено.
Не текстовые форматы дампа
Другие форматы позволяют делать частичное восстановление, работать в несколько потоков и сжимать данные.
Бинарный с компрессией:
pg_dump -Fc users > users.bak
Тарбол:
pg_dump -Ft users > users.tar
Directory-формат:
pg_dump -Fd users > users.dir
Использование pg_basebackup
pg_basebackup позволяет создать резервную копию для кластера PostgreSQL.
pg_basebackup -h node1 -D /backup
* в данном примере создается резервная копия для сервера node1 с сохранением в каталог /backup.
pg_dumpall
Данная утилита делает выгрузку всех баз данных, в том числе системных. На выходе получаем файл для восстановления в формате скрипта.
pg_dumpall > cluster.bak
Утилиту удобно использовать с ключом -g (—globals-only) — выгрузка только глобальных объектов (ролей и табличных пространств).
Для создание резервного копирования со сжатием:
pg_dumpall | gzip > cluster.tar.gz