What is gunicorn, and what does it do?
Содержание:
- Prerequisites and Goals
- Creating the PostgreSQL Database and User
- Conclusion
- Configure Nginx to Proxy Pass to Gunicorn
- Install and Configure VirtualEnv and VirtualEnvWrapper
- Prerequisites and Goals
- Web Server Gateway Interface
- Кеширование частей шаблонов
- Кеширование средствами nginx
- Creating systemd Socket and Service Files for Gunicorn
- Step 7 — Testing Socket Activation
- Prerequisites and Goals
- Шаг 5 — Настройка Nginx для работы с запросами прокси-сервера
- Testing Socket Activation
- Prerequisites and Goals
- Installing the Packages from the Ubuntu Repositories
- Creating the PostgreSQL Database and User
- Шаг 4 — Настройка Gunicorn
- 9: Устранение неполадок Nginx и Gunicorn
- ASGI frameworks
Prerequisites and Goals
In order to complete this guide, you should have a fresh Ubuntu 18.04 server instance with a basic firewall and a non-root user with privileges configured. You can learn how to set this up by running through our initial server setup guide.
We will be installing Django within a virtual environment. Installing Django into an environment specific to your project will allow your projects and their requirements to be handled separately.
Once we have our database and application up and running, we will install and configure the Gunicorn application server. This will serve as an interface to our application, translating client requests from HTTP to Python calls that our application can process. We will then set up Nginx in front of Gunicorn to take advantage of its high performance connection handling mechanisms and its easy-to-implement security features.
Let’s get started.
Creating the PostgreSQL Database and User
We’re going to jump right in and create a database and database user for our Django application.
By default, Postgres uses an authentication scheme called “peer authentication” for local connections. Basically, this means that if the user’s operating system username matches a valid Postgres username, that user can login with no further authentication.
During the Postgres installation, an operating system user named was created to correspond to the PostgreSQL administrative user. We need to use this user to perform administrative tasks. We can use sudo and pass in the username with the option.
Log into an interactive Postgres session by typing:
You will be given a PostgreSQL prompt where we can set up our requirements.
First, create a database for your project:
Note: Every Postgres statement must end with a semi-colon, so make sure that your command ends with one if you are experiencing issues.
Next, create a database user for our project. Make sure to select a secure password:
Afterwards, we’ll modify a few of the connection parameters for the user we just created. This will speed up database operations so that the correct values do not have to be queried and set each time a connection is established.
We are setting the default encoding to , which Django expects. We are also setting the default transaction isolation scheme to “read committed”, which blocks reads from uncommitted transactions. Lastly, we are setting the timezone. By default, our Django projects will be set to use . These are all recommendations from :
Now, we can give our new user access to administer our new database:
When you are finished, exit out of the PostgreSQL prompt by typing:
Postgres is now set up so that Django can connect to and manage its database information.
Conclusion
In this guide, we’ve set up two Django projects, each in their own virtual environments. We’ve configured uWSGI to serve each project independently using the virtual environment configured for each. Afterwards, we set up Nginx to act as a reverse proxy to handle client connections and serve the correct project depending on the client request.
Django makes creating projects and applications simple by providing many of the common pieces, allowing you to focus on the unique elements. By leveraging the general tool chain described in this article, you can easily serve the applications you create from a single server.
Configure Nginx to Proxy Pass to Gunicorn
Now that Gunicorn is set up, we need to configure Nginx to pass traffic to the process.
Start by creating and opening a new server block in Nginx’s directory:
Inside, open up a new server block. We will start by specifying that this block should listen on the normal port 80 and that it should respond to our server’s domain name or IP address:
/etc/nginx/sites-available/myproject
Next, we will tell Nginx to ignore any problems with finding a favicon. We will also tell it where to find the static assets that we collected in our directory. All of these files have a standard URI prefix of “/static”, so we can create a location block to match those requests:
/etc/nginx/sites-available/myproject
Finally, we’ll create a block to match all other requests. Inside of this location, we’ll include the standard file included with the Nginx installation and then we will pass the traffic directly to the Gunicorn socket:
/etc/nginx/sites-available/myproject
Save and close the file when you are finished. Now, we can enable the file by linking it to the directory:
Test your Nginx configuration for syntax errors by typing:
If no errors are reported, go ahead and restart Nginx by typing:
Finally, we need to open up our firewall to normal traffic on port 80. Since we no longer need access to the development server, we can remove the rule to open port 8000 as well:
You should now be able to go to your server’s domain or IP address to view your application.
Note: After configuring Nginx, the next step should be securing traffic to the server using SSL/TLS. This is important because without it, all information, including passwords are sent over the network in plain text.
If you have a domain name, the easiest way to get an SSL certificate to secure your traffic is using Let’s Encrypt. Follow this guide to set up Let’s Encrypt with Nginx on Ubuntu 20.04. Follow the procedure using the Nginx server block we created in this guide.
Install and Configure VirtualEnv and VirtualEnvWrapper
We will be installing our Django projects in their own virtual environments to isolate the requirements for each. To do this, we will be installing , which can create Python virtual environments, and , which adds some usability improvements to the work flow.
We will be installing both of these components using , the Python package manager. We can install this utility from the Ubuntu repositories.
If you are building your Django projects with Python 2, type:
If you are using Python 3, type:
Now that you have installed, we can install and globally. We will also upgrade to the latest version using itself.
If you are using Python 2, type:
If you are using Python 3, type:
With these components installed, we can now configure our shell with the information it needs to work with the script. Our virtual environments will all be placed within a directory in our home folder called for easy access. This is configured through an environmental variable called . We can add this to our shell initialization script and can source the virtual environment wrapper script.
If you are using Python 3 and the command, you will have to add an additional line to your shell initialization script as well:
Regardless of which version of Python you are using, you need to run the following commands:
Now, source your shell initialization script so that you can use this functionality in your current session:
You should now have directory called in your home folder which will hold virtual environment information.
Prerequisites and Goals
In order to complete this guide, you should have a fresh Ubuntu 16.04 server instance with a non-root user with privileges configured. You can learn how to set this up by running through our initial server setup guide.
We will be installing Django within a virtual environment. Installing Django into an environment specific to your project will allow your projects and their requirements to be handled separately.
Once we have our database and application up and running, we will install and configure the Gunicorn application server. This will serve as an interface to our application, translating client requests in HTTP to Python calls that our application can process. We will then set up Nginx in front of Gunicorn to take advantage of its high performance connection handling mechanisms and its easy-to-implement security features.
Let’s get started.
Web Server Gateway Interface
As described in PEP3333, the Python Web Server Gateway Interface
(WSGI) is a way to make sure that web servers and python web applications can talk to each other.
To be more precise:
So somewhere inside your application (usually a wsgi.py file) an object is defined which can be
invoked by Gunicorn. This object is used to pass request data to your application, and to
receive response data.
Gunicorns takes care of running multiple instances of your web application, making sure they are healthy and restart them as needed,
distributing incoming requests across those instances and communicate with the web server.
In addition to that, Gunicorn is pretty darn fast about it. A lot of effort has gone into optimizing it.
Кеширование частей шаблонов
Теперь рассмотрим наиболее правильный и эффективный метод кеширования, который заключается в сохранении только избранных частей сгенерированных веб-страниц. С его помощью мы можем сделать так, чтобы при обращении к веб-серверу заново генерировались только те элементы страницы, которые реально часто меняются, а такие элементы, как хидер, футер, меню сайта, и многие другие «долгоживущие» элементы страницы загружались из кеша.
Конфиг uWSGI для Django
Основной профит этого метода в его чрезвычайной эффективности, а также нетребовательности к ресурсам машины. Даже если хранить кеш в базе данных или в обычном файле, скорость отдачи кеша по определению будет выше скорости генерирования указанных частей шаблона и выборки из базы данных. В то же время этот метод не так просто применить, как предыдущие два: для этого требуется понимать структуру сайта и в основных чертах знать, как работает система шаблонов Django, что относится больше к веб-девелопингу, чем к тематике рубрики. Как бы там ни было, не рассказать об этом типе кеширования нельзя, поэтому приступим к его рассмотрению. Для инструктирования Django о помещении какого-либо блока сайта в кеш предусмотрен шаблонный тег с одноименным именем cache, принимающий два обязательных аргумента: время жизни кеша в секундах и имя кеш-блока, которое может быть произвольным. В дефолтной библиотеке тегов его нет, поэтому перед использованием этого тега следует подключить одноименную библиотеку с помощью директивы load (размещаем соответствующую строку в начале нужных шаблонов):
Типичный пример использования cache может выглядеть следующим образом:
Здесь всё просто. Есть блок header и два вложенных блока logo и menu, обрамленные блоком cache. Это значит, что сгенерированные фрагменты страницы из блоков logo и menu попадают в кеш, где живут ровно 5000 секунд, после чего генерируются снова. В такие же блоки cache можно помещать и другие элементы веб-страниц, варьируя время жизни кеша в зависимости от предполагаемого времени их жизни.
Кеширование средствами nginx
Хоть это и малоэффективно, но кеширование можно настроить и с помощью nginx. Для этого можно использовать директивы proxy_store и try_files:
В результате все запрашиваемые файлы будут помещаться в каталог /var/www/cache (лучше примонтировать к нему tmpfs, чтобы файлы хранились в оперативной памяти), однако чистить его придется вручную (удаление файлов старше 10 минут):
Также можно поместить эти команды в cron.
Чтобы активировать кеширование для блоков, содержимое которых меняется предсказуемым образом с учетом каких-либо данных (например, различные сайдбары для зарегистрированных юзеров и анонимусов, страницы одной статьи и т. д.), следует указать переменные, содержащие эти данные, в качестве аргументов. Например:
В результате система кеширования будет создавать индивидуальные записи в кеше для разных пользователей на основе их ников.
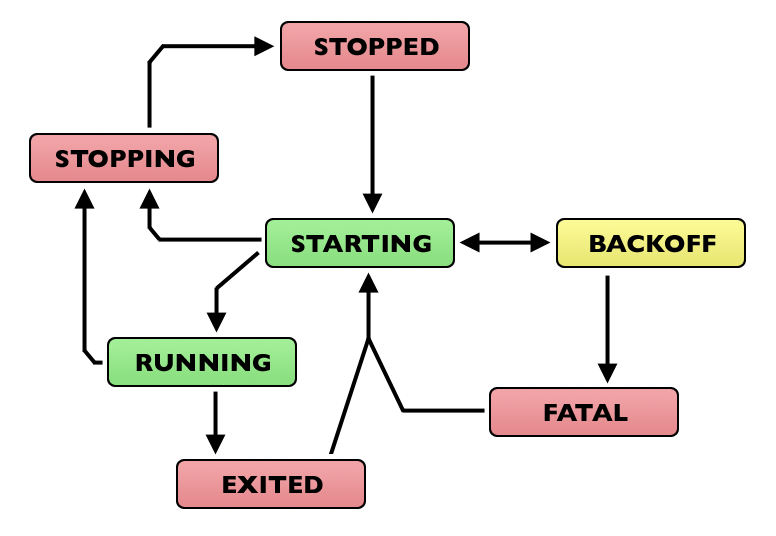
Creating systemd Socket and Service Files for Gunicorn
We have tested that Gunicorn can interact with our Django application, but we should implement a more robust way of starting and stopping the application server. To accomplish this, we’ll make systemd service and socket files.
The Gunicorn socket will be created at boot and will listen for connections. When a connection occurs, systemd will automatically start the Gunicorn process to handle the connection.
Start by creating and opening a systemd socket file for Gunicorn with privileges:
Inside, we will create a section to describe the socket, a section to define the socket location, and an section to make sure the socket is created at the right time:
/etc/systemd/system/gunicorn.socket
Save and close the file when you are finished.
Next, create and open a systemd service file for Gunicorn with privileges in your text editor. The service filename should match the socket filename with the exception of the extension:
Start with the section, which is used to specify metadata and dependencies. We’ll put a description of our service here and tell the init system to only start this after the networking target has been reached. Because our service relies on the socket from the socket file, we need to include a directive to indicate that relationship:
/etc/systemd/system/gunicorn.service
Next, we’ll open up the section. We’ll specify the user and group that we want to process to run under. We will give our regular user account ownership of the process since it owns all of the relevant files. We’ll give group ownership to the group so that Nginx can communicate easily with Gunicorn.
We’ll then map out the working directory and specify the command to use to start the service. In this case, we’ll have to specify the full path to the Gunicorn executable, which is installed within our virtual environment. We will bind the process to the Unix socket we created within the directory so that the process can communicate with Nginx. We log all data to standard output so that the process can collect the Gunicorn logs. We can also specify any optional Gunicorn tweaks here. For example, we specified 3 worker processes in this case:
/etc/systemd/system/gunicorn.service
Finally, we’ll add an section. This will tell systemd what to link this service to if we enable it to start at boot. We want this service to start when the regular multi-user system is up and running:
/etc/systemd/system/gunicorn.service
With that, our systemd service file is complete. Save and close it now.
We can now start and enable the Gunicorn socket. This will create the socket file at now and at boot. When a connection is made to that socket, systemd will automatically start the to handle it:
We can confirm that the operation was successful by checking for the socket file.
Step 7 — Testing Socket Activation
Currently, if you’ve only started the unit, the will not be active yet since the socket has not yet received any connections. You can check this by typing:
To test the socket activation mechanism, we can send a connection to the socket through by typing:
You should see the HTML output from your application in the terminal. This indicates that Gunicorn was started and was able to serve your Django application. You can verify that the Gunicorn service is running by typing:
If the output from or the output of indicates that a problem occurred, check the logs for additional details:
Check your file for problems. If you make changes to the file, reload the daemon to reread the service definition and restart the Gunicorn process by typing:
Make sure you troubleshoot the above issues before continuing.
Prerequisites and Goals
In order to complete this guide, you should have a fresh Ubuntu 14.04 server instance with a non-root user with privileges configured. You can learn how to set this up by running through our initial server setup guide.
We will be installing Django within a virtual environment. Installing Django into an environment specific to your project will allow your projects and their requirements to be handled separately.
Once we have our database and application up and running, we will install and configure the Gunicorn application server. This will serve as an interface to our application, translating client requests in HTTP to Python calls that our application can process. We will then set up Nginx in front of Gunicorn to take advantage of its high performance connection handling mechanisms and its easy-to-implement security features.
Let’s get started.
Шаг 5 — Настройка Nginx для работы с запросами прокси-сервера
Сервер приложений Gunicorn должен быть запущен и ожидать запросы файла сокета в каталоге проекта. Теперь мы настроим Nginx для передачи веб-запросов на этот сокет. Для этого мы сделаем небольшие добавления в его файл конфигурации.
Вначале мы создадим новый файл конфигурации серверных блоков в каталоге Nginx . Назовем его для соответствия остальным именам в этом модуле:
Откройте серверный блок и укажите Nginx прослушивать порт по умолчанию . Также укажите использовать этот блок для запросов доменного имени нашего сервера:
/etc/nginx/sites-available/myproject
Затем добавим блок расположения, соответствующий каждому запросу. В этот блок мы добавим файл , определяющий некоторые общие параметры прокси, которые необходимо настроить. После этого запросы будут переданы на сокет, который мы определили с помощью директивы :
/etc/nginx/sites-available/myproject
Сохраните файл и закройте его после завершения.
Чтобы активировать созданную конфигурацию серверных блоков Nginx, необходимо привязать файл к каталогу :
Когда файл будет находиться в этом каталоге, можно провести проверку на ошибки синтаксиса:
Если ошибок обнаружено не будет, перезапустите процесс Nginx для чтения новой конфигурации:
В заключение снова изменим настройки брандмауэра. Нам больше не потребуется доступ через порт , и мы можем удалить это правило. Затем мы сможем разрешить полный доступ к серверу Nginx:
Теперь у вас должна быть возможность открыть доменное имя вашего сервера в браузере:
Вы увидите результат выполнения вашего приложения:
Если будут обнаружены любые ошибки, проверьте следующее:
- : проверяет журналы ошибок Nginx.
- : проверяет журналы доступа Nginx.
- : проверяет журналы процессов Nginx.
- : проверяет журналы Gunicorn вашего приложения Flask.
Testing Socket Activation
Currently, if you’ve only started the unit, the will not be active yet since the socket has not yet received any connections. You can check this by typing:
To test the socket activation mechanism, we can send a connection to the socket through by typing:
You should receive the HTML output from your application in the terminal. This indicates that Gunicorn was started and was able to serve your Django application. You can verify that the Gunicorn service is running by typing:
If the output from or the output of indicates that a problem occurred, check the logs for additional details:
Check your file for problems. If you make changes to the file, reload the daemon to reread the service definition and restart the Gunicorn process by typing:
Make sure you troubleshoot the above issues before continuing.
Prerequisites and Goals
In order to complete this guide, you should have a fresh Ubuntu 14.04 server instance with a non-root user with privileges configured. You can learn how to set this up by running through our initial server setup guide.
We will be installing Django within two different virtual environments. This will allow your projects and their requirements to be handled separately. We will be creating two sample projects so that we can run through the steps in a multi-project environment.
Once we have our applications, we will install and configure the uWSGI application server. This will serve as an interface to our applications which will translate client requests using HTTP to Python calls that our application can process. We will then set up Nginx in front of uWSGI to take advantage of its high performance connection handling mechanisms and its easy-to-implement security features.
Let’s get started.
Installing the Packages from the Ubuntu Repositories
To begin the process, we’ll download and install all of the items we need from the Ubuntu repositories. We will use the Python package manager to install additional components a bit later.
We need to update the local package index and then download and install the packages. The packages we install depend on which version of Python your project will use.
If you are using Django with Python 3, type:
Django 1.11 is the last release of Django that will support Python 2. If you are starting new projects, it is strongly recommended that you choose Python 3. If you still need to use Python 2, type:
This will install , the Python development files needed to build Gunicorn later, the Postgres database system and the libraries needed to interact with it, and the Nginx web server.
Creating the PostgreSQL Database and User
We’re going to jump right in and create a database and database user for our Django application.
By default, Postgres uses an authentication scheme called “peer authentication” for local connections. Basically, this means that if the user’s operating system username matches a valid Postgres username, that user can login with no further authentication.
During the Postgres installation, an operating system user named was created to correspond to the PostgreSQL administrative user. We need to use this user to perform administrative tasks. We can use sudo and pass in the username with the option.
Log into an interactive Postgres session by typing:
You will be given a PostgreSQL prompt where we can set up our requirements.
First, create a database for your project:
Note: Every Postgres statement must end with a semi-colon, so make sure that your command ends with one if you are experiencing issues.
Next, create a database user for our project. Make sure to select a secure password:
Afterwards, we’ll modify a few of the connection parameters for the user we just created. This will speed up database operations so that the correct values do not have to be queried and set each time a connection is established.
We are setting the default encoding to , which Django expects. We are also setting the default transaction isolation scheme to “read committed”, which blocks reads from uncommitted transactions. Lastly, we are setting the timezone. By default, our Django projects will be set to use . These are all recommendations from :
Now, we can give our new user access to administer our new database:
When you are finished, exit out of the PostgreSQL prompt by typing:
Postgres is now set up so that Django can connect to and manage its database information.
Шаг 4 — Настройка Gunicorn
Ваше приложение написано, и для него создана точка входа. Теперь мы можем перейти к настройке Gunicorn.
Прежде чем продолжить, нужно убедиться, что Gunicorn может правильно обслуживать приложение.
Для этого нужно просто передать имя нашей точки входа. Оно составляется из имени модуля (без расширения ) и имени вызываемого элемента приложения. В нашем случае это .
Также мы укажем интерфейс и порт для привязки, чтобы приложение запускалось через общедоступный интерфейс:
Результат будет выглядеть следующим образом:
Откройте в браузере IP-адрес вашего сервера с суффиксом .
Вы увидите результат выполнения вашего приложения:
Убедившись в его нормальной работе, нажмите в окне терминала.
Мы закончили работу с виртуальной средой, и теперь можем отключить ее:
Теперь любые команды Python снова будут использовать системную среду Python.
Далее мы созадим файл служебных элементов systemd. Создание файла элементов systemd позволит системе инициализации Ubuntu автоматически запускать Gunicorn и обслуживать приложение Flask при загрузке сервера.
Для начала создайте файл элементов с расширением в каталоге :
Мы начнем с раздела этого файла, где указываются метаданные и зависимости. Здесь мы разместим описание службы и предпишем системе инициализации запускать ее только после достижения сетевой цели:
/etc/systemd/system/myproject.service
Теперь откроем раздел . Здесь указывается пользователь и группа, от имени которых мы хотим запустить данный процесс. Сделаем владельцем процесса учетную запись обычного пользователя, поскольку этот пользователь является владельцем всех соответствующих файлов. Также назначим владельцем группу , чтобы упростить коммуникацию Nginx с процессом Gunicorn. Не забудьте заменить приведенное имя пользователя своим именем пользователя:
/etc/systemd/system/myproject.service
Теперь составим карту рабочего каталога и зададим переменную среды , чтобы система инициализации знала, что исполняемые файлы этого процесса находятся в нашей виртуальной среде. Также укажем команду для запуска службы. Эта команда будет выполнять следующее:
- Запуск 3 рабочих процессов (хотя вы можете изменить это при необходимости)
- Создание и привязвка к файлу сокетов Unix в каталоге нашего проекта. Мы зададим значение umask , чтобы при создании файла сокета предоставлялся доступ для владельца и для группы, а любой другой доступ ограничивался
- Укажите имя файла точки входа WSGI, а также вызываемый элемент Python в этом файле ()
Systemd требует, чтобы мы указывали полный путь исполняемого файла Gunicorn, установленного в нашей виртуальной среде.
Не забудьте заменить имя пользователя и пути проекта собственными данными:
/etc/systemd/system/myproject.service
/etc/systemd/system/myproject.service
Теперь служебный файл systemd готов. Сохраните и закройте его.
Теперь проверим состояние:
Результат должен выглядеть следующим образом:
Если вы увидите какие-либо ошибки, устраните их, прежде чем продолжить выполнение этого обучающего модуля.
9: Устранение неполадок Nginx и Gunicorn
Если в результате ваше приложение не отображается, вам необходимо устранить неполадки.
Nginx открывает страницу по умолчанию вместо приложения Django
Если Nginx отображает страницу по умолчанию и не проксирует запросы для вашего приложения, попробуйте настроить директиву server_name в файле /etc/nginx/sites-available/myproject и указать в ней IP-адрес или доменное имя сервера.
Nginx использует директиву server_name, чтобы определить, какой блок server использовать для ответа на запросы. Если вы видите страницу Nginx по умолчанию, это значит, что Nginx не смог явно выполнить запрос к блоку sever, поэтому он вернулся к блоку по умолчанию, определенному в /etc/nginx/sites-available/default.
Директиву server_name в виртуальном хосте вашего проекта должна содержать более конкретное значение, чем виртуальный хост по умолчанию.
Nginx выдает ошибку 502 Bad Gateway
Ошибка 502 указывает, что Nginx не может успешно проксировать запрос. Ошибка 502 отображает широкий спектр проблем с конфигурацией, поэтому для устранения неполадок требуется дополнительная информация.
Основное место для поиска такой информации – это логи ошибок Nginx. Как правило, здесь можно узнать, какие условия вызвали проблемы во время проксирования. Чтобы открыть логи, введите:
Теперь сделайте в своем браузере еще один запрос, чтобы создать новую ошибку (попробуйте обновить страницу). Вы должны увидеть новое сообщение об ошибке, записанное в лог. Это сообщение поможет вам сузить проблему.
Вы можете увидеть следующее сообщение:
Это значит, что Nginx не смог найти файл gunicorn.sock в указанном месте. Вы должны сравнить расположение proxy_pass, определенное в файле /etc/nginx/sites-available/myproject, и фактическое расположение файла gunicorn.sock, созданного блоком gunicorn.socket systemd.
Если вы не можете найти файл gunicorn.sock в каталоге /run, вероятно, сокет-файл не смог его создать. Вернитесь к разделу 6 данного мануала.
Если вы получили:
Это указывает на то, что Nginx не смог подключиться к сокету Gunicorn из-за проблем с правами доступа. Это может произойти, когда процедура выполняется через пользователя root, а не sudo. Хотя systemd может создать файл сокета Gunicorn, Nginx не может получить к нему доступ.
Это бывает, если в какой-то точке между корневым каталогом (/) и файлом gunicorn.sock есть ограничения доступа. Чтобы просмотреть права сокет-файла и каждого из его родительских каталогов, передайте абсолютный путь к файлу сокета команде namei:
В выводе отображаются права для каждого из компонентов каталога. Изучив права доступа (первый столбец) и собственности (второй и третий столбец), вы можете выяснить, какой тип доступа открыт к сокету.
В приведенном выше примере файл сокета и каждый из каталогов, ведущих к нему, предоставляют право на чтение и выполнение всем пользователям (столбец прав для каталогов заканчивается на r-x вместо —). Значит, процесс Nginx может доступ к сокету.
Если какой-либо из каталогов, ведущих к сокету, не предоставляет таких прав, Nginx не сможет получить доступ к сокету. Также Nginx должен входить в группу, которая является владельцем сокет-файла.
Django выдает сообщение «could not connect to server: Connection refused»
При попытке получить доступ к приложению в веб-браузере Django может выдать такое сообщение:
Это значит, что Django не может подключиться к базе данных Postgres. Убедитесь, что экземпляр Postgres запущен:
Если БД не запущена, вы можете запустить ее и добавить ее в автозагрузку:
Если это не решило проблему, убедитесь, что параметры базы данных, определенные в файле ~/myprojectdir/myproject/settings.py, указаны корректно.
Общие действия
При появлении любых неполадок проверяйте логи – они могут сузить область ваших поисков. Проверьте каждый лог по очереди и найдите сообщения, указывающие на проблемные области.
Лог процессов Nginx:
Лог доступа Nginx:
Лог ошибок Nginx:
Лог приложения Gunicorn:
Лог сокета Gunicorn:
При обновлении конфигурации или приложения вам, вероятно, потребуется перезапустить процессы, чтобы изменения вступили в силу.
Если вы обновите приложение Django, вы можете перезапустить процесс Gunicorn с помощью команды:
Изменив сокет или сервис-файл Gunicorn, перезапустите демон и процесс:
Отредактировав виртуальный хост Nginx, не забудьте проверить ошибки в файле и перезапустить веб-сервер:
ASGI frameworks
You can use Uvicorn, Daphne, or Hypercorn to run any ASGI framework.
For small services you can also write ASGI applications directly.
Starlette
Starlette is a lightweight ASGI framework/toolkit.
It is ideal for building high performance asyncio services, and supports both HTTP and WebSockets.
Django Channels
The ASGI specification was originally designed for use with Django Channels.
Channels is a little different to other ASGI frameworks in that it provides
an asynchronous frontend onto a threaded-framework backend. It allows Django
to support WebSockets, background tasks, and long-running connections,
with application code still running in a standard threaded context.
FastAPI
FastAPI is an API framework based on Starlette and Pydantic, heavily inspired by previous server versions of APIStar.
You write your API function parameters with Python 3.6+ type declarations and get automatic data conversion, data validation, OpenAPI schemas (with JSON Schemas) and interactive API documentation UIs.