Dokuwiki txt
Содержание:
- Comments Support Wiki header on first Line
- Syntax Plugins
- Log File Format
- Создание пространства имен
- Ссылки
- Таблицы
- Основные конструкции форматирования
- Links
- Workflow Microsoft Word 2 DokuWiki using html2wiki-GUI
- Embedding HTML and PHP
- Code Blocks
- Оформление текста
- Интеграция с RSS/ATOM фидами
- Text Conversions
- Appendix B — AWStats configuration
- Installation
- Ссылки
Comments Support Wiki header on first Line
I have find this script helpful
I would like just to add this lines to put the first line like an header:
			//explode the source by line with the use of regular expressions

			$arrayS = preg_split ("/+/", $s);

			$nb_lines = count ($arrayS)-1;
			$s = $s . $nb_lignes;
			$s = ""; // we clean the text
			foreach ( $arrayS as $key => $lines ){
			if ($key == ) {

                        //we put the header here on the first line
                      $lines = str_replace("|", "^", $lines);

			}//end if
			$s = $s . $lines .  "\n";
			}//end for

			$s = substr($s,,-2); //get rid of last newline conversion
Finally, the code with English / French / Russian translations,
empty cells stay empty (no “ . ”), first line become header:
- xls2wiki.php
-
<?php header("Content-type: text/html; charset=utf-8"); ?>
<!DOCTYPE html PUBLIC "-//W3C//DTD XHTML 1.0 Transitional//EN" "http://www.w3.org/TR/xhtml1/DTD/xhtml1-transitional.dtd">
<html xmlns="http://www.w3.org/1999/xhtml" xml:lang="en" lang="en" dir="ltr">
<head>
	<meta http-equiv="Content-Type" content="text/html; charset=utf-8" />
	<script type="text/javascript" charset="utf-8">
	function selText()
	  {
	  document.getElementById("txt1").select()
	  }
	</script>

		<style type="text/css">
		body {
			font: .8em "Trebuchet MS", Verdana, Arial, Sans-Serif;
			text-align: center;
			color: #333;
			background-color: #fff;
			margin-top: 0em;
		}

		h1 {
			font-size: 2em;
			padding: 0;
			margin: 0;
		}

		h5 {
			font-size: 1em;
			color: #09c;
			font-weight: bold;
		}

		form {
			background-color: #eee;
			border: 1px solid #ccc;
			margin-left: auto;
			margin-right: auto;
			padding: 1em;
		}


		a {
			color: #09c;
			text-decoration: none;
			font-weight: bold;
		}


		</style>

</head>
	<?php
		$s = $_POST's';
		$fromto = $_POST'fromto';

		if ($fromto=="E2W"){


			$s = str_replace("\r\n", " |\n| ", $s);
			$s = str_replace("\t", " | ", $s);
			//$s = str_replace("|  |", "| . |", $s);

			$s = "| ".$s;
			$s = substr($s,,-2); //get rid of last newline conversion


			//explode the source by line
			$arrayS = preg_split ("/+/", $s);
			$nb_lines = count ($arrayS)-1;
			$s = $s . $nb_lines;
			$s = "";
			foreach ( $arrayS as $key => $lines ){
			if ($key == ) {
			$lines = str_replace("|", "^", $lines);
			}//end if
			$s = $s . $lines .  "\n";
			}//end for

			$s = substr($s,,-2); //get rid of last newline conversion
		}else{
			$s = str_replace("^", "|", $s);
			$s = str_replace("|\r\n|", "\r\n", $s);
			$s = str_replace("\r\n ", "\r\n", $s);
			$s = str_replace(" |", "|", $s);
			$s = str_replace("| ", "|", $s);
			$s = str_replace("|", "\t", $s);
			$s = substr($s,1); // get rid of first | without /r/n

		}

	?>
<body onload="selText()">
<center>
<h5>WIKI2EXCEL converter</h5>

Copy and paste your Excel or Wiki table below and press <br/>
Copier et coller votre Table Excel ou Wiki dans le cadre ci-dessous et cliquez sur <br/>
Скопируйте и вcтавьте таблицу из Excel или Wiki и нажмите  (конвертировать)
	<form method=POST action="">
		<input type="radio" name="fromto" value="E2W" checked>Excel - Wiki<br>
		<input type="radio" name="fromto" value="W2E">Wiki - Excel<br>
		<INPUT TYPE=SUBMIT VALUE="Convert!"><br/>
		<textarea id="txt1" name="s" wrap="off" cols=50 rows=50 style="width:400; height:450"><?=$s ?></textarea>
	</form>
<span style="font-size:80%">
<strong>Version 0.1 : </strong>
<ul>
<li>Headers from wiki2excel will not be converted properly</li>
<li>Links with alternative text (like <i>]</i> ) will not convert properly</li>
</ul>
</span>
</center>
</body></html>
There is a spell mistake here…
$nb_lines = count ($arrayS)-1;
$s = $s . $nb_lignes;
nb_lignes should be nb_lines.
Syntax Plugins
DokuWiki’s syntax can be extended by Plugins. How the installed plugins are used is described on their appropriate description pages. The following syntax plugins are available in this particular DokuWiki installation:
- Structured Data Plugin 2019-03-20 by Andreas GohrAdd and query structured data in your wiki
- DokuTeaser Plugin 2016-01-16 by Andreas GohrA plugin for internal use on dokuwiki.org only
- Gallery Plugin 2019-01-05 by Andreas GohrCreates a gallery of images from a namespace or RSS/ATOM feed
- Info Plugin 2020-06-04 by Andreas GohrDisplays information about various DokuWiki internals
- Repository plugin 2015-06-24 by Andreas Gohr/Håkan SandellHelps organizing the plugin repository
- Translation Plugin 2020-03-24 by Andreas GohrSupports the easy setup of a multi-language wiki.
- PHPXref Plugin 2016-02-03 by Andreas GohrMakes linking to a PHPXref generated API doc easy.
Log File Format
Both solutions will use the NCSA combined or NCSA extended log file format. This log file format is very popular and often used on web servers like apache. Many report generators can read this format and create nice reports from it. Because of this fantastic support by external programs Dokuwiki doesn’t need any built-in reporting functionality itself.
Report generators that could be used are (only some examples, list far from complete):
- AWStats — A nice report generator from France. Notes on customising for DokuWiki in below
- Webalizer — Another famous report generator
- …
The log file format consists of several fields concatenated to a single line:
<host> <rfc931> <user> "<request>" <error> <filesize> "<referer>" "<agent>"
- <host> — IP of the client host (we don’t do reverse host look-ups)
- <rfc931> — remote user identification or ‘-‘ if not available
- <user> — user id of authenticated user or ‘-‘ if not available
- <timestamp> — time in format [01/Dec/2005:22:19:12 +0200]
- <request> — Requested protocol, for eg. GET or POST, requested page and protocol
- <error> — error code from server, for eg. 200 (OK) or 404 (file not found)
- < filesize > — size of the wiki page (only the bare text)
- <referer> — page from which the user come from. This information is very client dependent and not always available. The logging function does it’s best to fill in useful information here.
- <agent> — identifying information that the client browser reports about itself
Создание пространства имен
Для создания пространств имен не нужно предпринимать каких-то специальных действий: просто используйте двоеточие в названиях страниц. Часть названия после последнего двоеточия станет названием страницы (файла), а все, что находится до, станет именным простанством (последовательностью вложенных директорий). Если такого именого пространства еще нет, оно создастся автоматически.
| Ссылка | указывает на страницу (файл) «example» |
|---|---|
| example .example .:example |
в текущем именном простанстве. |
| :example | в корневом именном пространстве. |
| ..example ..:example .:..:example |
в родительском именном пространстве (директории на уровень выше) |
| wiki:example | в именном пространстве «wiki». Именное пространство «wiki» вложено в корневое именное пространство. |
| ns1:ns2:example :ns1:ns2:example |
страница «example» находится в именном пространстве «ns2». Пространство «ns2» расположено в пространстве «ns1», которое, в свою очередь, лежит в корневом именном пространстве. |
| .ns1:ns2:example .:ns1:ns2:example |
страница «example» находится в именном пространстве «ns2». Пространство «ns2» расположено в пространстве «ns1», лежащем, в свою очередь, в текущем именном пространстве. |
| .ns1:ns2: | ссылается на страницу «start» в именном пространстве «ns2». Именное пространство «ns2» расположено в именном пространстве «ns1», лежащем, в свою очередь, в текущем именном пространстве. |
Ссылки
Плагин Bookmark
Плагин позволяет указывать якоря (link anchor) внутри документа. В этом случае появляется возможность сделать ссылку (переход) непосредственно на якорь.
Формат якоря:
<BOOKMARK:name>
В HTML-код страницы этот якорь будет вставлен как:
<a name='name'></a>
Для перехода на якорь нужно использовать ссылку:
]
Страница плагина: plugin:bookmark
Плагин ActionLink
Вставляет ссылки на служебные функции/специальные страницы DokuWiki. Например, .
Страница плагина: plugin:actionlink
{{actionlink>|}}
Элемент action может принимать следующие значения:
- edit — редактировать/создать/показать страницу
- history — история страницы
- recent — недавние изменения
- login — войти/выйти
- index — все страницы
- admin — управление DokuWiki
- top — ссылка «перейти к началу»
- back — ссылка «вернуться назад»
- backlink — список обратных ссылок
Выводит список ссылок на текущую страницу:
Страница плагина: plugin:backlinks
Pagequery
Выводит список страниц в соответствии с результатами поиска. Позволяет строить индексы страниц по пространствам имён.
Страница плагина: plugin:pagequery
Примеры использования:
{{pagequery>* @:playground;sort=title:asc,name,a;group;cols=2;display={title};}}
Показывает в глоссарии все страницы:
{{pagequery>*;sort=title:asc,name,a;group;cols=2;display={title};}}
Показывает в глоссарии только страницы пространства имён playground:test:funkcyi_profilya
{{pagequery>* @:playground:test:funkcyi_profilya;sort=title:asc,name,a;group;cols=2;display={title};}}
Показывает в глоссарии только страницы текущего пространства имён:
{{pagequery>* ns:.;sort=title:asc,name,a;group;cols=2;display={title};}}
он же Блокнот
Таблицы
«Докувики» поддерживает упрощённый синтаксис создания таблиц.
Заголовок 1
Заголовок 2
Заголовок 3
Ряд 1 Колонка 1
Ряд 1 Колонка 2
Ряд 1 Колонка 3
Ряд 2 Колонка 1
Объединение колонок (обратите внимание на двойную вертикальную черту)
Ряд 3 Колонка 1
Ряд 2 Колонка 2
Ряд 2 Колонка 3
Обычные ряды должны начинаться и заканчиваться вертикальной чертой — |, а заголовки «крышечкой» (циркумфлекс) — ^.
^ Заголовок 1 ^ Заголовок 2 ^ Заголовок 3 ^
| Ряд 1 Колонка 1 | Ряд 1 Колонка 2 | Ряд 1 Колонка 3 |
| Ряд 2 Колонка 1 | Объединение колонок (обратите внимание на двойную вертикальную черту) ||
| Ряд 3 Колонка 1 | Ряд 2 Колонка 2 | Ряд 2 Колонка 3 |
Чтобы объединить две соседние клетки в ряду, просто оставьте соседнюю клетку полностью пустой, как показано выше. Следите, чтобы количество разделителей клеток было одинаковым.
Вертикальные заголовки тоже можно сделать:
| Заголовок 1 | Заголовок 2 | |
|---|---|---|
| Заголовок 3 | Ряд 1 Колонка 2 | Ряд 1 Колонка 3 |
| Заголовок 4 | Объединения нет | |
| Заголовок 5 | Ряд 2 Колонка 2 | Ряд 2 Колонка 3 |
Как легко увидеть, разделитель, стоящий перед клеткой, определяет форматирование:
|              ^ Заголовок 1       ^ Заголовок 2      ^
^ Заголовок 3  | Ряд 1 Колонка 2   | Ряд 1 Колонка 3  |
^ Заголовок 4  | Объединения нет   |                  |
^ Заголовок 5  | Ряд 2 Колонка 2   | Ряд 2 Колонка 3  |
Можно сделать вертикально объединённые ячейки добавлением трёх двоеточий в объединяемые нижележащие ячейки.
| Заголовок 1 | Заголовок 2 | Заголовок 3 |
|---|---|---|
| Ряд 1 Колонка 1 | эта ячейка объединена вертикально | Ряд 1 Колонка 3 |
| Ряд 2 Колонка 1 | Ряд 2 Колонка 3 | |
| Ряд 3 Колонка 1 | Ряд 2 Колонка 3 |
В этих ячейках не должно быть ничего, кроме синтаксиса объединения ().
^ Заголовок 1        ^ Заголовок 2                       ^ Заголовок 3            ^
| Ряд 1 Колонка 1    | эта ячейка объединена вертикально | Ряд 1 Колонка 3        |
| Ряд 2 Колонка 1    | :::                               | Ряд 2 Колонка 3        |
| Ряд 3 Колонка 1    | :::                               | Ряд 2 Колонка 3        |
Текст клетки таблицы можно выравнивать. Просто добавьте минимум два пробела с противоположной стороны: слева — если надо выравнять вправо, справа — если надо выравнять влево, и по два с каждой стороны — если по центру.
| Таблица с выравниванием | ||
|---|---|---|
| вправо | по центру | влево |
| влево | вправо | по центру |
| xxxxxxxxxxxx | xxxxxxxxxxxx | xxxxxxxxxxxx |
^           Таблица с выравниванием        ^^^
|        вправо|   по центру  |влево         |
|влево         |        вправо|   по центру  |
| xxxxxxxxxxxx | xxxxxxxxxxxx | xxxxxxxxxxxx |
Примечание: вертикальное выравнивание не поддерживается.
Основные конструкции форматирования
«Докувики» поддерживает выделение текста жирным шрифтом, курсивом, подчёркнутый текст и вывод текста . Все эти конструкции можно .
«Докувики» поддерживает выделение текста **жирным шрифтом**, //курсивом//,
__подчёркнутый текст__ и вывод текста ''моноширинным шрифтом''.
Все эти конструкции можно **__//''объединить''//__**.
Также можно использовать подстрочный и надстрочный индексы.
Также можно использовать <sub>подстрочный</sub> и <sup>надстрочный</sup> индексы.
Ещё можно зачеркнуть текст.
Ещё можно <del>зачеркнуть текст</del>.
Абзацы отбиваются пустой строкой. Если нужно принудительно вставить перенос строки, не создавая абзац, вставьте два обратных слэша и за ним пробел или переход к новой строке.
Просто текст с разрывом строк
Обратите внимание,
что два обратных слэша действуют только в конце строки
или если за ними стоит
пробел. Если его не поставить, \\получится вот так.
Просто текст с разрывом строк\\ Обратите внимание,
что два обратных слэша действуют только в конце строки\\
или если за ними стоит\\ пробел. Если его не поставить, \\получится вот так
Принудительные переносы следует использовать только в случае крайней необходимости.
Links
DokuWiki supports multiple ways of creating links.
External
DokuWiki supports multiple ways of creating links. External links are recognized
automagically: http://www.google.com or simply www.google.com - You can set
link text as well: [[http://www.google.com|This Link points to google]]. Email
addresses like this one: <andi@splitbrain.org> are recognized, too.
Internal
Internal links are created by using square brackets. You can either just give
a ] or use an additional ].
Wiki pagenames are converted to lowercase automatically, special characters are not allowed.
You can use ] by using a colon in the pagename.
For details about namespaces see namespaces.
Linking to a specific section is possible, too. Just add the section name behind a hash character as known from HTML. This links to .
This links to ].
Notes:
- DokuWiki does not use CamelCase to automatically create links by default, but this behavior can be enabled in the config file. Hint: If DokuWiki is a link, then it’s enabled.
- When a section’s heading is changed, its bookmark changes, too. So don’t rely on section linking too much.
Interwiki
DokuWiki supports Interwiki links. These are quick links to other Wikis. For example this is a link to Wikipedia’s page about Wikis: Wiki.
DokuWiki supports ] links. These are quick links to other Wikis.
For example this is a link to Wikipedia's page about Wikis: ].
Windows shares like this are recognized, too. Please note that these only make sense in a homogeneous user group like a corporate Intranet.
Windows Shares like ] are recognized, too.
Notes:
- For security reasons direct browsing of windows shares only works in Microsoft Internet Explorer per default (and only in the “local zone”).
-
For Mozilla and Firefox it can be enabled through different workaround mentioned in the Mozilla Knowledge Base. However, there will still be a JavaScript warning about trying to open a Windows Share. To remove this warning (for all users), put the following line in (more details at ):
- conf/lang/en/lang.php
-
<?php
/**
 * Customization of the english language file
 * Copy only the strings that needs to be modified
 */
$lang = '';
Image Links
You can also use an image to link to another internal or external page by combining the syntax for links and (see below) like this:
[[http://php.net|{{wiki:dokuwiki-128.png}}]]
Please note: The image formatting is the only formatting syntax accepted in link names.
The whole and syntax is supported (including image resizing, internal and external images and URLs and interwiki links).
Workflow Microsoft Word 2 DokuWiki using html2wiki-GUI
I was looking for a way to convert about 150 DOC-files (Microsoft Word2000 or 2003) in our new wiki without too much hassle.
The macros available didn’t work for me.
Specifications
- usable for multiple files
- converting tables
- converting images
suggested workflow (works best IMO)
- open word-document in OpenOffice
- save as HTML (the pictures will be stored in the same folder as the HTML)
-
open html2dokuwiki pluginClick here to download Html2DokuWiki
-
paste and copy HTML-code in the GUI
- save as txt-file (or create new page for integrity)
- copy txt-file in the DATA/PAGES/NAMESPACE-folder and Pictures in the DATA/MEDIA/NAMESPACE-folder
Is there a faster way
(2009/07/18 by bobeck)
→ This is still the fastest and most reliable way (2014/09/24 by josh)
Embedding HTML and PHP
You can embed raw HTML or PHP code into your documents by using the or tags. (Use uppercase tags if you need to enclose block level elements.)
HTML example:
<html>
This is some <span style="color:red;font-size:150%;">inline HTML</span>
</html>
<HTML>
<p style="border:2px dashed red;">And this is some block HTML</p>
</HTML>
<p style="border:2px dashed red;">And this is some block HTML<p>
PHP example:
<php>
echo 'The PHP version: ';
echo phpversion();
echo ' (generated inline HTML)';
</php>
<PHP>
echo '<table class="inline"><tr><td>The same, but inside a block level element:</td>';
echo '<td>'.phpversion().'</td>';
echo '</tr></table>';
</PHP>
echo '<table class="inline"><tr><td>The same, but inside a block level element:</td>';
echo '<td>'.phpversion().'</td>';
echo '</tr></table>';
Please Note: HTML and PHP embedding is disabled by default in the configuration. If disabled, the code is displayed instead of executed.
Code Blocks
You can include code blocks into your documents by either indenting them by at least two spaces (like used for the previous examples) or by using the tags or .
This is text is indented by two spaces.
This is preformatted code all spaces are preserved: like <-this
This is pretty much the same, but you could use it to show that you quoted a file.
Those blocks were created by this source:
This is text is indented by two spaces.
<code>
This is preformatted code all spaces are preserved: like              <-this
</code>
<file>
This is pretty much the same, but you could use it to show that you quoted a file.
</file>
Syntax Highlighting
DokuWiki can highlight sourcecode, which makes it easier to read. It uses the GeSHi Generic Syntax Highlighter – so any language supported by GeSHi is supported. The syntax uses the same code and file blocks described in the previous section, but this time the name of the language syntax to be highlighted is included inside the tag, e.g. or .
/**
 * The HelloWorldApp class implements an application that
 * simply displays "Hello World!" to the standard output.
 */
class HelloWorldApp {
    public static void main(String args) {
        System.out.println("Hello World!"); //Display the string.
    }
}
There are additional advanced options available for syntax highlighting, such as highlighting lines or adding line numbers.
Downloadable Code Blocks
When you use the or syntax as above, you might want to make the shown code available for download as well. You can do this by specifying a file name after language code like this:
<file php myexample.php>
<?php echo "hello world!"; ?>
</file>
- myexample.php
-
<?php echo "hello world!"; ?>
If you don’t want any highlighting but want a downloadable file, specify a dash () as the language code: .
Оформление текста
Плагин BBCode
Плагин позволяет использовать в тексте BB-коды. Такие коды обычно используются на форумах и имеют вид:
bold text
italic text
underline
deleted
monospace
Также данный плагин позволяет менять цвет шрифта, а также уменьшать или увеличивать размер шрифта. Для этого используются такие коды:
smaller text
colored text
Страничка плагина: plugin:bbcode
Плагин позволяет менять цвет шрифта
Страничка плагина: plugin:color
Плагин Highlight
Плагин позволяет выделять текст цветом: выделение по умолчанию выделение нужным цветом (red)
Страничка плагина: plugin%3Ahighlight
Плагин boxes
Плагин позволяет выделить текст с помощью «бокса»:

Данный плагин позволяет оформлять «боксы» в самых различных цветовых комбинациях.
- Страничка плагина: plugin:boxes
Плагин note
Плагин позволяет выделить текст в виде заметки:
Это текст заметки
Или вывести текст предупреждения:
Никогда, никогда не используйте программу MS Notepad для редактирования файлов в UTF-8 кодировке!
Страничка плагина: plugin:note
Плагин Chem
-
Страничка плагина: plugin:chem
-
Загрузить исправленную версию плагина (добавлена поддержка изотопов, исправлены ошибки): chem.zip
Позволяет автоматически форматировать простые химические формулы, например:
- 10C2H5OH, 2H3PO4, Al(OH)3
- уравнения: 2H2 + O2 ⇒ H2O
- ионы: H3O+, OH-, Fe3+, 1532+23-, (PO4)3-
- изотопы: 238Pu, 2239Pu3+
- степени окисления: N-3, N, N+1
  * <chem>10C2H5OH, 2H3PO4, Al(OH)3</chem>
  * уравнения: <chem>2H2 + O2 => H2O</chem>
  * ионы: <chem>H3O+, OH-, Fe3+, 153|2+2|3-, (PO4)3-</chem>
  * изотопы: <chem>238^Pu, 2|239^Pu3+</chem>
  * степени окисления: <chem>N-3, N0, N+1</chem>
Интеграция с RSS/ATOM фидами
| Параметр | Описание |
|---|---|
| любое число | максимальное кол-во отображаемых элементов, по умолчанию — 8 |
| reverse | вывести список новостей в обратном порядке — самые старые записи выводятся первыми |
| author | показывать имена авторов (если указаны в фиде) |
| date | показывать даты записей (если указаны в фиде) |
| description | показывать описание записи. Если в настройках DokuWiki выключено отображение HTML кодов, то из описания будут удалены все HTML коды |
| n | период обновления фида, где d=дни, h=часы, m=минуты. (т.е. 12h = 12 часов, а 2d = 2 дня). |
По умолчанию период обновления равен 4 часам. Если указать значение меньше 10 минут, то DokuWiki всё-равно будет обновлять не чаще, чем раз в 10 минут. По умолчанию DokuWiki выдаёт пользователю сохранённую версию страницы, однако указание периода обновления фида приводит к повторному рендерингу страницы.
Пример:
{{rss>http://wsrss.bbc.co.uk/russian/index.xml 7 author date 10h }}
Произошла ошибка при получении следующей новостной ленты: http://wsrss.bbc.co.uk/russian/index.xml
Text Conversions
DokuWiki can convert certain pre-defined characters or strings into images or other text or HTML.
The text to image conversion is mainly done for smileys. And the text to HTML conversion is used for typography replacements, but can be configured to use other HTML as well.
Text to Image Conversions
DokuWiki converts commonly used emoticons to their graphical equivalents. Those Smileys and other images can be configured and extended. Here is an overview of Smileys included in DokuWiki:
- 😎
- 😯
- 🙁
- 🙂
- =)
- :-/
- :-\
- 😕
- 😀
- 😛
- :-O
- :-X
- 😐
- 😉
- ^_^
- ❓
- ❗
- LOL
- FIXME
- DELETEME
Text to HTML Conversions
Typography: DokuWiki can convert simple text characters to their typographically correct entities. Here is an example of recognized characters.
→ ← ⇒ ⇐ ⇔ » « – — 640×480
“He thought ‘It’s a man’s world’…”
-> <- <-> => <= <=> >> << -- --- 640x480 (c) (tm) (r)
"He thought 'It's a man's world'..."
The same can be done to produce any kind of HTML, it just needs to be added to the pattern file.
There are three exceptions which do not come from that pattern file: multiplication entity (640×480), ‘single’ and “double quotes”. They can be turned off through a config option.
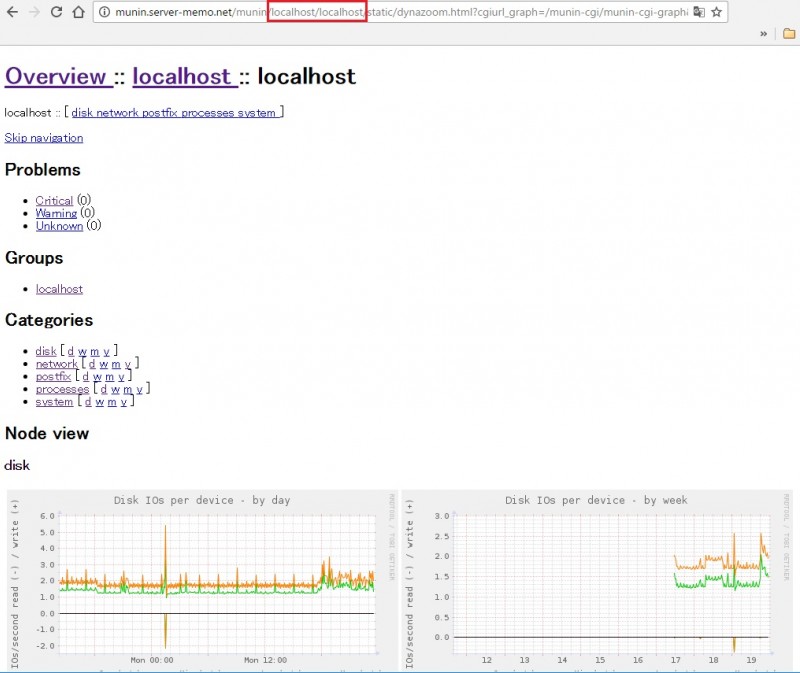
Appendix B — AWStats configuration
If you choose to use AWStats to process your logs, then here are some tips on configuration options that give you some more control over how DokuWiki accesses are shown.
By default, AWStats does not keep track of the parameters after a “?” in the URL. So all your wiki accesses will appear as hits on the one page “doku.php”. If you want to see which pages in the wiki are being accessed then you can enable tracking of parameters.
URLWithQuery=1 # Set this to "1" to enable tracking of URL parameters
URLWithQueryWithOnlyFollowingParameters="id media" # Use this to limit which parameters you are interested in.
-
AWStats lets you produce customised reports. Here are 3 additional custom reports that show the top 10:
- wiki pages accessed in descending order of popularity
- wiki media files downloaded in descending order of popularity
- searches performed using the wiki search box
NOTE: You will have to edit the following lines according to your installation:
- ExtraSectionCondition* — put the URL path to the doku.php and fetch.php file
- ExtraSectionFirstColumnFormat* — as above
- MaxNbOfExtra* — set the number of rows you want in the report
NOTE: The results have the following limitations:
- DokuWiki sometimes switched to the POST method rather than the GET method. The log files do not contain the parameters to POST requests and will therefore not be counted in these reports.
- The “id=” parameter is overloaded — it does not always represent a request for a particular page.
- If a user performs a search without hitting <RETURN> or clicking on “Search” then the search is all performed using AJAX and does not show in these reports.
ExtraSectionName1="Wiki Pages"
ExtraSectionCodeFilter1="200 304"
ExtraSectionCondition1="URL,\/doku.php"
ExtraSectionFirstColumnTitle1="Page"
ExtraSectionFirstColumnValues1="QUERY_STRING,id=(+)"
ExtraSectionFirstColumnFormat1="<a href="/doku.php?id=%s">%s</a>"
ExtraSectionStatTypes1=PHBL
ExtraSectionAddAverageRow1=0
ExtraSectionAddSumRow1=1
MaxNbOfExtra1=10
MinHitExtra1=1

ExtraSectionName2="Wiki Media Downloads"
ExtraSectionCodeFilter2="200 304"
ExtraSectionCondition2="URL,\/fetch.php"
ExtraSectionFirstColumnTitle2="Document"
ExtraSectionFirstColumnValues2="QUERY_STRING,media=(+)"
ExtraSectionFirstColumnFormat2="<a href="/lib/exe/fetch.php?media=%s">%s</a>"
ExtraSectionStatTypes2=PHBL
ExtraSectionAddAverageRow2=0
ExtraSectionAddSumRow2=1
MaxNbOfExtra1=10
MinHitExtra1=1

ExtraSectionName3="Wiki Searches"
ExtraSectionCodeFilter3="200 304"
ExtraSectionCondition3="QUERY_STRING,do=search&id=(+)"
ExtraSectionFirstColumnTitle3="Search terms"
ExtraSectionFirstColumnValues3="QUERY_STRING,id=(+)"
ExtraSectionFirstColumnFormat3="<a href="/doku.php?do=search&id=%s" target="_blank">%s</a>"
ExtraSectionStatTypes3=PHBL
ExtraSectionAddAverageRow3=0
Installation
Please forgive such a n00b question, but how does one install this helpful Trick? A small installation section would be extremely helpful.
My n00b answer:
use iframe….
create a PHP page somewhere into your website DokuWiki root and put the code inside.
Use iframe to include this PHP page into a wiki page.
Look to this plugins if you hate HTML: iframe
You can not try to include directly the code in a wiki page either:
something like:
<php>
Put the code here//§
</php>
Because the page use little JavaScript tricks.
More simple. Save xls2wiki.php to your dokuwiki\www\ folder and click this link: http://localhost/xls2wiki.php. For net security set file attributes 600.
Ссылки
Ссылки в «Докувики» бывают разные и создавать их можно тоже по-разному.
Внешние
Внешние ссылки распознаются автоматически: http://www.google.com или
просто www.google.com — также можно указывать текст ссылки:
Это ссылка на Google. Адреса электронной почты
тоже распознаются: andi splitbrain org.
Внешние ссылки распознаются автоматически: http://www.google.com или
просто www.google.com --- также можно указывать текст ссылки:
[[http://www.google.com|Это ссылка на Google]]. Адреса электронной почты
тоже распознаются: <andi@splitbrain.org>.
Внутренние
Внутренние ссылки создаются посредством квадратных скобок.
Можно либо просто указать имя страницы, либо
дополнительно прописать текст ссылки. Имена
вики-статей автоматически переводятся в нижний регистр,
спецсимволы использовать нельзя.
Внутренние ссылки создаются посредством квадратных скобок.
Можно либо просто указать ], либо
дополнительно прописать ]. Имена
вики-статей автоматически  переводятся в нижний регистр,
спецсимволы использовать нельзя.
Можно использовать в ссылке пространства имён через двоеточие.
Можно использовать в ссылке ] через двоеточие.
Ставить ссылки на определённый раздел тоже можно. Просто добавьте через решётку (#) имя раздела, так же, как это делается в HTML. Ссылка на .
Ссылка на ].
Примечания:
- «Докувики» по умолчанию не использует CamelCase (ВерблюжийРегистр) для автоматического создания ссылок, но эту возможность можно включить в файле config. Проверка: если DokuWiki — ссылка, значит эта возможность включена.
- Если меняется название раздела, ссылки на него не меняются автоматически. Так что не очень полагайтесь на ссылки на разделы.
- Ссылки на разделы делаются именно на .
Интервики
«Докувики» поддерживает интервики-ссылки. Это короткие ссылки
на другие вики. Например, вот ссылка на статью Википедии о вики: Wiki.
«Докувики» поддерживает ]-ссылки. Это короткие ссылки
на другие вики. Например, вот ссылка на статью Википедии о вики: ].
Сетевые ресурсы Windows
Ссылки на сетевые ресурсы вида \\server\share тоже распознаются. Однако учтите, что такие ссылки имеют смысл только в гомогенных группах пользователей, например в корпоративном интранете.
Ссылки на сетевые ресурсы вида \\server\share тоже распознаются.
Примечания:
- Из соображений безопасности непосредственный просмотр сетевых ресурсов работает по умолчанию только в Internet Explorer (и только в «локальной зоне»).
- В браузерах Mozilla эту возможность можно включить с помощью опции , но делать это не рекомендуется.
- Подробней читайте здесь: .
Картинки-ссылки
Совместив синтаксис ссылки и , можно вставить в текст картинку, которая будет внутренней или внешней ссылкой:
[[http://www.php.net/|{{wiki:dokuwiki-128.png}}]]
Учтите: форматирование картинок — это единственная синтаксическая конструкция, которую можно использовать в тексте ссылки.
Сноски
С помощью двойных скобок можно добавить сноску.
С помощью двойных скобок можно добавить сноску((Сноска —
помещаемые внизу страницы примечание, ссылка, перевод.)).